Friday, February 23, 2018

Lawn Fawn Inspiration Week Bonus Day: Little Fireflies


Hello there!  Welcome to bonus day of Lawn Fawn Release Week!  The new release is available NOW in the Lawn Fawn store and at your favorite retailers!

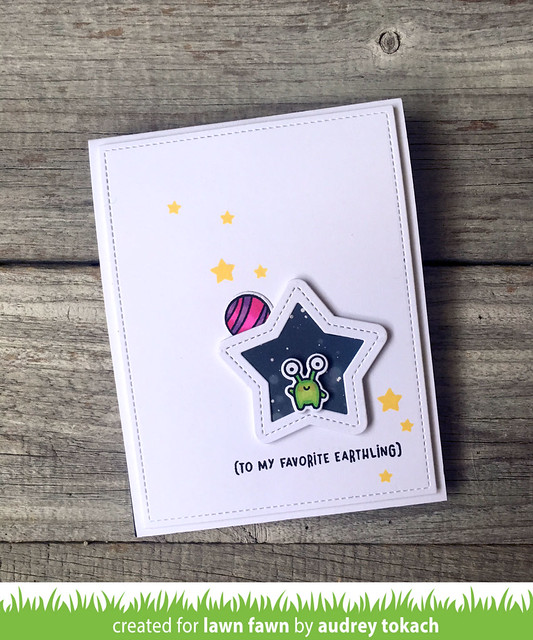
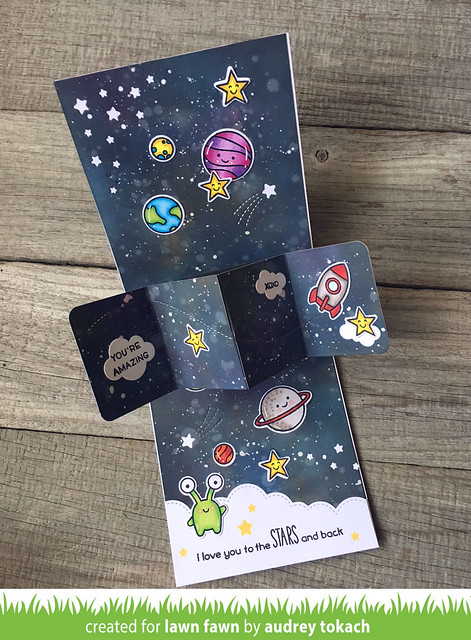
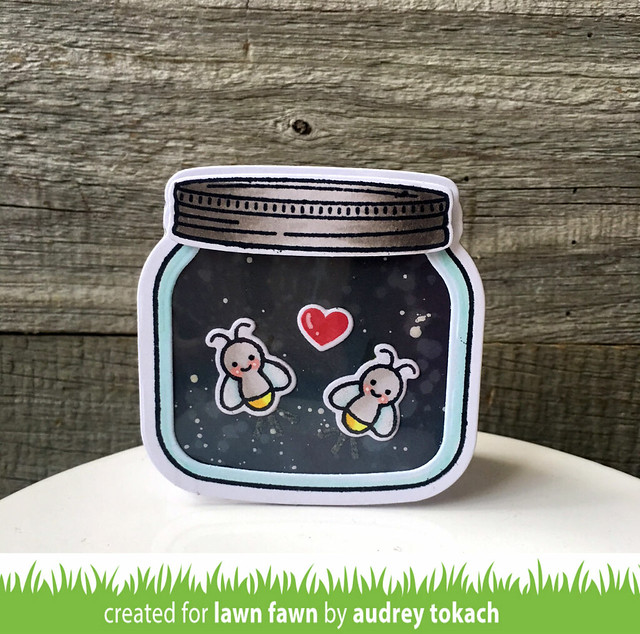
Today, the Lawn Fawn team has a bonus day of projects for you using the glow in the dark goodies from the new release!  For my project, I created a mini card using the How You Bean stamp set.  The little jar is perfect for housing Little Fireflies!  I created a galaxy background using Distress Oxide inks and white paint.  Then I diecut the background with the How You Bean Shaker Add On dies.  I stamped the jar and lid, colored them with Copic markers and diecut them, and then cut a piece of acetate for the window.  I stamped two little fireflies, and tiny red heart.  It's hard to see in the photo, and I couldn't get a good photo of it actually glowing, but there are little glow in the dark rays under their bums.  The new glow in the dark embossing power is so fun! I love it!   Instead of turning this card into a shaker, I decided to glue all of the layers flat flat, except the lid, which I popped up with foam tape.  I plan to tuck this little card into my husband's overnight bag on his next trip :)

Little Fireflies

Be sure to check out the Lawn Fawn blog for more!  Hope you love all of your new Lawn Fawn goodies!!  It's such a GREAT release!!

Thanks for stopping by!!

Thursday, February 22, 2018

Confetti Camera Sneak Peek!


Hello there!  Just wanted to let you know that I am sharing a fun project on the Reverse Confetti blog today!  Head on over there to see my card and get all of the details on how I created it!  Here is a sneak peek:


Hope you'll check it out! 
Thanks for stopping by :)

Wednesday, February 21, 2018

Lawn Fawn Inspiration Week: Hay There


Hello there!  Welcome to day 7 of Lawn Fawn Release Week!  All of the new products that I will be showcasing throughout the week will be available for purchase on February 22nd!

Today, my card uses the adorable sheep from the Hay There stamp set!  These cute little farm animals are great for so many occasions, and I am thrilled to see another Lawn Fawn sheep as I love the Baaah Humbug stamp set.  To create my card, I inked a background using Shaded Lilac and Blueprint Sketch Distress Oxide inks and then diecut it with the largest die from the Outside In Stitched Rectangles dies.  I had counting sheep on my mind for this card, but a cow jumping over the moon would be so cute as well.  To make this an interactive card, I used one of the dies from the new Slide On Over Semi Circles dies to create a slider.  I diecut the shape from the watercolor background, and save the diecut piece.  I stamped and colored by sheep, and assembled my slider, but before gluing everything down with foam tape, I glued the negative of the semi circle in place with the new Glue Tube.  I could've left it white, and the card base would have shown through.  To fill the night sky, I diecut clouds using the Simple Puffy Cloud Frames dies (the new Glue Tube has a fine tip, and is perfect for adhering narrow diecuts!) and Simple Puffy Clouds dies, the moon from the Sun and Moon die set, and a trio of smiling stars from the Critters Ever After stamp set.  I stamped a sentiment from Critters Ever After onto a Cloudy Hillside Pop-Up Add on die and added that to the bottom of the panel with foam tape, and then mounted the whole thing on a white card base.  I added a scattering of iridescent sequins, and some white gel pen accents to finish off my card.

Hay There

Be sure to stop by the Lawn Fawn blog to see lots more inspiration from the design team, and get your wishlist ready, because tomorrow, you can go shopping!! It's release day!!

Thanks for stopping by! :)

Tuesday, February 20, 2018

Lawn Fawn Inspiration Week: Easter Party


Hello there!  Welcome to day 6 of Lawn Fawn Release Week!  All of the new products that I will be showcasing throughout the week will be available for purchase on February 22nd!

Today, I have a card to share with you using the cute new set, Easter Party!  Easter Party is full of images of little people dressed in spring and Easter themed outfits.  My card features the little girl dressed as a daisy.  I watercolored a background using Squeezed Lemonade and Twisted Citron distress inks, then added a strip of Perfectly Plaid Spring paper to the bottom before diecutting the panel with a Stitched Rectangle dies.  I stamped the little daisy girl three times, and colored her in bright pastel shades with my Copic markers.  I also colored several flowers and leaves, also found in the set and scattered them randomly around the card.  I stamped a sentiment from the set onto a Bannertastic banner, and added a scattering of sequins and white gel pen accents before popping the panel up on a white card base with foam tape.

Easter Party

Be sure to visit the Lawn Fawn blog today as there is lots more inspiration from the design team!  Hope to see you again tomorrow because I have another project to share with you! :)

Thanks for stopping by!!

Fusion Card Challenge {Reverse Confetti}


Hello there!  Today, I have a card to share with you using Reverse Confetti products!  I am playing along with the current Fusion Card Challenge - Spring Wreath.  I chose to use the photo in the challenge as inspiration for my card today.


For my card, I started off with an A2 card base cut from Midnight cardstock.  Then, using the second largest die from the Pierced Round Top Layers Confetti Cuts die set, I diecut an arched panel.  I used my score board to score lines in it to mimic the door in the challenge photo.  I popped the arched layer up on the card base with foam tape.  I stamped and colored the wreath and a few flowers from the Fall For You stamp set, and diecut them with the coordinating Fall For You Confetti Cuts dies.  For my sentiment, I stamped and colored the banner from the Banner in Bloom stamp set, added a sentiment from the set onto the banner, and diecut it with the coordinating Banner in Bloom Confetti Cuts dies. I adhered that across the center of the wreath and popped everything up with foam tape.

For Someone Special

I love photo challenges because they really stretch me outside of my box.  I would never have thought to color this wreath in shades of brown until I saw the challenge photo.

For Someone Special

That's all for me today!  Thanks so much for stopping by! :)


Monday, February 19, 2018

Lawn Fawn Inspiration Week: Stitched Basket & Perfectly Plaid Spring


Hello there!  Welcome to day 5 of Lawn Fawn Release Week!  All of the new products that I will be showcasing throughout the week will be available for purchase on February 22nd!

Hello there!  Today, I have a fun Easter project to share with you!  Lawn Fawn is releasing an adorable Stitched Basket, perfect for Easter and other occasions too!  They would make adorable place settings at your holiday tables!

To create my basket, I used some Perfectly Plaid Spring patterned paper and Ballet Slippers cardstock.  To decorate my basket, I  stamped and colored images from the Eggstra Special stamp set, and diecut them with the coordinating Eggstra Special dies.  The tiny carrot is from the new Some Bunny stamp set.  I was so surprised to see that this basket, once assembled, is a great size!  It fits three Cadbury eggs perfectly!

Easter Basket

Be sure to visit the Lawn Fawn blog for lots more inspiration from the design team!  And come back tomorrow because I have another project to share with you!!

Thanks for stopping by! :)

Sunday, February 18, 2018

Lawn Fawn Inspiration Week: Some Bunny


Hello there!  Welcome to day 4 of Lawn Fawn Release Week!  All of the new products that I will be showcasing throughout the week will be available for purchase on February 22nd!

Today, I have a card to share with you using the adorable new Some Bunny stamp set and a few other new goodies too!  I started off by watercoloring my background using pastel shades of Distress inks on Distress watercolor paper.  When it was dry, I diecut the watercolor with the largest die in the Outside In Stitched Rectangles dies.  Then, I used the Stitched Egg Stackables to diecut an egg from Gotta Have Gingham patterned paper, and framed it with a Stitched Egg Frame cut from Sticky Note cardstock.  I stamped and colored images from Some Bunny and diecut them using the coordinating Some Bunny dies.  I stamped a sentiment on a banner from the Bannertastic stamp set, and centered that across the egg.  Everything is popped up with foam tape, and the panel is popped up on an A2 sized card base.

Some Bunny

That's it for me today!  Be sure to stop by the Lawn Fawn blog to see lots more amazing projects from the design team!!

Hope to see you back here tomorrow! :)

Thanks for stopping by!

Saturday, February 17, 2018

Lawn Fawn Inspiration Week: Scalloped Treat Box: Spring Add-on


Hello there!  Welcome to day 3 of Lawn Fawn Release Week!  All of the new products that I will be showcasing throughout the week will be available for purchase on February 22nd!

Today, we are showing off the Scalloped Treat Box: Spring Add-On!  I created my Scalloped Treat Box out of some of the new Gotta Have Gingham papers.  I diecut the roof and window and door frames from Narwhal cardstock.  The front door and cute little flowers in the window box are cut from Chili Pepper cardstock.  All of the shrubs are Cilantro cardstock, and how cute is that little picket fence!?  

Spring Treat Box 1

Each side of the box has windows and cute flower filled flower boxes!  The possibilities are endless with this add on set, and it works perfectly with the previously released Scalloped Treat Box Add-On dies!

Spring Treat Box 2

Be sure to visit the Lawn Fawn blog for lots more inspiration from the design team, and stop back by tomorrow because I have another project to share with you!! :)

Thanks for stopping by!! :)

Friday, February 16, 2018

Lawn Fawn Inspiration Week: Pivot Pop-Up


Hello there!  Welcome to day 2 of Lawn Fawn Release Week!  All of the new products that I will be showcasing throughout the week will be available for purchase on February 22nd!

Today, the team is sharing projects made with the newest Lawn Fawn interactive dies, the Pivot Pop-Up!  Upon hearing the name of this die, the PIVOT! "Friends" episode immediately came to mind!  LOL!

This card was a labor of love.  It was one of those cards that I started without a real direction, and I just let it evolve and enjoyed the process.  It ending up being a card for my husband for Valentine's Day, and he loved it!  Here is the outside of my card...  I used the Outside In Stitched Rectangles dies to cut stitched rectangle from white cardstock.  For the focal point, I created an ink blended background with Distress Oxide inks, and diecut it with the smallest of the new Stitched Stars Stackables.  Then I used the new Stitched Star Frames to add a frame around the patterned star.  I stamped and colored one of the adorable aliens from the new Beam Me Up stamp set, and added a planet from the Out of This World stamp set.  A sentiment from Beam Me Up was stamped under the star, which I popped up with foam tape, and to finish off the front, I added a scattering of stars from the Lucky Stars stamp set, stamped in Sunflower ink.

Pivot Popup Outside

Upon opening the card, you will find an entire galaxy!  I inked blended a background for the inside too, using Distress Oxides.  I used the Starry Skies dies to add some shooting stars and star clusters randomly on the background.  Then I backed the panel with a white card base to make the stars stand out.  I stamped and colored images from Beam Me Up, Out of this World and Critters Ever After and glued them all down with the new Glue Tube from Lawn Fawn.  This glue is amazing, and the fine tip is perfect for tiny pieces!  I stamped a sentiment from Out of This World on the new Cloudy Pop-Up Add On dies.  The pivot mechanism was easy to assemble, but it is important to use good STURDY adhesive to adhere it together.  Constant opening and closing could loosen things over time, so you want to make sure it's not going anywhere.  I used glossy accents to glue down my Pivot Pop-Up and it worked beautifully.


Pivot PopUp Inside

That's all for me today!  Make sure you stop by the Lawn Fawn blog to see what is happening over there... lots more projects to share with you!  I hope you will come back tomorrow as I have another card for you!!

Thanks for stopping by!!

Thursday, February 15, 2018

Lawn Fawn Inspiration Week: Rub-A-Dub-Dub & Quilted Backdrop


Hello there! Welcome to day 1 of the February Lawn Fawn Inspiration Week!  All of the new goodies that I will be sharing with you today will be available for purchase on February 22nd, although I know a lot of you probably pre-ordered them already!

Today, the team is showcasing two of my favorites from the new release (I know I say that about everything LOL!), Rub-A-Dub-Dub and the Quilted Backdrop.

To create my card, I started off with a white A2 card base.  On top of that, I added the Quilted Backdrop, also cut from white cardstock.  I just love white on white patterns.  Then I added a strip of the new Gotta Have Gingham 6x6 paper paper to mimic the  bathroom floor.  I stamped and colored the images from Rub-A-Dub-Dub with Copic markers and diecut them with the coordinating dies.  Once I arranged my scene, I adhered some pieces flat with the new Glue Tube, and others were popped up with foam tape.  I added some white gel pen accents, and made some glitter bubbles with some Nuvo Glitter drops.  Then I stamped a sentiment from the set on a hand cut banner, and added a white Stitched Rectangle Frame around the entire scene to finish off the card.


Rub and Dub Dub

That's all for me today! Be sure to visit the Lawn Fawn blog to see lots more inspiration from the team, and stop back by tomorrow because I have another project to share with you! :)

Thanks for stopping by!!

Thursday, February 8, 2018

Reverse Confetti February Blog Hop!


Hello there!  It's February 8th, and that means it's time for the February Reverse Confetti blog hop!  This month, our theme is LOVE!

I made some cute little candy boxes filled with conversation hearts... because it wouldn't be Valentine's Day without conversation hearts!

To create my boxes, I started off with two clear treat boxes.  I used the box topper from the Clear Treat Box and Box Wrap Combo.  I cut the box topper from Piggy Bank and Iced Aqua cardstock.  For the tags, I diecut two of the Round Top Tag Confetti Cuts die from two different patterned papers from the Pattern Play paper pad.  I stamped and colored the adorable T-Rex from the No Tomorrow stamp set, one in shades of pink and the other in shades of aqua.  I diecut them with the coordinating No Tomorrow Confetti Cuts, and gave them googly eyes for extra cuteness!  Then I added some non-green greenery around each dino.  Underneath, I stamped a sentiment from Heart Filled Sentiments in Midnight ink.

February Hop 

To attach each tag to the box, I tied a bow from coordinating satin ribbon, and threaded the tag through the bow with some Solid Blossom and Solid Caribbean twine.

February Hop 

Who says dinosaurs are only for boys?  If she's pink, she's obviously a girl!! ;)

February Hop


That's all for me today!  But be sure to hop along to see what the Confetti Crew have to share with you today! 

And, ‘Fetti Friends...


BLOG TEMPLATE BY DESIGNER BLOGS