Friday, January 28, 2022

Sunny Studio Stamps - Passionate Penguins


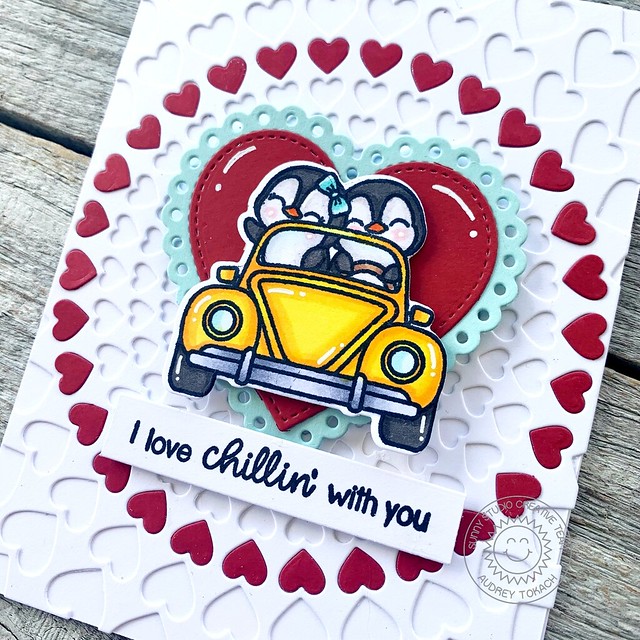
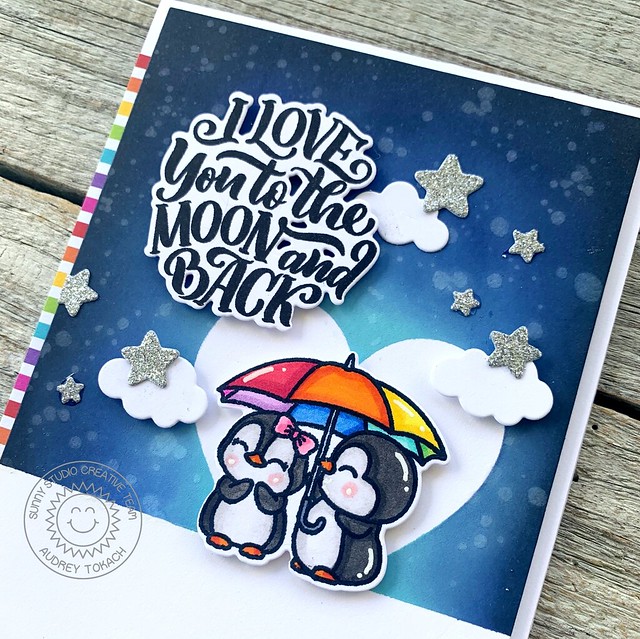
Hello friends! Today, I am here with some adorable penguins from Sunny Studio Stamps!  To create my card, I started off with a piece of white cardstock cut to 4" x 5.25".  I masked off the bottom 2/3 of the panel and then added another heart shaped mask in the bottom right corner which I cut using the Stitched Hearts 2 dies.  I used distress oxide inks in the shades Salvaged Patina, Blueprint Sketch, Chipped Sapphire and Black Soot to create a night sky, when splattered on some clean clear water to bleach out some areas for added interest.  I stamped and colored the penguin couple under the umbrella from the Passionate Penguins stamp set and diecut them with the coordinating Passionate Penguins dies.  I popped them up using foam tape in the heart shaped highlighted area.
 

Sunny Studio Passionate Penguins

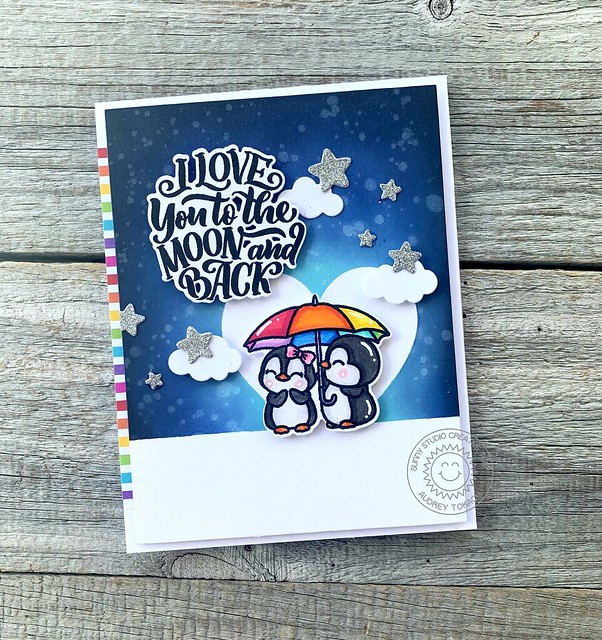
  For the sentiment, I used the Lovey Dovey stamp set, and diecut with the coordinating Lovey Dovey dies.  I popped that up in the sky, almost to mimic the moon.  Then, I added some tiny clouds, using the Comic Strip Everyday dies, and a scattering of silver glitter stars using the Basic Mini Shapes II and Basic Mini Shapes 3 dies.  Finally, I added a  few white gel pen accents and popped the panel up on an A2 card base, to which I added a strip of striped paper from the Rainbow Bright 6x6 paper pad.

Sunny Studio Passionate Penguins

That's all for me today!  Thanks for stopping by! :)

Friday, January 21, 2022

Sunny Studio Stamps - Bursting Hearts


Hello Friends! Today, I am here with a fun card for you using the new Bursting Hearts die and other new products from Sunny Studio Stamps!  I love that this die can be used horizontally or vertically for a totally different look.  Today, I will use it for an A2 horizontal card.  To create my card, I diecut the Bursting Hearts die, popped the inner most hearts on half of the panel, and created a rainbow shape.  I diecut the Bursting Hearts die again from white, and was careful to keep as many of the hearts in the diecut as I could so I could easily color them with my copic markers.  I wanted a more loose look rather than perfectly blended, almost to look a bit like watercolor.  When I was done with the coloring, I inlaid the hearts onto the card base in rainbow order.  Then, I used the Slimline Nature Borders cloud die to cover up the remaining part of the card front. 

Sunny Studio Bursting Hearts

 I stamped and colored a trio of birds from the Little Birdiestamp set, and diecut them with the coordinating Little Birdie dies before popping them up on the rainbow area and clouds.  I used a sentiment from the new Lovey Dovey stamp set, diecut with the Lovey Dovey dies, and diecut a trio of tiny clouds from the Comic Strip Everyday dies.  To finish off my card, I added white gel pen accents and a scattering of little clay hearts.


Sunny Studio Bursting Hearts

That's all for me today!  Thanks so much for stopping by! :)

Friday, January 14, 2022

Sunny Studio Stamps - Hearts Dies


Hello there! I am here today with a fun card to share with you today using products from the new Sunny Studio Stamps Spring 2022 release!  To create this card, I started off with a white A2 card base.  I diecut the new Bursting Hearts die from both white cardstock and red cardstock.  I glued the white diecut to the card base, and to highlight my focal point, I inlaid red hearts in a circle, following the pattern in the diecut.  Then, I diecut the medium heart from the Stitched Hearts 2 dies from red cardstock and the medium heart from the Scalloped Hearts dies from aqua cardstock.  They were adhered together with a glue pen to serve as the backdrop for the adorable Passionate Penguins!  


Sunny Studio Hearts Dies

I stamped and colored the penguin pair in the car with my copic markers and then diecut them with the coordinating Passionate Penguins dies.  I popped them up with foam tape on the heart diecuts and added a sentiment from Passionate Penguins underneath them.  To finish off my card, I added some white gel pen accents to those adorable critters!

Sunny Studio Hearts Dies

That's all for me today!  Thanks so much for stopping by! :)

Saturday, January 8, 2022

Reverse Confetti January Blog Hop!


Today is the day!  Release Day at Reverse Confetti!  All of the new goodies that we have been sharing with you over the last few days are available NOW in the Reverse Confetti store and at your favorite retailers!!  Before you go shopping, I have one more card to share with you using one of my favorite stamp sets of this release, Hello Daisy!

To create this card, I started off by diecutting the new Stitched Daisies Cover Panel from white cardstock.  I added a strip of navy striped paper to the left edge of the panel.  Then, I stamped and colored the floral image from Hello Daisy in shades of pink, orange and navy, which is one of my favorite color combinations.  I diecut the image with the Hello Daisy Confetti Cuts dies and popped it up on the card front with foam tape.

January 8 - Blog Hop 1

For the sentiment, I used the new Layered Lots of Love Confetti Cuts dies, with the sentiment cut from Navy cardstock and the shadow cut from white cardstock.  I popped that up over the floral image.  To finish off the card, I added a scattering of clear sequins and white gel pen accents.

January 8 - Blog Hop 2


That's a wrap!  I hope you have fallen in love with this release as much as I have!  Be sure to hop along and see what the rest of the gang has to share with you, then go buy some goodies to add to your stash!  Thanks for stopping by!!

The hop starts here:


Reverse Confetti

Cheiron Brandon

Audrey Tokach - **you are here**

Becky Roberts

Maria Russell

Amy Rohl

Lisa Henke

Kelly Lunceford

Dilay Nacar

Amy Kolling

Michelle Short

Kellianne Wilson

Tiffany Pryce Russom

Andrea Shell

Rachel Alvarado

Dana Kirby

Candice Fisher

Susan Wymer

Amy Tsuruta

Tricia Barber

Melissa Phillips

Jenny Colacicco

Olga Moss

Jeanne Jachna


Friday, January 7, 2022

Reverse Confetti Countdown to Confetti - Day 3

Hello there!  It's day three of the Countdown to Confetti at Reverse Confetti!  This might be one of my favorite releases ever!  All of the products that you see over the next few days will be available in the Reverse Confetti store and at your favorite retailers on January 8th!   

Today, I get to share my two favorite projects of this release!  The new Hello Daisy stamp set is a gorgeous floral bouquet, and it pairs perfectly with the new Love Bugs stamp set, if I do say so myself ;)

To create this card, I started off by diecutting a piece of white cardstock with the Along the Dotted Lines Cover Panel  (one of my most favorite RC products if you can't tell!) which I splattered with black watercolor.  I stamped and colored the floral cluster from Hello Daisy with my Copic markers and diecut it with the coordinating Hello Daisy Confetti Cuts dies.  Then, I stamped one of the cute little bees from Love Bugs along with the flight trail and diecut them with the coordinating Love Bugs Confetti Cuts dies.

January 7 - Hello Daisy 1

I glued the floral image down with a glue pen, and popped the bee up with foam tape.  The sentiment from Hello Daisy is a bold solid font, which I stamped in black ink, and diecut.  I also cut the diecut three more times from white and stacked them together for dimension without foam tape.  I finished off the card with some glitter on the bee's wings and some white gel pen accents.

January 7 - Hello Daisy 2

My second card also features the Hello Daisy stamp set, this time colored a little differently to mimic Black Eyed Susans, one of my Nana's favorite flowers.  I created this card much the same way as the last.  I diecut white cardstock with the Diagonal Stitches Cover Panel, splattered it with black watercolor, then added a strip of black and white patterned paper to the left edge.  I stamped and colored the Hello Daisy flowers with Copic Markers, this time in colors that remind me of wild flowers.  Then, I diecut the images with the coordinating Hello Daisy Confetti Cuts.

January 7 - Hello Daisy 3

For the sentiment, I used the previously released Happy Coordinates stamp set and coordinating Happy Confetti Cuts.  I diecut the HAPPY in black with a white shadow, then stamped a Mother's Day sentiment underneath, popped up on a strip of white cardstock.  To finish off my card, I added some Stickles glitter and white gel pen accents.

January 7 - Hello Daisy 4

That's all for me today!  Be sure to hop along with the rest of the team and our special guests this month!  Comment along the way for your chance to win a Reverse Confetti gift certificate!  I hope you will come back tomorrow for release day and the big blog hop!

The hop starts here:

Reverse Confetti

Audrey Tokach - * you are here*

Maria Russell

Lisa Henke

Amy Kolling

Kellianne Wilson

Dana Kirby

Amy Tsuruta

Melissa Phillips

Jeanne Jachna


Thursday, January 6, 2022

Reverse Confetti Countdown to Confetti - Day 2


Hello there!  It's day two of the Countdown to Confetti at Reverse Confetti!  This might be one of my favorite releases ever!  All of the products that you see over the next few days will be available in the Reverse Confetti store and at your favorite retailers on January 8th!   

Today, we are showing off the new Poppies stamp set and coordinating Poppies Confetti Cuts!  For my first card, I started off by watercoloring a piece of watercolor paper with Distress Ink ink Wild Honey.  I cut the panel down to 4" x 5.25" and added a strip of patterned paper to the left side of the panel.  Then, I stamped the Poppies in black ink and filled them in with three shades of orange ink and two shades of green ink.  I adhered them down with a glue pen and splattered on gold metallic watercolor over everything.

January 6 - Poppies 1

After the watercolor dried, I stamped a sentiment from the new Big Heart Sentiments stamp set and diecut it with the coordinating dies.  I popped that up in the center of the panel, and added a tiny clay heart as punctuation for my sentiment.  To finish off the card, I popped the panel up on an A2 card base with foam tape.

January 6 - Poppies 2

For my second card, I started off by diecutting a piece of patterned paper with the Stitched Rays Cover  Panel (which I belive was recently retired).  Over top of that, I added a horizontal strip of contrasting patterned paper.  Then, I used the Celebrate Tag to serve as a backdrop for my sentiment.  The large sentiment is another from the new Big Heart Sentiments stamp set, and the smaller sentiment is from the Poppies stamp set.  This time, I stamped the Poppies in shades of yellow.

January 6 - Poppies 3

I finished off the tag with some jute twine and a black diecut heart along with some gel pen accents.

January 6 - Poppies 4

That's all for me today!  Be sure to hop along with the rest of the team and our special guests this month!  Comment along the way for your chance to win a Reverse Confetti gift certificate!  I hope you will come back tomorrow to see more of the new release!

The hop starts here:

Reverse Confetti

Audrey Tokach - * you are here*

Maria Russell

Lisa Henke

Amy Kolling

Kellianne Wilson

Dana Kirby

Amy Tsuruta

Melissa Phillips

Jeanne Jachna


Wednesday, January 5, 2022

Reverse Confetti Countdown to Confetti - Day 1

Hello there!  It's day one of the Countdown to Confetti at Reverse Confetti!  This might be one of my favorite releases ever!  All of the products that you see over the next few days will be available in the Reverse Confetti store and at your favorite retailers on January 8th!   I have three projects to share with you today, so grab a cup of coffee and we will get going!

How ADORABLE are these Love Bugs?!  Read on to see how I created this little ensemble!

January 5 - Group

First up, I created this card with the new Love Bugs stamp set and the Postal Cover Panel.  I started off by diecutting the Postal Cover Panel from white cardstock, and splattered it with black watercolor.  I used the largest heart from the die Postal Cover Panel die set to add a striped heart behind the focal image.  I stamped and diecut one of the little bees from the Love Bugs stamp set, along with the flight path, and diecut them with the coordinating Love Bugs Confetti Cuts.

January 5 - Big Heart Sentiments 1

The sentiment is from the Big Heart Sentiments stamp set, which has coordinating dies!  To finish off this card, I adhered it to a black card base, added some white gel pen accents and Stickles glitters to the bee's wings, and finally a scattering of tiny clay hearts from my stash.

January 5 - Big Heart Sentiments 2

Next up, a card using the cute little butterfly from the Love Bugs stamps set!  I diecut a piece of white cardstock with the Along the Dotted Lines Cover Panel, and splattered it with black watercolor.  Then, I diecut the Oh My Heart Cover Panel from copy paper and used it as a stencil to add faint pink hearts to the right side of the panel.  I used the new Large Circle of Hearts Confetti Cuts cut from white cardstock to add a frame over top of the stenciled area.  I stamped the butterfly and the flight trail from Love Bugs and popped it up with foam tape.

January 5 - Valentines Sentiments 1

I stamped a sentiment from the new Valentine Sentiments stamp set on a white banner and added strips of striped paper and red glitter paper underneath.  I finished off the card with a scattering of red glitter hearts, some Christmas Red Stickles on the butterfly's antennas and some white gel pen accents.

January 5 - Valentines Sentiments 2

Finally, I made a set of tags to complete the ensemble.  I diecut the new Lovely Tag Confetti Cuts die twice from black pattened paper and splattered each with watered down white acrylic paint.  Then, keeping the two heart dies from the set connected, I ran them through my diecut machine with red cardstock to create a heart frame.  I stamped one of the bees and the flight trail from Love Bugs, colored them, and diecut them to pop them up with foam tape.

January 5 - Love Bugs 1

I added a sentiment to each using sentiments from the Big Heart Sentiments stamp set, which I diecut with the coordinating dies.  To finish off the tags, I added Stickles glitter to the bee's wings, and some white gel pen accents before tieing each with some red and white twine.

January 5 - Love Bugs 2

That's all for me today!  Be sure to hop along with the rest of the team and our special guests this month!  Comment along the way for your chance to win a Reverse Confetti gift certificate!  I hope you will come back tomorrow to see more of the new release!

The hop starts here:

Reverse Confetti

Audrey Tokach - * you are here*

Maria Russell

Lisa Henke

Amy Kolling

Kellianne Wilson

Dana Kirby

Amy Tsuruta

Melissa Phillips

Jeanne Jachna


BLOG TEMPLATE BY DESIGNER BLOGS