Tuesday, September 25, 2018

Fusion Citrus Challenge {Reverse Confetti}


Hello there!  I have a card to share with you for the current Fusion Card Challenge using Reverse Confetti goodies!

I used the layout and the orange and yellow from the Fusion Citrus challenge for my card.


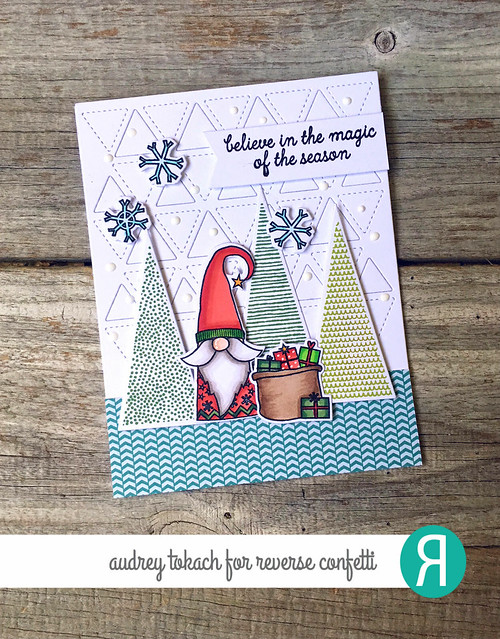
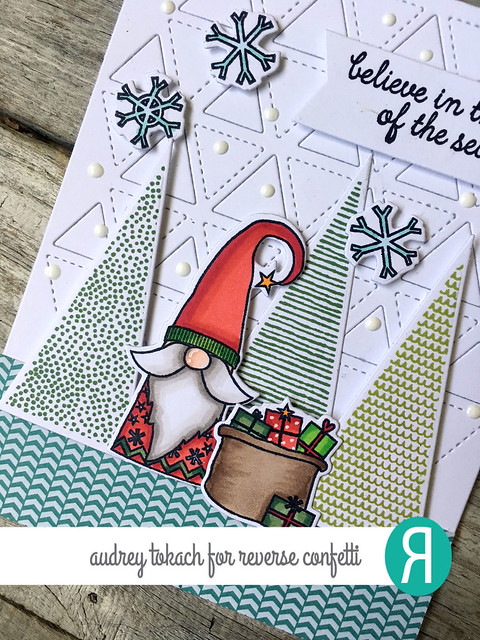
To create my card, I started off with a A2 card base cut from Preimer Polar White cardstock. To that, I added strips of two patterned papers from the Cue the Confetti Paper Pad.  Then, I diecut the pinked edge circle from the Flowers For Mom Confetti Cuts die set out of RC Aqua cardstock, and a patterned circle to layer inside it. I stamped and colored the adorable koala from the Bear Hugs stamp set, and diecut him with the coordinating Bear Hugs Confetti Cuts dies.  Then, I popped the circle up on the right side of the card base with foam tape, and stamped a sentiment from the Bear Hugs stamp set to the left of it.

Feel Better Soon

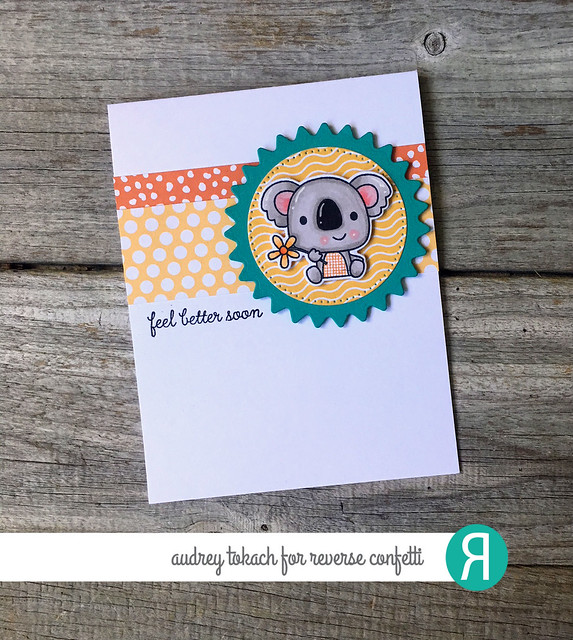
I love all of the white space on this card with the bright pops of color!  I can't wait to drop this in the mail to brighten someone's day! :)

Feel Better Soon

That's all for me today!  Thanks so much for stopping by! :)


Tuesday, September 18, 2018

Lawn Fawn Inspiration Week: Winter Skies & Snowfall Backdrop


Hello there!  Welcome to another day of Lawn Fawn September Inspiration Week!  Today, we are showcasing the new Winter Skies stamp set and coordinating dies, and the Snowfall Backdrop dies, which are one of my most favorite products from the release!

To create my card, I started off with a white A2 case base.  On top of that, I added a Snowfall Backdrop  layer cut from Sugarplum cardstock.  I diecut three Birch Trees from white cardstock, and diecut a hill using the Simple Hillside Borders dies and Pixie Dust Sparkle cardstock.  Then I stamped the adorable little bear pair from the Winter Skies stamp set and diecut them with the coordinating Winter Skies dies.  For my sentiment, I pulled out my Merry Messages stamp set, and stamped a sentiment in Sugarplum ink and then diecut it with the Everyday Sentiment Banners dies.  To finish off my card, I added a bunch of Mini Snowflakes cut from Pixie Dust cardstock.

Winter Skies

Look at that iridescent sparkle!!  I want to use Pixie Dust Sparkle paper on every card!!

Winter Skies

That's all for me today!  Be sure to stop by the Lawn Fawn blog to check out what the rest of the design team has to share with you!!

Thanks for stopping by! :)

Saturday, September 15, 2018

Lawn Fawn Inspiration Week: Thanks a Latte


Hello there!  Welcome to another day of Lawn Fawn September Inspiration Week!  Today, we are showing off one of my favorites from the release, Thanks a Latte!

To create my card, I started off with a white A2 card base.  Then, I used the largest die from the Outside In Stitched Rectangles to cut a slightly smaller rectangle and add a stitched edge.  Then I ran that panel through my diecut machine again with the largest die from the Reverse Stitched Scalloped Circle Windows dies to create a window in my panel.  Behind my window, I added a piece of snowflake paper from the Really Rainbow Christmas 6x6 paper pad, and a piece of the new woodgrain paper to act as a table to set my adorable cups on.  I stamped and colored two mugs from the Thanks a Latte stamp set, along with some steam trails, a tiny heart and trio of itty bitty marshmallows, all of which are included the in stamp set.  I popped everything up with foam tape, and stamped a sentiment from the set onto a Everyday Sentiments Banners diecut, then added white gel pen accents to finish off my card.

Thanks a Latte

That's all for me today!  Be sure to visit the Lawn Fawn blog for lots more inspiration from the design team!

Thanks for stopping by! :)

Friday, September 14, 2018

Lawn Fawn Inspiration Week: Simply Celebrate Winter


Hello there!  Welcome to another day of Lawn Fawn Inspiration Week!  Today, I have a card to share with you using the new Simply Celebrate Winter stamp set, the coordinating Simply Celebrate Winter dies, and the Winter Scripty Sentiments stamp set!

To create my card, I started off with a white A2 card base.  I diecut another piece of white cardstock, once with the largest die in the Outside In Stitched Rectangles die set, and again with the Portrait Snowfall Backdrop die.  I used Wilted Violet, Blueprint Sketch, Peacock Feathers and Cracked Pistachio Distress Oxide inks to ink  blend a vibrant background.  That the bottom of the ink blended panel, I added a Simple Stitched Hillside Border.  Then, I stamped and colored the row of adorable snowmen from the Simply Celebrate Winter stamp set, colored them with Copic Markers and diecut them with their coordinating die.  I popped them up with foam tape.  Underneath them, I stamped the "let it snow" sentiment from the Winter Scripty Sentiments stamp set in Peacock ink.  I used the Stitched Snowflakes dies and Mini Snowflakes dies to add some different sized snowflakes to the background, and added a few white gel pen accents to finish the panel off before gluing it to the card base with liquid glue.

Simply Celebrate Winter

That's all for me today, but be sure to check out the Lawn Fawn blog because the rest of the design team has so much to share with you.

Thanks so much for stopping by! :)

Thursday, September 13, 2018

Lawn Fawn Inspiration Week: Holiday Helpers


Hello there!  Welcome to day 1 of the Lawn Fawn September Inspiration Week!  Today, we are showcasing the adorable Holiday Helpers stamp set!

To create my card, I started off with a card base cut from Paper Bag cardstock.  I diecut a frame from Paper Bag cardstock using the largest die from the Stitched Rectangles Frames dies and glued that to the card base with the Glue Tube.  Inside the frame, I added a stitched rectangle cut from Pixie Dust Sparkle paper.  On top of that, I added another rectangle, diecut from Paper Bag cardstock, then ran through my diecut machine again with the Snowy Backdrops die so that the sparkle should show through and look like sparkly snow.  I added a Pixie Dust Sparkle paper hill using the Simple Stitched Hillside Borders dies.  Then, I stamped the two little elves from Holiday Helpers and a bunch of little toys from the set, which I colored with copic markers and diecut with the coordinating Holiday Helpers dies.  I arranged them around a Christmas tree from the previously released Christmas Dreams stamp set.  I stamped a sentiment from the previously released Beary Happy Holidays stamp set onto a piece of Paper Bag cardstock, heat embossed it with white embossing powder and diecut it with the Everyday Sentiment Banners dies, and then popped it up with foam tape, and added white gel pen accents to finish off my card.

Little Helpers

That's all for me today!  Be sure to check out the Lawn Fawn blog for lots more inspiration from the design team!

Thanks for stopping by! :)

Saturday, September 8, 2018

Reverse Confetti September Blog Hop

WOOHOO!  It's Reverse Confetti blog hop and release day!  All of the new goodies are available NOW in the Reverse Confetti store and at all of your favorite retailers!


Today, I have a card to share with you using two new stamp sets that I haven't shared with you yet!  This card combines the new Fall Foliage stamp set and the new Christmas Candles stamp set.

To create my card, I started off with a white A2 card base.  I added a warm glow to the front using Antique Linen Distress Oxide ink.  To ground my elements, I added a strip of patterned paper from the new Abundant Autumn paper pad.  Then I stamped three candles from the Christmas Candles stamp set, colored them with Copic markers and diecut them with the coordinating Christmas Candles Confetti Cuts dies.  To frame them, I stamped a trio of maple leaves from the Fall Foliage stamp set, along with a few other pieces of greenery from the same set, colored them, and diecut them with their coordinating Fall Foliage Confetti Cuts dies.  Before gluing down the candles with a glue pen, I stamped a light halo where each flame would be, then glued the candles flat and popped the leaves up around them with foam tape.


Christmas Candles and Fall Leaves

I stamped a sentiment from the Christmas Candles stamp set  above the scene in black ink , then added some white gel pen accents to finish off my card.

Christmas Candles and Fall Leaves 2

That's all for me today, but be sure to stop by the design team blogs to see what everyone else has to share with you today!

Audrey Tokach - ** you are here**
Maria Sabina

Thanks for stopping by :)


Friday, September 7, 2018

Countdown to Confetti Day 3: Holiday Gnomes & Triangle Trees

Hello there!  Welcome to day 3 of the Countdown to Confetti with Reverse Confetti!  Our September release is just around the corner!  All of the new goodies that we will be sharing with you over the next few days will be available on September 8th in the Reverse Confetti store and at your favorite retailers!


Today, my card features the new Holiday Gnomes stamp set and coordinating Holiday Gnomes Confetti Cuts dies, the new Triangle Trees stamp set and coordinating Triangle Trees Confetti Cuts dies, and the new Triangles Cover Panel Confetti Cuts die.

To create my card, I started off with an A2 white card base.  I diecut the Triangles Cover Panel from Premier Polar white cardstock and glued it to the card base with a glue pen.  To the bottom of the panel, I added a strip of patterned paper from the new Abundant Autumn paper pad.  Then I stamped three of the tress from Triangle Trees in three different colors of green ink - Lime, Olive and Avocado.  I glued one down flat and popped two other up with foam tape.  Then, I stamped one of the cute Holiday Gnomes and his present sack, colored them with Copic markers and diecut them with the coordinating Holiday Gnomes Confetti Cuts dies.  They are popped up with foam tape in front of the trees.

Holiday Gnomes 1

I stamped a sentiment from the Holiday Gnomes stamp set onto a banner diecut from the Tag Me Confetti Cuts die set in black ink and popped it up with foam tape.  Then I added a trio of snowflakes from the Holiday Gnomes set, and some snow with white Nuvo Drops to finish off my card.

Holiday Gnomes 2

The rest of the design team has lots to share with you today, including another new stamp set that I will share with you tomorrow.  Be sure to hop along and comment for your chance to win a RC gift certificate!


Audrey Tokach - ** you are here**

See you tomorrow for the blog hop and release! :)

Thanks for stopping by!!


Thursday, September 6, 2018

Countdown to Confetti Day 2: Cotton & Thistles

Hello there!  Welcome to day 2 of the Countdown to Confetti with Reverse Confetti!  Our September release is just around the corner!  All of the new goodies that we will be sharing with you over the next few days will be available on September 8th in the Reverse Confetti store and at your favorite retailers!


Today, we are showcasing a few new goodies, and my card uses the new Cotton & Thistles stamp set and coordinating Cotton & Thistles Confetti Cuts dies along with the new Bag & Tags Creator Confetti Cuts die set.  To create my card, I started off with an A2 card base cut from Sand cardstock.  I diecut the zigzagged rectangles from the Bag & Tags Creator die set from Sand cardstock as well, and ran it through my diecut machine with the Stitched Rays Cover Panel Confetti Cuts die to add a fun stitched detail.  Then, I popped it up  on the card base with foam tape, and splattered the entire card front with white acrylic paint.  I added a piece of pattered paper from the  previously release Free Spirit paper pad to act as a table cloth for my scene.  Running it though my diecut machine with the zigzagged rectangle die from the Bag & Tags Creator die set ensures that it matches up perfectly with the panel.

Cotton and Thistle 1

I stamped the wildflower bouquet and jar from the Cotton & Thistles stamp set onto Sand cardstock with Sand ink, and diecut then with the coordinating Cotton & Thistles Confetti Cuts dies.  I colored then with colored pencils and added some white gel pen accents.  Then, I glued them together, and added a tiny twine bow to the  neck of the jar before popping it up on the panel with foam tape.  For my sentiment, I pulled out my Bitty Banners stamp set, and stamped a banner in Sand ink on to Sand cardstock and diecut it with the coordinating Bitty Banners Confetti Cuts dies, then I popped it up on the jar with foam tape.

Cotton and Thistle 2

That's all for me today, but the rest of the design team has lots to share with you today!  Be sure to hop along and comment, for your chance to win a RC gift certificate! :)

Audrey Tokach - **you are here**

See you back here tomorrow for another peek at the new release!  Thanks for stopping by! :)


BLOG TEMPLATE BY DESIGNER BLOGS