Tuesday, December 11, 2018

MFT & Friends December Release


Hi there!  I am so excited to share that I am part of the MFT & Friends December 2018 Release with My Favorite Things!

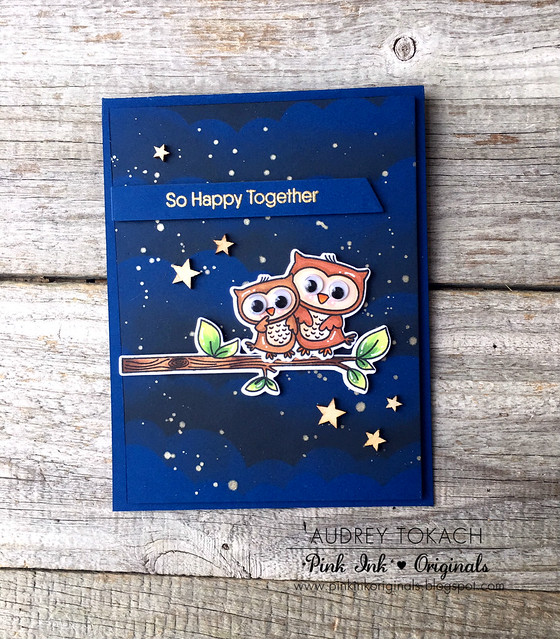
My card features the new Forever and Owlways stamp set and the coordinating Forever and Owlways Die-namics along with the new Essential Slanted Sentiment Strips Die-namics.

To create my card I started off with a panel of dark blue cardstock measuring 4" x 5.25".  I used the Cloud Stencil along with some Black Soot Distress Oxide ink to create a cloudy  night sky.  Then I splattered on some metallic gold watercolor.  I stamped and colored the larger branch and the cute owl pair from the Forever and Owlways stamp set and diecut them with the coordinating Forever and Owlways Die-namics.  Then, I stamped a sentiment from the set onto dark blue cardstock and heat embossed it with gold embossing powder before diecutting it with the Essential Slanted Sentiment Strips Die-namics.  I popped everything up with foam tape, and added a few finishing touches to my card including googly eyes to the owls, white pen accents, and a scattering of tiny wooden stars from my stash.


So Happy Together

Be sure to check out the MFT blog for all the details on the December release, available now in the MFT store and at your favorite retailers.

Thanks so much for stopping by! :)

Saturday, December 8, 2018

Reverse Confetti December Blog Hop


Hello there!  It's the 8th of the month, and that means it's time for the Reverse Confetti blog hop!  This month, we are doing something fun and different.  I  have a brand new project to share with you along with three of my favorite projects from all of 2018!

First up, my new project!  To create my card, I started off with an A2 card base cut from Polar White cardstock.  On top of that, I layered the Big Stripes Cover Panel Confetti Cuts.  For my focal point, I diecut the pinked edge circle from the FaLaLa Circle Confetti Cuts die set from white cardstock along with the smaller circle in the set.  I ran the smaller circle through my diecut machine again with the Stitched Rays Cover Panel Confetti Cuts for some added texture.  I thought it would be fun to pull out the very first Reverse Confetti stamp set that I ever purchased, Puppy Love.  I stamped and colored the cute puppy pair and their food bowl, then stamped the heart from the set in Salsa ink.  Everything was cut with the coordinating Puppy Love Confetti Cuts dies.  I popped the images up on the card front with foam tape, and stamped a sentiment from the same set inside one of the stripes of the cover panel.  Finally, I added some white gel pen accents to finish off the card.

December blog hop

Now onto my favorites for the year!  I think it's pretty safe to say that the Stitched Rays Cover Panel die might be my favorite RC product of the year.  I use it ALL the time!  It can be seen on this card, originally created for the FALL-idays blog hop.  You can read more about how I created this card here:


Fa La La

Next up is a card that I created for my mom for Mother's Day.  You may recognize the Stitched Rays Cover Panel.  Obsessed.  You can read all about how I created this card here:

For Mom

April Blog Hop

This card doesn't use the Stitched Rays Cover Panel, but I'm pretty sure that's only because it had not been released yet! LOL!  Who doesn't love rainbows?  And scallops.  And adorable seals holding umbrellas.  See all about how I created this 2018 favorite here:

Rain or Shine

Sealiously 1

That's all for me today, but be sure to hop along and  see what the rest of the team has to share with you today!  The fun starts here:

Lawn Fawn Inspiration Week Day 1: Let's Toast


Hello there! Today kicks of sneak peeks for Lawn Fawn's Valentines Inspiration Week!  First up is an adorable new stamp set, Let's Toast.  This set is full of cute images and punny sentiments, perfect for making cute little love notes. To create my card, I started off with a white card base.  On top of that, I layered the new Hearts Backdrop Portrait die.  SO cute!  For my focal point, I diecut the largest of the Lacy Heart Stackables from white cardstock, and layered it with some Let's Polka in the Dark patterned paper.  I stamped and colored two pieces of toast, and stamped one with peanut butter and the other with jelly.  I love their little faces!  The sentiment, also from the set, is stamped in Juice Box ink on to an Everyday Sentiment Banner diecut.  To finish off my card, I added a scattering of tiny hearts and some white gel pen accents.

Lets Toast

That's all for me today,  but be sure to visit the Lawn Fawn blog to see lots more from the design team! :)

Thanks for stopping by!

Thursday, November 29, 2018

Hello Bluebird November Release Roundup


Hello there!  Today, I just wanted to share with you all of the cards that I have made so far using the new November release from Hello Bluebird!  If you follow me on Instagram, you have have seen them already :)

This card uses:

Merry Pigs

This card uses:

Skating

This card uses:

Frosty Littles

This card uses:

North Star

That's all for me today!  Thanks so much for stopping by! :)

Tuesday, November 27, 2018

Giving Tuesday with Lawn Fawn


A new day and a new surprise from Lawn Fawn!

FREE shipping extended one day! Plus, hundreds of grab bags have arrived in the shop! These mystery bags are 50% off retail value and are filled with stamps, dies, and other surprise goodies.

In recognition of Giving Tuesday, Lawn Fawn will donate 100% of the profits from all grab bag purchases to the California Wildfire Relief Fund.

Check out the Grab Bag collection and scoop up a mystery bag before they disappear!

Thank you so much for supporting such an important cause!  Thanks for stopping by! :)

Sunday, November 25, 2018

25 Days of Christmas Tags: Hello Bluebird

Hello there! Today, I am so excited to be participating in the 25 Days of Christmas Tags coordinated by the amazing Tracey McNeeley !  Be sure to visit Tracey's blog to see lots of other tags today and for the rest of the month! Today is Hello Bluebird day!


To create my tag, I started off with a pink cardstock tag.  On top of that, I stamped the Falling Snow Background in darker pink ink.  I stamped the cute polar bear, and tree from the Frosty Friends stamp set and diecut them with the coordinating Frosty Friends dies.  The presents are from the North Pole Littles stamp set.  To ground my scene, I diecut two banners, one from white cardstock and one from patterned paper.  On the white diecut, I stamped a sentiment from the North Pole Littles stamp set.  I adhered the patterned banner flat with a glue pen, and popped up the sentiment banner and all of my scene images.  Then, I stamped a trio of tiny snowflakes from the North Pole Littles stamp set and heat embossed them in white so they would stand out.  To finish things off, I added some white pen accents, and more red and white twine.


25 Days of Christmas Tags_HB

That's all for me today, but be sure to visit Tracey's blog to see lots more Hello Bluebird fun!

Thanks for stopping by! :)

Friday, November 23, 2018

Lawn Fawn Black Friday Exclusive: A Little Sparkle


Hello, hello!  Happy day after Thanksgiving!  In true Lawn Fawn fashion, Lawn Fawn has a special treat for you today!

Get FREE shipping on all U.S. orders, and a $4 shipping discount on international orders.
You can also get the never-before-released mini stamp set “A Little Sparkle” FREE with orders over $35, plus the coordinating “A Little Sparkle Lawn Cuts” with orders over $60. Promotion ends Monday, Nov. 26 at 11:59pm (Pacific Time).
Check out the details on Lawn Fawn's Black Friday - Cyber Monday FAQ


Here is card I made using the adorable A Little Sparkle stamp set!

I started off by diecutting a piece of watercolor paper with the Stitched Rectangles Stackables, when I used a rainbow of Zig Clean Color Real Brush Markers to paint a drippy rainbow on either end of the panel.  I stamped and colored the unicorn from the A Little Sparkle stamp set, and diecut her with the coordinating A Little Sparkle dies.  I added a trio of Simple Puffy Cloud Frames in various sizes behind her and popped her up with foam tape.  Then I stamped a sentiment from the set onto an Everyday Sentiment Banners diecut, which I also popped up with foam tape.


Hope Your Day Sparkles

I stamped a scattering of the tiny twinkle images from the set randomly around the panel, then added glittery Stickles to the unicorn's horn and in the center of each sparkle, and finished off with some white gel pen accents.

Hope Your Day Sparkles

That's all for me today!  Be sure to visit the Lawn Fawn blog for more details and to see lots more cards from the design team.

Thanks so much for stopping by! :)

Wednesday, November 21, 2018

25 Days of Christmas Tags: Lawn Fawn


Hello there! Today, I am so excited to be participating in the 25 Days of Christmas Tags coordinated by the amazing Tracey McNeeley !  Be sure to visit Tracey's blog to see lots of other tags today and for the rest of the month!  Today is Lawn Fawn day!


To create my tag, I started off with the largest Fancy Scalloped Circle Stackables dies cut from white cardstock.  On top of that I layered a Dotted Circle Stackables, cut once from black cardstock, then run though my machine again with the Snowfall Backdrop die.  I added a Stitched Hillside Border to the bottom, and a pair of Birch Trees.  Then, I stamped and colored images from the Baaah Humbug stamp set.  I stamped a sentiment from the set onto a Everyday Sentiment Banner diecut, and added a scattering of Mini Snowflakes, before adding some Peppermint Lawn Trimmings to finish off my tag.

25 Days Tag_Lawn Fawn

That's all for me today!  Thanks so much for stopping by!

Thursday, November 8, 2018

Reverse Confetti November Blog Hop

Hello there!  Happy blog hop day!  That means it's also release day at Reverse Confetti!  The new release is available now in the Reverse Confetti store and at your favorite retailers!


My card today features the new Snow Bunnies stamp set and coordinating Snow Bunnies Confetti Cuts dies.  To create my card, I started off with a white A2 card base.  Over top of that, I layered the new Snowballs Cover Panel Confetti Cuts die cut from Mist cardstock.  To the bottom of that panel, I added a strip of patterned paper from the Warm Heart paper pad.  Then I added a frame around the panel using the Greetings Frame Confetti Cuts die.  I stamped and colored the skating bunnies from the Snow Bunnies stamp set, and diecut them with the coordinating Snow Bunnies Confetti Cuts dies.  I popped them up on the panel with foam tape.

Snow Bunnies 1

To fill a bit of the space behind them, I added a snowflake diecut from the Snowflake Trio Confetti Cuts die set, then stamped a sentiment from the Snow Bunnies stamp set on a hand cut banner and popped it up with foam tape.  To finish things off, I added some white gel pen accents, and some glitter with Stickles.

Snow Bunnies 2

That's all for me, but be sure to hop along to see what the rest of the team has to share with you today.  Thanks so much for stopping by! :)


Wednesday, November 7, 2018

Countdown to Confetti Day 3: Snowflake Magic


Hello there!  Welcome to day 3 of the Countdown to Confetti with Reverse Confetti!  Our November release is just around the corner!  All of the new goodies that we will be sharing with you over the next few days will be available on November 8th in the Reverse Confetti store and at your favorite retailers!

Today, we are showcasing a new set called Snowflake Magic!  It's no secret that I love snowflakes, and I couldn't wait to play with this stamp set.

To create my card, I started off by diecutting a piece of Polar White cardstock with the Stitched Rays Cover Panel Confetti Cuts die.  Then, I used the Topped Off Tag Confetti Cuts die set and diecut a piece of the new Winter Solstice patterned paper.  To the bottom of the tag, I added a pinked edge cut from gold glitter paper.  To do this, I used the Top 'o The Tag Confetti Cuts die set.  These are meant for the top of the tag, but I adhered it to the bottom so that just to decorative edge was peeking out.  I stamped the more solid snowflake from the Snowflake Magic stamp set in Stone ink, and the more detailed image in Coral ink, stamped off once to get a lighter shade of coral. I layered two diecuts together for a little more dimension.  Then, I stamped one of the greetings for the center of the snowflake in Coral ink, full strength, and diecut everything with the coordinating Snowflakes Magic Confetti Cuts dies.

Snowflake Magic 1

I popped the tag up on the panel, and splattered everything with some gold metallic watercolor, then mounted the panel on an A2 card base, and added a coral satin bow to finish things off.

Snowflake Magic 2

The rest of the team has lots to share with you today!  Be sure to hop along and comment for your chance to win a RC gift certificate! :)


Reverse Confetti Blog
Amy Kolling
Melissa Phillips
Deanne Kuntz
Amy Sheffer
Tricia Barber
Kelly Lunceford
Lisa Henke
Amy Rohl
Heather Hoffman
Amy Tsuruta
Kathy Schweinfurth
Audrey Tokach - **you are here**
Jeanne Jachna
Olga Moss
Leanne West
Melissa Bickford

See you tomorrow! :)


Tuesday, November 6, 2018

Countdown to Confetti Day 2: Furever Friends


Hello there!  Welcome to day 2 of the Countdown to Confetti with Reverse Confetti!  Our November release is just around the corner!  All of the new goodies that we will be sharing with you over the next few days will be available on November 8th in the Reverse Confetti store and at your favorite retailers!

Today, my card uses the new Furever Friends stamp set!  Holy moly is this stamp set CUTE!  It has both a cat and a dog in the set, and a bunch of cute accessories and sentiments!

To create my card, I started off with an A2 card base cut from Polar White cardstock.  Then, I added another layer using the Big Stripes Cover Panel Confetti Cuts die cut from white cardstock.  I used the Flowers For Mom Confetti Cuts dies to add a focal point behind my cute little dog. The patterned paper is from the new Winter Solstice paper pad.  I paper pieced his cute little dog bed with more Winter Solstice papers, and turned it into a party scene with the hat and balloons from the Monkey Business stamp set.

Furever Friends 1

The sentiment is from the Furever Friends stamp set too.  I really love how all of the critter sets mix and match so well to create cute, fun scenes!

Furever Friends 2

The rest of the team has lots to share with you today!  Be sure to hop along and comment for your chance to win a RC gift certificate! :)


Reverse Confetti Blog
Amy Kolling
Melissa Phillips
Deanne Kuntz
Amy Sheffer
Tricia Barber
Kelly Lunceford
Lisa Henke
Amy Rohl
Heather Hoffman
Amy Tsuruta
Kathy Schweinfurth
Audrey Tokach - **you are here**
Jeanne Jachna
Olga Moss
Leanne West
Melissa Bickford

See you tomorrow! :)


BLOG TEMPLATE BY DESIGNER BLOGS