Monday, September 28, 2015

Sharing on the Lawn Fawn blog today!

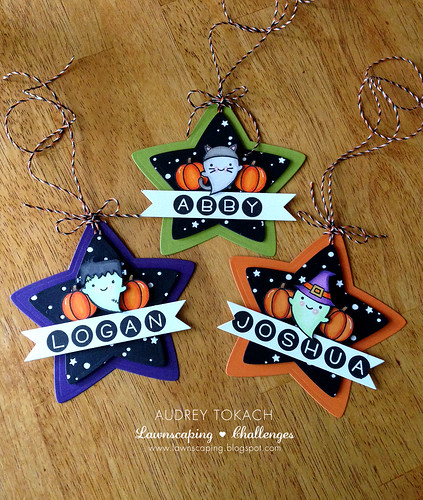
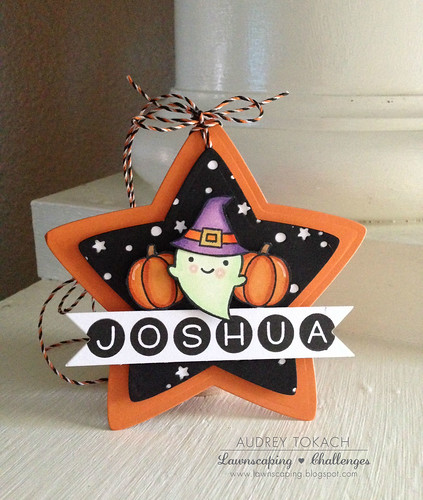
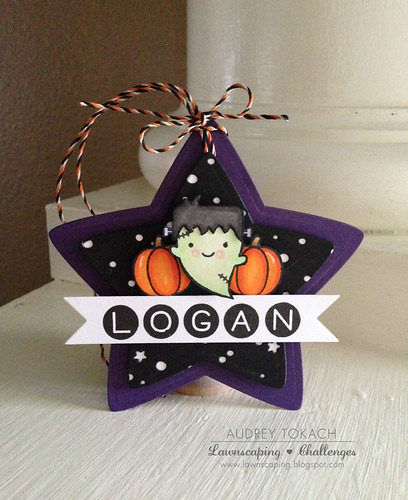
Hi there!  Today, I am SO SO SO excited to be sharing a few projects on the Lawn Fawn blog!  In addition to the halloween tags that I shared here, I also made a card to share!

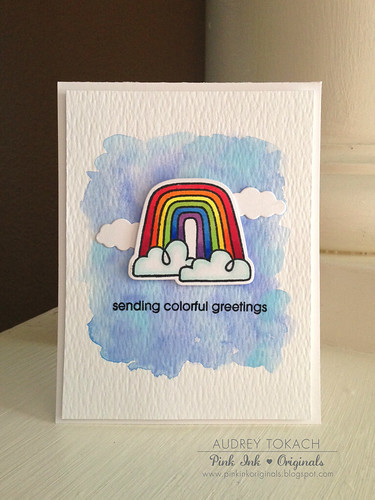
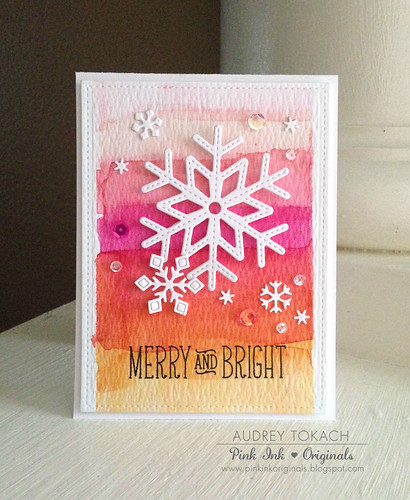
If you've visited my blog before, it's no secret that I love Lawn Fawn and I love watercolor.  More than just a little.  Obsessed is a good word.  So on this card, I combined the two! :) I used distress inks to create this ombre striped background (a technique that I learned in the newest Online Card Class).  When it was dry, I diecut the watercolor piece with the largest die from the Small Stitched Rectangles die set.  Then, using the Stitched Snowflakes dies and the new Mini Snowflakes dies, I cut a bunch from white card stock.  I adhered some with foam tape, and others with a glue pen.  I stamped a sentiment from the Snow Day stamp set (I just love the sentiment and the font!!), and added a few sequins for sparkle before adhering the panel to a white card base.  I am SO excited to see smaller snowflakes to go with the large set!  I think these two die sets pair beautifully together, and I think they are definitely going to get a workout this winter *wink* :)

Merry and Bright

Thanks so much for stopping by! :)

Supplies:
Stamps: Lawn Fawn Snow Day
Dies: Lawn Fawn Stitched Snowflakes, Mini Snowflakes, Small Stitched Rectangles Stackables
Paper: Tim Holtz Distress Watercolor Paper, PTI White
Ink: Memento Tuxedo Black, Ranger Distress Inks in Spun Sugar, Worn Lipstick, Picked Raspberry, Abandoned Coral, Spiced Marmalade
Other: Pretty Pink Posh sequins in 4mm Sparkling Clear, Ballerina Pink, Fairytale Fuchsia, Strawberry Burst, Foam Tape

Friday, September 25, 2015

Sunny Studio Stamps Creative Team!

Hello there!  I have some fun news to share!  I am joining a great group of girls as part of the Sunny Studio Stamps 2015 Creative Team!  You can see the announcement here on the Sunny Studio blog!


You may remember a few weeks ago, I was part of the grand opening blog hop, where I shared these projects using the Bundled Up and Snow Kissed stamp sets:


Look for more projects using Sunny Studio stamps in the next few days! In the meantime, take a peek around the store and see all the cuteness that Sunny Studio has to offer! :)

Thanks for stopping by!!

Thursday, September 24, 2015

Artsy Hello for Butterfly Reflections Ink


Hey there!  I am over on the Butterfly Reflections Ink blog today with a card inspired by the BRI September mood board!  Above you'll see a tiny peek, but you can click here to see the entire card!  


Thanks for stopping by! :)


Monday, September 21, 2015

Lawnscaping Challenge #114 - One Layer

Hello there!  It's time for another Lawnscaping Challenge!  Challenge #114 is a one layer card challenge!


We are sponsored this week by the super fabulous Lawn Fawn!


One layer cards are hard for me.  HARD.  Foam tape is my BFF.  So this Lawnscaping Challenge was just that.  A challenge.  But I had fun with this one, and I am pleased with how it turned out.  I started off by stamping the witch hat from the Booyah stamp set, masked it off, stamped the ghost, masked that off and stamped the broom.  I stamped the end of the broom handle on the right side of the ghost too to make the handle appear as if it's reaching all the way behind the ghost.  I stamped the speech bubble and masked that off too, and added the little hanging spider.  Then I used the star dies from the Stitched Journaling Card die set to diecut a post-it note.  I used the little star diecuts as masks, and then used Dusty Concord, Hickory Smoke and Blueprint Sketch distress inks to sponge a night sky.  I removed the tiny star masks which showed the white cardstock underneath, and outlined those with my Sakura Stardust pen.  I removed the rest of the masks and colored the ghost with my Copic makers, then I stamped more tiny stars with the Blueprint Sketch ink.  Finally, I stamped the sentiment, also from the Booyah stamp set.


One Layer Halloween

That's all for me... be sure to check out the blog for all of the challenge details and to get lots more inspiration from the design team!  I hope you'll play along for a chance to win some new Lawn Fawn!

Thanks for stopping by! :)

Supplies:
Stamps: Booyah
Dies: Stitched Journaling Card dies
Paper: PTI white
Ink: Memento Tuxedo Black, Ranger Distress in Dusty Concord, Blueprint Sketch and Hickory Smoke
Other: Copic Markers, Sakura Stardust pen

Sunday, September 20, 2015

Paper Smooches SPARKS Challenge - Anything Goes!


Hey there!  It's time for another Paper Smooches SPARKS challenge, and this week, anything goes!


My obsession with watercolor continues.  I pulled out my new Spreading Sunshine stamp set because I want to send some sunshine to a friend's mailbox.  I started off by watercoloring a piece of Tim Holtz Distress Watercolor Paper with my Artist's Loft watercolors from Michaels.  Then, in the bottom right corner, I stamped a sentiment from Spreading Sunshine.  I stamped, colored and fussy cut a bunch of the clouds from the same stamp set, and then using the Tiny Hearts die, I cut the largest heart from red cardstock, glittered it with Wink of Stella and coated it with some Glossy Accents before popping it us with some foam tape.  The entire panel is popped up with foam tape and there is a strip of patterend paper peeking out from the left side.


Focus on the sun

That's all for me today...

Be sure to check out what the other design team members have to share with you today!

Audrey Tokach - you are here!
Savannah O'Gwynn

Thanks so much for stopping by! :)

Supplies:
Stamps: Paper Smooches Spreading Sunshine
Dies: Paper Smooches Tiny Hearts
Ink: Memento Tuxedo Black
Paper: Tim Holtz Distress Watercolor Paper, Lawn Fawn Let's Polka 6x6 paper pad, PTI White, PTI Pure Poppy
Other: Copic Markers, Artist's Loft Watercolors (Michaels), Wink of Stella, Foam Tape, Glossy Accents


Saturday, September 19, 2015

Reverse Confetti SFYTT!

Hi there!  Today I wanted to share a card that I just finished up for the Reverse Confetti Sketch For You To Try!  Here is the September sketch:


And here is my card!  I LOVE all of the Reverse Confetti animals and I have been wishing for a cat set for a long time.  I was so excited to see Too Cute To Spook!  I also used the Diagonal Stripe Pretty Panels on my card too.  I watercolored the background with Twisted Citron Distress Ink and then used some Lawn Fawn patterned paper to ground things a bit.  Finally I finished things off with some Pretty Pink Posh Peridot Mist iridescent sequins.


Reverse Confetti SFYTT September

That's all for now!  Thanks for stopping by! :)

Supplies:
Stamps: Reverse Confetti Too Cute To Spook
Dies: Reverse Confetti Too Cute To Spook, Diagonal Stripe Pretty Panels
Paper: Ranger Distress Watercolor Paper, PTI White, PTI True Black, Lawn Fawn Let's Polka in the Dark 6x6 paper pad
Ink: Memento Tuxedo Black, Ranger Twisted Citron
Other: Copic Markers, Pretty Pink Posh Peridot Mist sequins, Foam Tape

Thursday, September 17, 2015

Watercolored Skies for Butterfly Reflections Ink

Hey there!  Today I am sharing a card over on the Butterfly Reflections Ink blog that I am super excited about!  Here is a little peek:


Like what you see?  Click here to be taken on over to the Butterfly Reflections Ink blog to see the finished card! :)

I also used the current Get Sketchy with Joni challenge sketch as inspiration for my card, so I am going to jump in on the challenge.  Here is the sketch:


Thanks so much for stopping by! :)

Tuesday, September 15, 2015

Sparkle and Shine Challenge #14 - Green

Hello there!!  It's time for another Sparkle and Shine Challenge!  This week, it's all about the color GREEN!


We are sponsored by our friends at Winnie and Walter!


I have a green halloween card to share with you today!  I started out by stamping stripes on a white card base using Papertrey Ink's Watercolor Wonder stamp set and Lawn Fawn Celery Stick ink.  Then I diecut the medium sized spider web using the Papertrey Ink Spider Web Trio die set.  I stamped, colored and fussy cut the adorable franken-ghost and the pumpkins from the Booyah and Happy Harvest stamp sets by Lawn Fawn, popped them up with foam tape onto my striped card base, and then added some stars and a sentiment from the Booyah stamp set, and finished things off with some Peridot Mist and Sparkling Clear sequins from Pretty Pink Posh.


Sparkle and Shine Challenge - Green

Be sure to check out the blog for lots more inspiration from the design team and for all of the challenge details!  I hope you'll join us! :)

Thanks so much for stopping by!

Supplies:
Stamps: Lawn Fawn Booyah, Happy Harvest
Dies: Papertrey Ink Spider Web trio
Paper: PTI White, True Black
Ink: Lawn Fawn Celery Stick, Juice Box, PTI Orange Zest, New Leaf, Memento Tuxedo Black
Other: Pretty Pink Posh Sparkling Clear and Peridot Mist sequins, Copic Markers

Personalized Halloween Tags {Lawn Fawn}

Hi there!  Today I am on the Lawnscaping blog with a fun set of Halloween tags using a bunch of goodies from the new release!  I  have a bunch of kiddos in my life that get special halloween treats, and I like to dress them up with handmade tags.  Here are a few that I created using the new Booyah stamp set!  I just love these little ghosts!  Keep reading to see how I made them, and for close up photos of each.

Halloween Tags


I started off by diecutting the largest star in the Puffy Star Stackables die set out of halloween colors of cardstock.  Then, using the second largest star in the set, I diecut both a black star and a white star...


Halloween Tags


I put the black star face down on the Snowy Backdrops die to cut the pattern into the black star, and then I glued the white star directly behind it to show off those cute tiny stars and circles!  I stamped, colored and fussy cut several little ghosts and accessories from the Booyah stamp set, and then stamped colored and fussy cut the largest pumpkins from the Happy Harvest stamp set - 2 for each tag.


Halloween Tags


Then, using Owen's ABCs and a banner die from my stash, I personalized each tag using black ink.  I punched a tiny hole in each of the large colored stars and threaded some Spooky Lawn trimmings through and tied a bow.  Then, I adhered the black and white star to the larger one with foam tape, along with the ghosts, pumpkins and banners, all with you guessed it, foam tape.  The ghosts are on two layers of tape so that they stand out above everything else.  I added some white gel pen accents and wink of stella glitter pen, too.


Halloween Tags

That's all for me today... I hope you are inspired to create some halloween tags of your own!  Thanks for stopping by! :)

Supplies:
Stamps: Lawn Fawn Booyah, Happy Harvest, Owen's ABCs
Dies: Lawn Fawn Snowy Backdrops, Puffy Star Stackables
Paper: PTI White, True Black, Orange Zest, Royal Velvet, Simply Chartruese
Other: Lawn  Fawn Spooky Lawn Trimmings, white gel pen, wink of stella clear glitter brush pen, foam tape

Sunday, September 13, 2015

Paper Smooches SPARKS Challenge - Picture Perfect

Hello there!  Today starts a new Paper Smooches SPARKS challenge, and this week, we have a fun inspiration photo for you!  I can't wait to see how you are inspired by this photo:


I was inspired by the rainbow color scheme and the blue in the top half of the background.  I am an 80s kids, and these blocks and color scheme remind me so much of my childhood.  I was slightly addicted to Rainbow Bright, and this rainbow image from the Spectrum stamp set immediately came to mind when I saw the inspiration photo.  To start my card, I watercolored a piece of Tim Holtz Distress watercolor paper to create a blue sky.  Then I stamped and colored my rainbow and die cut it with the coordinating Spectrum Icons dies.  I popped up my rainbow with foam tape, and behind it, added some clouds using the Cute Clouds dies.  I stamped a sentiment from the Luminous Spring stamp set, and then popped the panel up on a white card base using foam tape.


Sending Colorful Greetings

Be sure to check out what the other design team members have to share with you today!

Audrey Tokach - you are here!

Stop by the blog to check out all of the challenge details.  I hope you'll join us for a chance to win some Paper Smooches stamps! :)

Thanks for stopping by!

Supplies:
Stamps: Paper Smooches Spectrum, Luminous Spring
Dies: Spectrum Icons, Cute Clouds
Paper: PTI White, Tim Holtz Distress Watercolor Paper
Ink: Memento Tuxedo Black
Other: Artist's Loft Watercolor pan set (Michaels), Copic Markers, Foam Tape

Thursday, September 10, 2015

Friends Warm the Heart for Butterfly Reflections Ink

Hi there!  Today I am sharing a card on the Butterfly Reflections Ink blog using the stamps from the new Lawn Fawn Fall/Winter 2015 release!  Click the sneak peek below to head on over to the blog to see the finished card! :)


Thanks for stopping by!! :)

Tuesday, September 8, 2015

Sunny Studio Stamps Grand Opening Blog Hop!

Hello there!  Today I am joining a group of amazingly talented ladies to help introduce a new stamp company, Sunny Studio Stamps!


You should have come from Nina's blog... if you've gotten lost or want to start at the beginning, the full hop order is listed down below.

The very first release of Sunny Studio Stamps consists of 8 stamp sets and 6 die sets!  I am so excited to share projects made with my two favorite sets from the release, Bundled Up and Snow Kissed.  These two sets are filled with adorable penguins that you can dress up, and mix and match.  The possibilities are endless!

My first project uses the single penguin from the Bundled Up stamp set.  I just love dressing these little guys up!  I stamped, copic colored and fussy cut my pieces, but there are coordinating dies for these, and several other stamp sets.  I knew I wanted to use the fun pom-pom hat from the Bundled Up set, and I added some lines to the cuff of the hat to match the striped scarf.  After I colored him (or  her) with some of my favorite Copic shades, I popped this little penguin up on the ice patch from the Snow Kissed stamp set, using some foam tape.  The brightly colored patterned paper and rainbow starry background coordinate with the penguin's adorable attire.  The sentiment is also from the Bundled Up stamp set.


Sunny Studio Blog Hop

For my next project, I got a bit more ambitious.  I used the little skating penguin to create a domed ornament!  I started out by masking off a sky line of my ornament backer and used Tumbled Glass distress ink to add some color to what would be the sky in my scene.  Then I masked off the sky and used Peacock Feathers distress ink to create the water.  I stamped, colored, and fussy cut the ice patch, and skating penguin from the Snow Kissed stamp set, and his little coffee mug, from the Bundled Up stamp set.  I popped everything up on foam tape, and stamped a sentiment from Snow Kissed stamp set.  I added a google eye for some whimsy, and before I closed off the ornament, I added tiny little styrofoam snowballs that I found last year at the Dollar Tree.  These little snowballs cause quite a bit of static cling, but I don't mind. *wink*


Sunny Studio Blog Hop

It may be hard to see in the photos. but I added some Icicle Stickles to the ice patch to make it sparkle, and I stamped some tiny snowflakes from the stamp set in the sky using more Tumbled Glass distress ink.  The white gel pen accents really add to his outfit, don't you think? :)

Sunny Studio Blog Hop

I tied the ornament to a package, which is a fun way to dress up a gift with another little gift!  I love that when the ornament is laying flat, the sentiment gets hidden with snowballs.

Sunny Studio Blog Hop

That's it for me today... I hope you enjoyed my projects!  You'll want to keep reading so you don't miss any important snippets of information!!

  In case you've gotten lost and want to start at the beginning, here is the full hop order:

Audrey Tokach - **you are here!**

A few other tidbits...  Sunny Studio Stamps will be giving away stamps to THREE lucky winners! For your chance to win, to enter the rafflecopter giveaway on the Sunny Studio blog!  And so you don't miss a thing, follow Sunny Studio on social media:


Be sure to visit the store and check out the first release of Sunny Studio Stamps, AND for a limited time, all orders over $35 ship FREE (within the US) from now until September 13th!


The next stop on the hop is Teri Anderson!  You can bet that she's got some great things to share with you!!  Thanks so much for stopping by!!  

Supplies:

Card:

Stamps: Sunny Studio Stamps Bundled Up and Snow kissed
Dies: WPlus9 Sunshine Layers, Starry Background, Pretty Pink Posh Stitched Speech Bubbles
Paper: PTI White, Avery Elle Every Day Collection 6x6 paper pad
Ink: Memento Tuxedo Black
Other: Zig Clean Color Real Brush Markers, Copic Markers, Foam Tape

Ornament:

Stamps: Sunny Studio Stamps Snow Kissed, Bundled Up
Dies: PTI Scene-it Backer die
Paper: PTI White
Ink: Memento Tuxedo Black, Ranger Distress in Tumbled Glass and Peacock Feathers
Other: PTI Hawaiian Shores Satin Ribbon, Lawn Fawn Silver Sparkle twine, White Gel Pen, Sakura Stardust pen, Icicle Stickles, tiny styrofoam filling (Dollar Tree), Copic Markers, PTI Clear Dome, google eye, glossy accents


Monday, September 7, 2015

Lawnscaping Challenge #113 - Texture

Hey there!  It's time for another Lawnscpaing Challenge!  Challenge #113 is all about Texture!  We want you to add texture to your project in one way or another!


We are sponsored this week by the gang at Ellen Hutson!


For my card today, I started out by embossing a piece of white cardstock using a Tim Holtz embossing folder.  Then I inked it with an ink blending tool and Abandoned Coral, Walnut Stain and Aged Mahogany distress inks until I  got the color I was looking for.  I diecut a bunch of Stitched Leaves from fall colors of card stock and inked the edges with Walnut Stain ink to add a bit of dimension.  I adhered some to the embossed panel with a glue pen and others with foam tape.  Then I stamped, colored and fussy cut out the adorable acorn image from Into the Woods and popped him up with some foam tape as well.  I stamped a sentiment from the same stamp set on the banner from the Stitched Journaling Card die set, popped that up with foam tape and then adhered the panel to a kraft card base, which I also inked with Walnut Stain distress ink.  Finally, I added some Kraft Blend sequins from Avery Elle to finish off my card.


  1. I Heart Fall
Be sure to visit the blog to get all of the challenge details and to see what else the design team has to share with you!!

Thanks so much for stopping by! :)

Supplies:
Stamps: Lawn Fawn Into the Woods
Dies: Lawn Fawn Stitched Leaves, Stitched Journaling Card, Tim Holtz Brick Embossing Folder
Ink: Distress inks in Abandoned Coral, Walnut Stain and Aged Mahogany, Memento Tuxedo Black
Paper: PTI White, Kraft, Terracotta Tile, Scarlet Jewel, Dark Chocolate
Other: Copic Markers, Avery Elle Kraft Blend sequins, Foam Tape, Ink Blending Tool

Thursday, September 3, 2015

Happy Harvest for Butterfly Reflections Ink

Hello there!  Today, I am featuring a card on the Butterfly Reflections Ink blog using the new Lawn Fawn Happy Harvest stamp set and other new products from the Lawn Fawn fall/winter release!  Here is a little peek:

Happy Harvest

Be sure to visit the blog to see the entire card, and then go add that little scarecrow to your cart because everyone NEEDS him! :)

Thanks for stopping by!!  Have a great day!!

Wednesday, September 2, 2015

Simon Says Stamp STAMPtember Celebration!


Hello there!!  Incase you've missed all of the buzz, STAMPtember over at Simon Says Stamp is in full swing!  I'm here today to show you projects made with the new Stitched Oval dies that are newly available from Simon Says Stamp this month!  You can see the entire Stamptember release here!

For my first project, I used the largest oval die in the set to act as a focal point on my card.  These dies have a double stitched edge, so you get stitching on both sides of the diecut.  So fun!  I created this little rustic country home card using the Simon Says Stamp Make and Home stamp set and Home Building dies.    I did not realize until after I'd finished my project that this stamp set is sold out on the SSS website.  *sad face*  But you can see that the largest oval is a great size for taking center stage on the front of an A2 card!

Simon Says Stamp Stamptember!

My second project uses the Stitched Ovals in a different way.  I am all about 3D projects, and when I saw the second largest oval in the set,  I knew I wanted to create a paper pumpkin plant pick (say that three times fast! *wink*)  I plan to pair this with a fall mum as a gift for someone.  I diecut three of the second largest ovals, inked the edges with Walnut Stain distress ink, and the adhered them together.  The side ovals are adhered with a glue pen, and the center oval is popped up with foam tape.  I hand cut a stem, diecut some cute leaves using the Lawn Fawn Stitched Leaves die set and added some twine and spanish moss for some extra interest.  The sentiment is from the Simon Says Stamp Hand Lettered Winter Wishes stamp set.  I can see creating these in a bunch of different sizes for lots of other fall projects... pumpkin garland, place cards, gift tags... so many possibilities!

Simon Says Stamp Stamptember!

I hope you enjoyed my projects today!  There is lots going on over at the SSS blog, too.  Make sure you stop by and join in the party!!

Thanks so much for stopping by!! :)

Tuesday, September 1, 2015

Butterfly Reflections Ink Design Team Announcement!


Ok, so you all know how much I love Butterfly Reflections Ink, right?  And you probably have heard me say once or twice or ten times (or more!) how pleased I am with their shipping times and customer service...  I was thrilled to have to opportunity to be a guest designer for Venessa earlier this summer, and when she posted the design team call, I knew I wanted to apply.  Well, I am thrilled to share that I, along with several other wonderful ladies,  have been asked to join the Butterfly Reflections family, and I couldn't be more excited!  If you haven't checked out the shop, please do!  And follow the blog too, so you won't miss any of the inspiration the team has to share with you!  I'll be sharing my first project as an official DT member in the next few days!!  Be sure to stop back by for a visit! :)

Have a great day!!

Sparkle and Shine Challenge #13 - Tags

Hello there!  It's time for another Sparkle and Shine Challenge and the theme for this challenge is Tags!  Make one.  Make a set.  Any occasion! :)


We are sponsored this week by Pretty Pink Posh!


Awhile back I shared a picture on instagram of a few pieces of watercolor that I did using Distress inks.  I wasn't sure what I wanted to do with them when I painted them, but decided to make a set of tags once I saw the theme for this challenge!  I started off with two pieces of watercolor paper, one for the pink pattern, and one for the blue pattern.  The process for both was the same, I just used different ink colors.  I started off by taping my paper to a board and wetting it pretty well with clean water.  I tapped my distress inks onto an acrylic block and added some water to them.  With a wet paint brush, I took the color to the wet paper, dabbing color in a random pattern.  Because both the paper and ink was very wet, the colors were more muted.  I dried that layer with a heat tool.  Then, without rewetting the paper, I picked up more ink with very little water, and dabbed more saturated color onto the dry paper, then I dried that layer with my heat tool.  I used the Papertrey Ink Tag Sale 10 die to diecut my tags, and then diecut some Paper Smooches butterflies from white cardstock.  I adhered on the center of the butterfly to the scalloped frame, also from the Tag Sale 10 die set, and folded the wings up.  A scattering of Pretty Pink Posh Sparkling Clear sequins and some Lawn Fawn Silver Sparkle Lawn Trimmings finished them up.


Sparkle and Shine Tag Challenge

Be sure to check out the blog to see what else the design team has to share with you, and to get all of the challenge details!  We hope you'll play along! :)

Thanks for stopping by!!

Supplies:
Dies: Papertrey Ink Tag Sale 10, Paper Smooches Butterfly Duet
Paper: Masters Touch Watercolor Paper (Hobby Lobby), PTI White
Ink: Ranger Distress Inks in Abandoned Coral, Picked Raspberry, Spiced Marmalade, Twisted Citron, Mowed Lawn and Mermaid Lagoon
Other: Pretty Pink Posh Sparkling Clear 4mm, 6mm, and 8mm sequins, Lawn Fawn Silver  Sparkle Lawn Trimmings
BLOG TEMPLATE BY DESIGNER BLOGS