Saturday, August 26, 2017

Reverse Confetti August SFYTT


Hello there! Today, I have a card to share with you for the Reverse Confetti August SFYTT!  Here is this month's sketch:


And here is my card!

I started off with a Premier Polar White A2 card base.  Then I used the All Framed Up Confetti Cuts die to cut some white frames from the focal point of my card.  In the center of the frame, I put a piece of patterned paper from the True Love paper pad.  I stamped one of the cute little pandas from Miso Happy, and diecut him with the coordinating Miso Happy Confetti Cuts.  I diecut a heart from the All Heart Cover Panel from white cardstock and then colored it with a Copic markers to match the panda's cheeks.  The sentiment is stamped in black ink and it's from the gorgeous Sentiment Essentials stamp set and then diecut with the Sentiment Essentials Confetti Cuts.  Everything is popped up on card base with foam tape, and to finish things off, I added a trio of black sequins in the top left corner to follow the sketch.

August SFYTT

This sketch is such a good one!  There are so many fun possibilities with this one! :)

August SFYTT

Be sure to visit the Reverse Confetti blog for more inspiration from the design team.  I hope you will join us for your chance to win a Reverse Confetti gift certificate! :)

Thanks for stopping by!!


Wednesday, August 23, 2017

Lawn Fawn Inspiration Week: Halloween Treat Box and Cute Cobweb

Hello there!  Today, I have a fun project to share with you!  With the new Haunted House Add-On dies from Lawn Fawn, you can transform the Scalloped Treat Box into an adorable little haunted house!  This die set is full of little pieces! Doors, windows, a spooky tree, cat, ghost... the possibilities are endless!

 I cut the Scalloped Treat Box from Storm Cloud cardstock, then cut the roof, doors, windows and tree from Black Licorice cardstock.  I added a tiny pumpkin from Happy Harvest, and used the Stitched Journaling Card die set for the tiny starts.  There is a ghost in the set, but I used one from the Booyah stamp set as he is a tiny bit bigger.  The sentiment is stamped on a star from the Tiny  Tags die set, and the sentiment is from the new How You Bean: Candy Corn Add-On.  It is attached with a bow made of Spooky Lawn Trimmings.

Halloween Treat Box Front

The back and sides of the house each have a window, and I've added the adorable little Cute Cobweb, along with more tiny stars.

Halloween Treat Box Back

Be sure to visit the Lawn Fawn blog to see lots more inspiration from the design team!  All of the new release goodies will be available tomorrow, August 24th!

Thanks for stopping by! :)


Saturday, August 19, 2017

Lawn Fawn Inspiration Week: Candy Corn and Pumpkin Spice


Hello there!  Welcome back to another day of Lawn Fawn inspiration week!  Today, I have two cards to share with you as we highlight the adorable Pumpkin Spice and How You Bean: Candy Corn Add On stamp sets!  Both, along with the rest of the fall/winter 2017 release will be available on August 24th!  Let's get started, shall we?

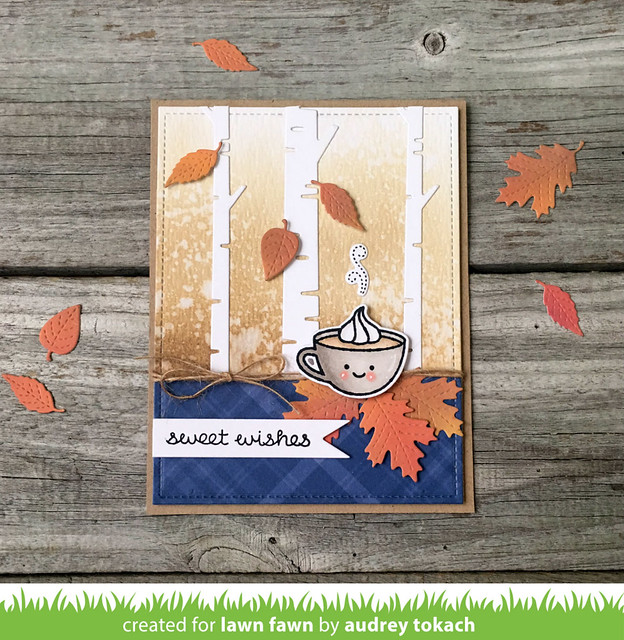
For my first card, I started off by ink blending a piece of watercolor paper with some brown Distress Oxide inks.  I splattered some water to lift some of the color, and when it was dry, I diecut it with the Outside In Stitched Rectangles dies.  I added a strip of patterned paper from the new Perfectly Plaid Chill paper collection to ground my image.  To set the fall forest scene, I used the new Birch Trees dies (LOVE THESE!) and diecut three trees.  Then I diecut a pile of tiny leaves using the Stitched Leaves dies, then inked them with a variety of fall colored Distess Oxide inks.  I added a few to the trees, and a few to the right side of the panel on top of my patterned paper.  On top of them is the adorable little Pumpkin Spice mug.  I think I will be using this set a TON!  While I am not too keen on Pumpkin Spice anything, this cute little mug can be filled with coffee or hot chocolate too, and whipped cream of course!  I think it's perfect for so many occasions!  I added a jute twine bow, and stamped a sentiment from the Milk and Cookies stamp set on a hand cut banner.  I added a little coffee steam from the Love You a Latte stamp set.  I think the sentiments in that set would work perfectly with Pumpkin Spice too!  Finally, I added some white gel pen accents and mounted that panel on a kraft card base.

Pumpkin Spice

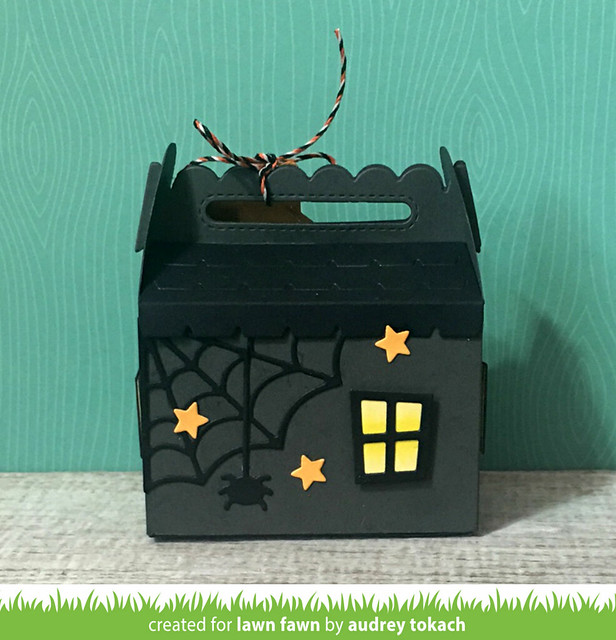
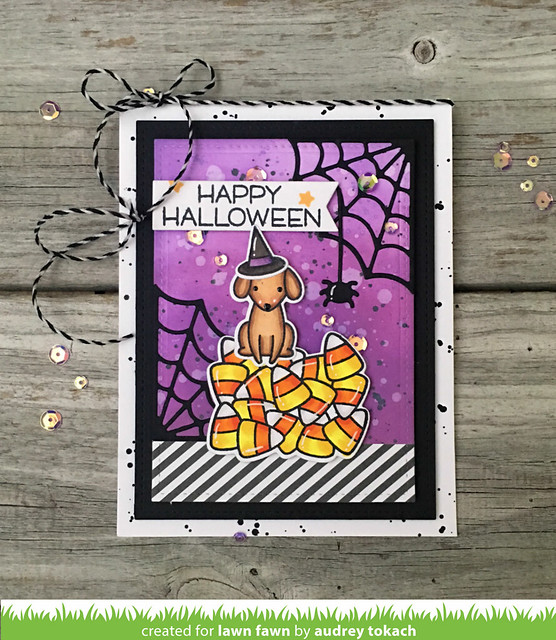
My second card today features the new How You Bean: Candy Corn Add On stamp set, as well as the new Cute Cobweb dies (another favorite!).  I started off by diecutting a piece of white cardstock with the Small Stitched Rectangles Stackables, then inked it with Wilted Violet and Seedless Preserves Distress Oxide inks.  I splattered it with water to bleach out some areas, and added a spattering of Black Soot Distress Oxide ink mixed with a little water.  When it was dry, I added a strip of striped patterned paper from the Let's Polka in the Dark patterned paper pad.  Then, I used the Cute Cobweb die to cut two spider webs and that cute little spider.  I stamped and colored the candy corn, and diecut it with the coordinating dies.  On top of the candy pile, I added a cute puppy from the previously released Happy Howloween stamp set. I adhered them with foam tape, then stamped a sentiment from the Booyah stamp set onto a hand cut banner.  I matted the panel with another Stitched Rectangle Stackable cut from back cardstock.  Before mounting that panel to the white card base, I added a splattering of black paint to the card base for some added fun.  Finally I added some white gel pen accents, a scattering of sequins and a bow using some Black Tie twine.

Candy Corn Add On

That's all for me today!  Stop by the Lawn Fawn blog to see more.  Be sure to come back tomorrow for more projects! :)

Thanks so much for stopping by!! :)

Friday, August 18, 2017

Lawn Fawn Inspiration Week: Shadow Box Card


Hello there!  Lawn Fawn Inspiration week is in full swing and today, we are showcasing the super fun, and super versatile Shadow Box Card die!  This die works with all of your Lawn Fawn favorites, old and new, to create adorable 3D shadowboxes to send in the mail!  It, along with the rest of the Fall/Winter 2017 release will be available for purchase on August 24th!

To create my shadowbox card, I started off by diecutting all of the main pieces from kraft cardstock.  For the sky, I added a bit of the new Perfectly Plaid Chill paper.  I assembled by box, which is super easy by the way.  Then, to create my scene, I stamped and diecut images from the Life is Good stamp set, along with the sun image from Hello Sunshine.  My greeting is stamped on a Bannertastic banner.  Once everything was stamped and diecut, I added the pieces to the inside of the shadow box.  I find it's easiest to assemble the box, and then decorate it.  Just be sure to decorate your sky before closing up the box.  Everything else can go in once it's together.

Shadowbox Card

The rest of the design team has samples to show you too!  Be sure to visit the Lawn Fawn blog to see them all!  They are all so amazing!

Be sure to come back tomorrow as I have another project to share with you!  Thanks so much for stopping by! :)

Saturday, August 12, 2017

Reverse Confetti SALE!


Hello there!  I'm here to tell you that Reverse Confetti is having a SALE!  It's Jen's birthday, but she's giving out the presents!  Now through August 13th, at 11:59 CST, receive 20% off of your ENTIRE order using the code JEN20!  How awesome is that?!  Time to stock up on all of your Reverse Confetti favorites! :)


I also have a birthday card to share with you!  To create my card, I started off by watercoloring a piece of watercolor paper with my Artist Loft watercolor palette from Michaels.  I used a wide brush to paint stripes of color on dry watercolor paper, slightly overlapping the colors.  I built up the color to get to the desired vibrancy.  When it was dry, I trimmed the panel to 4" x 5.25".  For my focal point, I stamped the cake and cake stand from the Candles 'n Confetti stamp set, then diecut them with the coordinating Candles 'n Confetti Confetti Cuts dies.  I glued the plate down with a glue pen, then popped the cake up with foam tape.  Around the cake, I added white diecut stars using the Seeing Stars Confetti Cuts dies, cut from Premier Polar White cardstock.  For my sentiment, I diecut a banner using the banner die from the Greetings Frame Confetti Cuts die set, and stamped a sentiment from the Celebrations stamp set in black ink.  I popped that up below the cake stand with foam tape, then mounted the panel up on a white card base with more foam tape.

Birthday Wishes

I added some rainbow colored jewels to the right border of the panel for some added fun.  Each jewel is the same color as the watercolor stripe below it.  This small little touch adds just enough that it doesn't take away from the main focal point of the card.

Birthday Wishes

Thanks so much for stopping by!  Be sure to check out the Reverse Confetti blog to see who else have projects to share with you today! :)


Tuesday, August 8, 2017

Reverse Confetti August Blog Hop


Hello hello!  Today, the Reverse Confetti team is hosting our  monthly blog hop, and this month's theme is Color Me Mine!  We are showing off all of Reverse Confetti's amazing ink and cardstock colors!

For my card today, I am using Magenta, Bumblebee Yellow and Island Blue.  I started off by ink blending Magenta, Bumblebee Yellow and Island Blue inks over the Lotsa Dots Stencil to create a polkadot background.  By allowing these colors to overlap in certain areas, it creates a bunch of new beautiful colors!  So fun!  I added a strip of patterned paper from the Under the Umbrella patterned paper pad to the bottom, then used Premier Polar White cardstock to cut some garland using the Circle Garland Confetti Cuts.  For my focal point, I stamped and diecut an adorable mouse from the Mouse Mail stamp set, and then colored him some balloons from the Monkey Business stamp set.  I perched him on top of a giant presents, using images from the Boxes 'n Balloons stamp set.  The box was stamped in Island Blue ink, and the bow was stamped in Magenta ink, and then they were diecut using the coordinating Boxes 'n Balloons Confetti Cuts dies.  I popped them up on the panel using foam tape, added some accents with a white gel pen, and a scattering of sequins to finish things off, before mounting the panel to a Bumblebee Yellow cardstock base.

Just For You

I just love all of the extra colors that are creating by overlapping these three primary colors!  Shades of orange, green, teal and purple peeking through make it so much fun, especially on a birthday card! :)

Just For You

Be sure to hop along with the rest of the team to see what amazing color schemes they have to share with  you! :)


Tricia Barber

Heather Pulvirenti

Lisa Henke

Amy Rohl

Heather Hoffman

Amy Tsuruta

Kathy Schweinfurth

Audrey Tokach - **you are here**

Deanne Kuntz

Jeanne Jachna

Laurie Schmidlin

Susan Liles

And, ‘Fetti Friend…

Therese Calvird


Thanks so much for stopping by! :)


BLOG TEMPLATE BY DESIGNER BLOGS