Friday, April 20, 2018

Live Live In Color {Reverse Confetti}


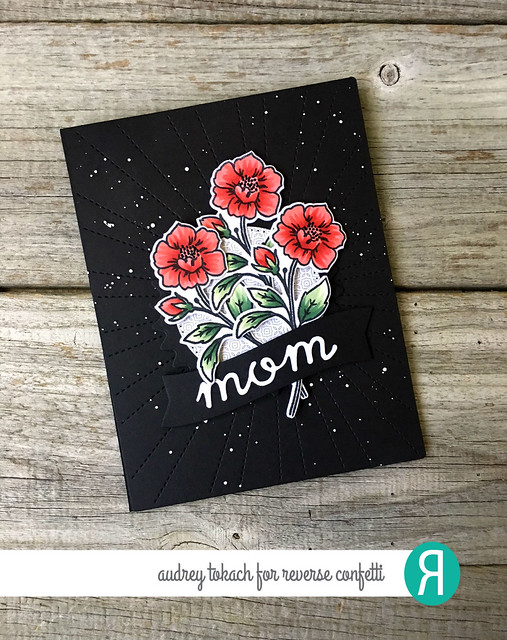
Hello there!  I have a fun and happy card to share with you using a bunch of products from Reverse Confetti!

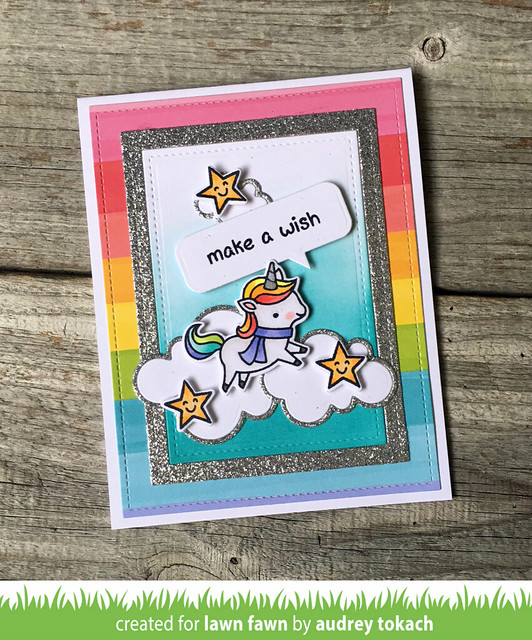
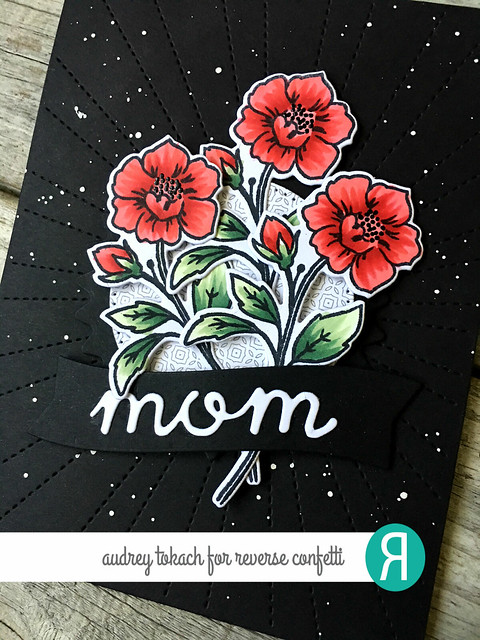
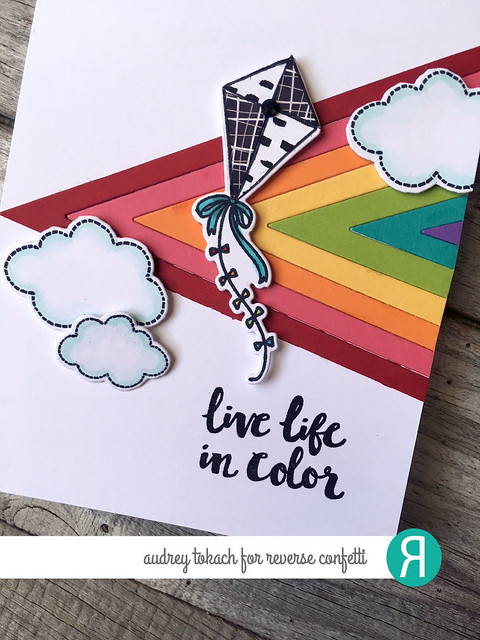
To create my card, I started off with a Cloud White card base.  I used the Tall Triangles Confetti Cuts to add a bold focal point.  I cut triangles from Salsa, Rose, Tangerine, Buttercup, Lime, Aqua and Royal Purple cardstock and glued them down with a glue pen.  Then I stamped the kit and clouds from the Take Flight stamp set and diecut them with the coordinating Take Flight Confetti Cuts dies.  I colored the clouds in with copic markers, and paper pieced the kite with patterned papers from the Cheerful & Kind and Every Little Bit paper pads.  I then popped everything up with foam tape, and stamped a sentiment from the Work of Art stamp set in Midnight ink.

Live Life in Color

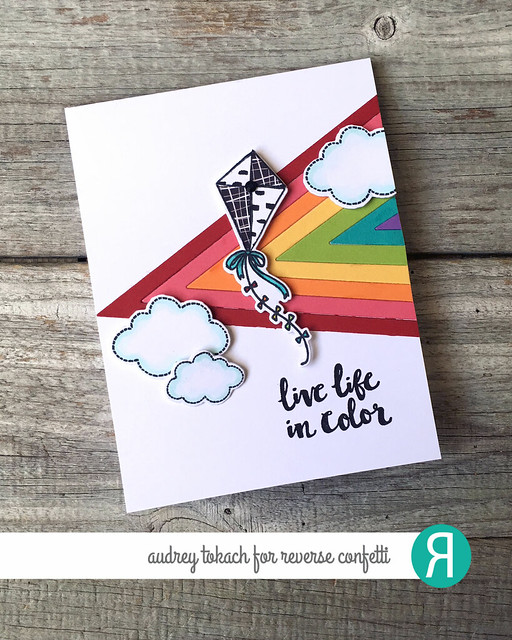
I just love the black and white patterns against the bright pop of colors from the rainbow.  There is just something magical that happens when all of those colors come together :)

Live Life in Color

That's all for me today!  Thanks so much for stopping by! :)


Thursday, April 19, 2018

You're So Berry Sweet {Reverse Confetti}


Hello there!  Today, I have a card to share with you for the newest Color Throwdown Challenge #489 - Red, Green and White, and I am using Reverse Confetti goodies! :)


To create my card, I started off with a Cloud White card base.  On top of that, I added a piece of green polka dot paper from the Fun Times paper pad.  I diecut a piece of Lime cardstock with the Big Stripes Cover Panel Confetti Cuts and glued that on top.  then I ran the die through my machine again with a piece of Cloud White cardstock so that I could have a white circle for the center.  I stamped and colored the outline strawberry from the Berry Sweet stamp set onto a piece of patterned paper from the Under the Umbrella paper pad, then shaded it with copic markers, and diecut it with the coordinating Berry Sweet Confetti Cuts dies.  I stamped the strawberry stem using Lime ink for the center and Olive ink around the edges.  Three tiny flowers from the set were stamped in Salsa ink, and their leaves with Lime and Olive inks.  I stamped a sentiment from the Berry Sweet set onto the white circle with Midnight ink.

You're So Berry Sweet

See, who says that red, green and white can only be used for Christmas?!  :)

You're So Berry Sweet

That's all for me today!  Thanks so much for stopping by!! :)


Wednesday, April 18, 2018

Lawn Fawn Inspiration Week: Speech Bubbles


Hello there! Today, I am back with one last project for Lawn Fawn Inspiration Week! Today, my project features the new Speech Bubbles dies!

To create my card, I started off with a white A2 card base.  Then I used the largest die from the Outside In Stitched Rectangles die set to cut a piece of Really Rainbow patterned paper.  I used a die from the Small Stitched Rectangles Stackables and one from the Large Stitched Rectangles Stackables die sets, taped them together, and cut a piece of silver glitter paper to create a frame.  Then I cut the next smaller sized rectangle from white cardstock to fit inside the frame.  I inked it up with Peacock Feathers Distress Oxide ink, getting lighter as I worked my way up the panel.   Then I stamped and colored the cute little unicorn from the Winter Unicorn stamp set, and diecut her with the coordinating Winter Unicorn dies.  I perched her up on some cloud diecuts, and added a silver lining with the Simple Puffy Clouds Frames.  I stamped a sentiment from the Critters Ever After stamp set onto a Speech Bubbles diecut, and added a scattering of stars from the same set to finish off my card.


Make a Wish

That's all for me today, but be sure to visit the Lawn Fawn blog for lots more inspiration from the design team!

Thanks so much for stopping by! :)

Tuesday, April 17, 2018

Lawn Fawn Inspiration Week: Happy Happy Happy Add On: Family


Hello there!  Welcome to another day of Lawn Fawn Inspiration Week!  Today, I have a card to share with you using the new Happy Happy Happy Add On: Family stamp set!

To create my card, I started off by using the largest die from the Large Stitched Rectangles Stackables die set to add a stitched edge to a piece of watercolor paper.  I ink blended a background using Peacock Feathers and Evergreen Bough Distress Oxide inks, then splattered it with clean clear water to add some bleached out areas.  I stamped and colored images from the Toadally Awesome stamp set, and diecut them with the coordinating Toadally Awesome dies.  I glued some pieces down flat with a glue pen, and popped others up with foam tape, then stamped a sentiment from the Happy Happy Happy Add On: Family stamp set underneath my scene.  To finish things off, I added some white gel pen accents and googly eyes to the daddy frog.

Happy You're My Dad


That's all for me today, but be sure to visit the Lawn Fawn blog for lots more inspiration from the design team!

Thanks so much for stopping by! :)

Monday, April 16, 2018

Lawn Fawn Inspiration Week: Really Rainbow & Happy Birthday Line Border


Hello there!  I am back again to share another card for Lawn Fawn Inspiration Week!  Today, I am showcasing the Really Rainbow paper collection and the Happy Birthday Line Border.

To create my card, I started off with a white A2 card base.  I used the largest die from the Outside In Stitched Rectangles die set to cut a panel which I then ink blended with Squeezed Lemonade Distress Oxide ink.  I added a  strip of Really Rainbow patterned paper to the bottom of that panel, but before doing so, I diecut it with the Happy Birthday Line Border die.  I also cut that die from black cardstock.  By cutting the rainbow paper with the die, it allowed for the black diecut to fit right in.  Inlaid diecutting. :)  I stamped two sets of balloons from the Bicycle Built for You stamp set, and colored them with copic markers to coordinate with the striped paper.  I stamped and colored two little birds from the Party Animal stamp set as well.  I popped the balloons and birds up with foam tape, and added some yellow iridescent sequins to look like confetti falling from the sky.

Happy Birthday Border_Really Rainbow

That's all for me today, but be sure to check out the Lawn Fawn blog for lots more inspiration from the design team!

Thanks for stopping by! :)

Sunday, April 15, 2018

Lawn Fawn Inspiration Week: Outside In Stitched Star Stackables & Stitched Star Frames


Hello there!  I have a card to share with you for Lawn Fawn Inspiration Week!  Today, the team is showcasing the Outside In Stitched Star Stackables and the Stitched Star Frames!

They pair together perfectly to create shakers, and that's what I did for my card today!  I started off with an A2 white card base.  Then I used the Stripey Backdrop die cut from white cardstock to create a tone on tone background.  I diecut the medium sized star from the Outside In Stitched Star Stackables from white card stock, and again from a piece of clear acetate for my shaker backer and window. Then, I used the medium sized star from the Stitched Star Frames dies, cut from gold glitter paper to create the outside frame for my shaker.  I glued the frame to the acetate, then added foam tape behind the frame.  I filled the shaker with gold sequins and backed it with the white diecut.  I used some Really Rainbow paper and the Shooting Star dies to add a trio of tails to my star shaker. Then I stamped a sentiment from the Lucky Stars stamp set onto a Everyday Sentiment Banner diecut.  I popped the sentiment banner up using foam tape, and added a scattering of gold sequins to finish off my card.

Stitched Star Frames

That's all for me today, but be sure to check out the Lawn Fawn blog for lots more inspiration from the design team!

Thanks for stopping by!! :)

Sunday, April 8, 2018

Reverse Confetti April Blog Hop


Hello there!  It's the 8th of the month, and that means it's blog hop day at Reverse Confetti!  This month, our theme is Moms, Dads and Grads!

To create my card, I started off with a Midnight A2 card base.  I used the Stitched Rays Cover Panel Confetti Cuts die to add a stitched detail to another piece of Midnight cardstock.  This die is one of my favorites from Reverse Confetti and I could seriously use it on every project!  I adhered that to the A2 card base, added some splatters with watered down white acrylic paint.  To anchor my focal point, I used the Flowers For Mom Confetti Cuts die set.  The pinked edge circle was cut from Midnight cardstock, and the dotted circle was cut from some Free Spirit patterned paper.  I stamped and colored a trio of flowers from the Tall Blooms stamp set, diecut them with the coordinating Tall Blooms Confetti Cuts dies, and arranged them with foam tape in the center of the circle, which I also popped up with foam tape.

April Blog Hop

The sentiment for the card was created using the Flowers For Mom Confetti Cuts die set as well.  The banner was cut from Midnight cardstock, and "mom", which is also included in the die set was cut from Premier Polar White cardstock.  I also added some black gel pen accents to the centers of each flower for a little bit of extra dimension and some shine.

April Blog Hop

Be sure to visit the rest of the gang for lots more inspiration using the new release!!  The fun starts at the Reverse Confetti Blog!


BLOG TEMPLATE BY DESIGNER BLOGS