Hello there! Today I have a fun post for you! We are in the middle of the Papertrey Ink 9th Anniversary celebration, and today the Moments Inked team gets to show off the newest additions to the Moments Inked product line! I have two different ideas to share with you today. Get your favorite cuppa something and I hope you enjoy!
First, I want to share my favorite thing from the MI release... I have been wishing for a planner icon stamp set for a long while, and Moments Inked: Everyday Icons is finally here! The set is full of adorable little images and several words that you can use alone in your planner or in combination with the icon images.
Instead of using them in the calendar pages of my planner, I chose to dress up the new Moments Inked: Perpetual Daily Pages. If you loved the daily pages from the 2015 planner, but didn't love the extra bulk they added to your planner, now you can have the best of both worlds. They are available in both spiral and binder format. The pages are the same dimensions at the Moments Inked planner, so if you choose the spiral version, all of the spiral planner covers will fit perfectly. Alternatively, if you choose the binder version, you can easily incorporate them into your binder system however you may choose. I think it would be a great idea to have them in a binder separate from your planner, that you can use as a scrapbook when you are done with the year. The binders would look lovely lined up on a book shelf year after year, don't you think?
The perpetual pages are printed in black and white, so that they coordinate with any of the monthly color schemes in the planner. You now have the ability add the date yourself with all of the months and days listed along the top of the page. I used the smallest outline circle in the Polka Dot Basics stamp set to circle my date. I used the new Moments Inked: Everyday Icons stamp set to add fun little icons next to my most important tasks for the day. There is another new stamp set, Moments Inked: Posted II (which works with the 3x6 white post-it notes that were introduced in December). It includes several larger titles for your lists. I used the "Don't Forget" stamp in the set for the title box at the box of the page.
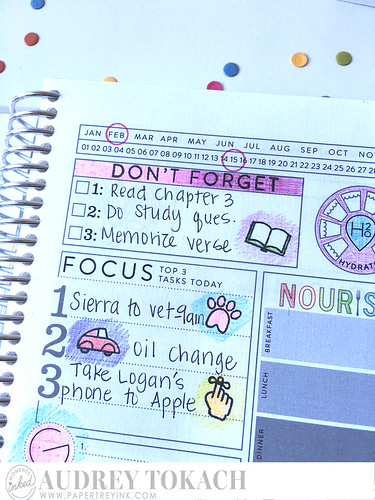
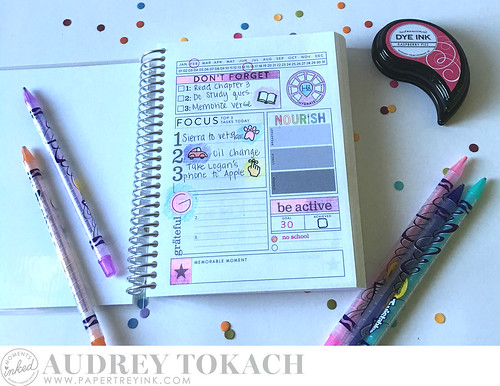
The new pages still include many of the great things that were included last year, like the top 3 tasks for the day, the activity and water trackers, memorable moments box, and a place for you to say what you are thankful for, and a meal tracker. Another new feature that I love is a perforated corner on each page. It's a bit hard to see in my photos, but tearing off the corner of each page as you finish with it will allow you to easily flip to current-day.
Since the pages are black and white, I wanted to add a bit of color. I chose to use colored pencils so there was no bleed through to the next page. In case you don't already own colored pencils, I wanted you to see that you don't need to make a huge investment if you'd like to use colored pencils in your planner. I bought a set of Crayola Twistables colored pencils for less than $5. I love using these, because as you color, the beautiful linen texture of the pages really stands out!
First, I want to share my favorite thing from the MI release... I have been wishing for a planner icon stamp set for a long while, and Moments Inked: Everyday Icons is finally here! The set is full of adorable little images and several words that you can use alone in your planner or in combination with the icon images.
Instead of using them in the calendar pages of my planner, I chose to dress up the new Moments Inked: Perpetual Daily Pages. If you loved the daily pages from the 2015 planner, but didn't love the extra bulk they added to your planner, now you can have the best of both worlds. They are available in both spiral and binder format. The pages are the same dimensions at the Moments Inked planner, so if you choose the spiral version, all of the spiral planner covers will fit perfectly. Alternatively, if you choose the binder version, you can easily incorporate them into your binder system however you may choose. I think it would be a great idea to have them in a binder separate from your planner, that you can use as a scrapbook when you are done with the year. The binders would look lovely lined up on a book shelf year after year, don't you think?
The perpetual pages are printed in black and white, so that they coordinate with any of the monthly color schemes in the planner. You now have the ability add the date yourself with all of the months and days listed along the top of the page. I used the smallest outline circle in the Polka Dot Basics stamp set to circle my date. I used the new Moments Inked: Everyday Icons stamp set to add fun little icons next to my most important tasks for the day. There is another new stamp set, Moments Inked: Posted II (which works with the 3x6 white post-it notes that were introduced in December). It includes several larger titles for your lists. I used the "Don't Forget" stamp in the set for the title box at the box of the page.

The new pages still include many of the great things that were included last year, like the top 3 tasks for the day, the activity and water trackers, memorable moments box, and a place for you to say what you are thankful for, and a meal tracker. Another new feature that I love is a perforated corner on each page. It's a bit hard to see in my photos, but tearing off the corner of each page as you finish with it will allow you to easily flip to current-day.
Since the pages are black and white, I wanted to add a bit of color. I chose to use colored pencils so there was no bleed through to the next page. In case you don't already own colored pencils, I wanted you to see that you don't need to make a huge investment if you'd like to use colored pencils in your planner. I bought a set of Crayola Twistables colored pencils for less than $5. I love using these, because as you color, the beautiful linen texture of the pages really stands out!
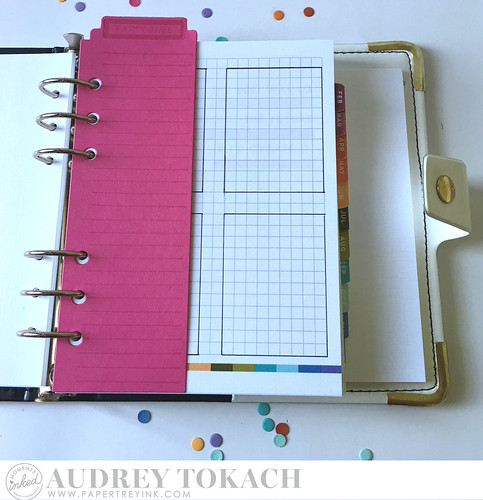
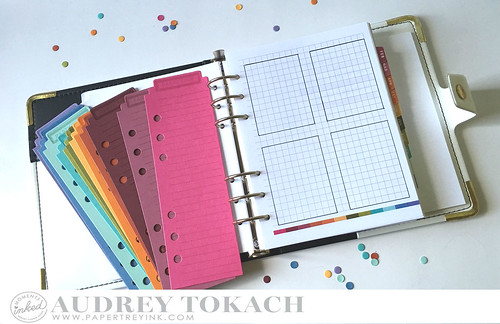
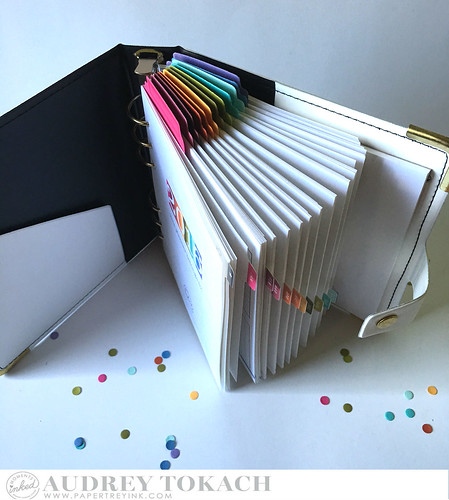
One of my goals this year is to keep better track of important dates and the cards that I need to make and send each month. I started out by diecutting the new Moments Inked: Binder Listed die out of cardstock that coordinates with each monthly tab in my planner. I used the Moments Inked: Listed Stamp set and matching ink to add a "Party Time" title box and lines to each diecut. I plan to write birthdays, anniversaries, and other occasions where I might need to send a card on my list, and put a list at the beginning of each month. Don't they look so pretty all lined up?! And can we talk about the fact that diecutting binder pages leaves you with a pile of bright, beautiful confetti! I will be saving all of my hole punches... you never know when you might need confetti! :)
Also available this month are lined pages and grid pages, each sold separately. I would really like to get in the habit of sketching out card ideas so that when it comes time to make them, I am ready to go. I used a black pen and a ruler to draw rectangles on my grid paper. One sheet gives me room to sketch out four card designs! I have added a grid sheet to each month, just behind my list for that month.
Rainbow lists... grid paper for sketching... free confetti out of the deal... *happy sigh!*
And as you can see, adding a list to each month is not only functional by PRETTY! I just love seeing a rainbow of tabs in my planner. It makes me excited to use my planner and even more excited to stay organized!
That's all for me today! Be sure to visit Nichole's blog to see all of the new products, join in the daily contests and challenges, and get tons of inspiration from the Papertrey Team as we celebrate PTI's 9th anniversary!
Thanks so much for stopping by! :)

6 comments:
I really like the idea of pre sketching the card outlines on the graph paper! I too make the colorful birthday lists for each month, as you have here!
I have birthdays listed in the front of my calendar - but also having them on a tab within the month would be so handy in making sure I'm getting cards made in a timely fashion. Great idea, Audrey!
I don't use a planner, but you make me want to. Love how colorful and organized your planner is, Audrey.
oh my goodness, i love your rainbow tabs! yes, they look very pretty indeed and what a great idea.
The tabs you've created are so cheerful! And when you have all the birthdays written in for the year you can transfer all the tabs to next year's planner...
what kind of pens are shown in the picture
Post a Comment