Sunday, August 30, 2015

Paper Smooches SPARKS - Anything Goes!


Hello there!  There are five weeks in August, and that means an extra Anything Goes challenge over at the Paper Smooches SPARKS blog! :)

For my card today, I pulled out an older stamp set that I haven't used yet - Southwestern Charm!  My oldest son just got a baby iguana, and as soon as he got Echo, I knew I had to get this stamp set and make Logan a card.  This set is so fun to create scenes with, and I cant't wait to play with it some more.  I created a little desert scene and added some Cute Clouds to the sky, which I inked with distress ink.  I stamped, Copic colored, and fussy cut all of the images, popped some up with foam tape, and then to finish things off, added some white gel pen accents to make things pop a little more.  Hope you like it!

Hola

Check out what these wonderful ladies have to share with you too!  

We hope you'll play along for a chance to win some Paper Smooches! :)  Thanks for stopping by!

Sunday, August 23, 2015

Paper Smooches SPARKS Designer Drafts Challenge


Hello there!  It's time for another Paper Smooches SPARKS Challenge! It's Designer Drafts week and here is our sketch:


For my card, I started off with a piece of watercolor paper.  I scribbled a line of rainbow colors along the top right edge of the paper, using Zig Clean Color Real Brush markers.  I added some water to the scribbles and then stood the paper upright allowing the colors to run.  Then I let it air dry.  When it was completely dry, I cut the panel about 1/2" in from the edge to make room for my sentiment.  I stamped a sentiment from the World Salad stamp set and then popped the watercolor pieces up with foam tape on either side of it.  I added a paint tube and paint brush from the I Heart Art stamp set to the right side of the sentiment, and added some glossy accents for some interest.


You Color My World

Be sure to visit the blog for all of the challenge details, and check out what these amazing ladies have to share with you! :)

Audrey Tokach - you are here!
That's all for now!  Thanks for stopping by!!

Wednesday, August 19, 2015

Star Light, Star Bright {Wplus9}


Hello there!  I just got some Wplus9 happy mail from Butterfly Reflections Ink and had to dig into my new goodies right away!  With each new release, my Wplus9 collection grows and grows, and I just love it!  This month was no exception!  On this card, I combined several new products.  I started off by diecutting a piece of watercolor paper with the scalloped frame from the Sunshine Layers die set, then, using the new Starry Background die, I added some stars to my panel.  I love this die!  Not only does it diecut tiny stars, but it also embosses tiny stars.  It's so much fun! I watercolored my starry panel with my Zig Clean Color Real Brush Markers.  I wanted my stars to be yellow, so I cut another piece of watercolor paper with the smaller rectangle die from the Sunshine Layers die, and watercolored that with a few shades of yellow zig markers, and adhered that behind my starry panel.  I stamped and colored one of the adorable little bunnies from the new Wishing You stamp set, and perched him up on a hill, looking up into the sky.  I stamped and fussy but several clouds from the new Going Places stamp set, and arranged them in the starry sky, along with the moon from Wishing You.  The "star light, star bright" sentiment is also from that stamp set.  I then stamped a longer sentiment from the new Wishing You sentiments on the hill next to the bunny and popped the hill up with foam tape.  To finish things off, I added some shooting star trails from Wishing You to a few stars, and traced them with a Sakura Stardust Jellyroll pen, and I also coated the moon.  Then I popped the entire panel up on a white card base with foam tape.

Star Light Star Bright

Here you can see the stardust pen glitter :)


Star Light Star Bright

That's all for now... thanks for stopping by!! :)

Supplies:
Stamps: Wplus9 Wishing You, Wishing You Sentiments, Going Places
Dies: Wplus9 Sunshine Layers, Starry Background, Mama Elephant Landscape Trio 
Paper: PTI White, Masters Touch Watercolor Paper (Hobby Lobby)
Ink: Memento Tuxedo Black, Versafine Black Onyx
Other: Zig Clean Color Real Brush Markers, Copic Markers, Sakura Stardust glitter pen, Foam Tape

Tuesday, August 18, 2015

You're a Star! {Lawn Fawn}

Hello there!

I want to apologize in advance if these pictures aren't the greatest.... it's rainy season in Florida, and with daily rain, my window for picture taking isn't a very long one.  LOL!

Today, I am sharing this under the sea shaker over on the Lawnscaping Challenges Blog!  I started off by watercoloring a piece of  watercolor paper with Distress inks.  When it was dry, I diecut it with the largest die from the Small Stitched Rectangles Stackables die set.  From that, I also diecut a star shaped window using the Puffy Star Stackables die set.  Before filling my shaker, I stamped a sentiment from the So Jelly stamp set, and then added my shaker contents.  I popped up some Copic colored Jelly fish and a cute little starfish, also from the So Jelly Stamp set, up on the front of the shaker window with foam tape. After seeing it all put together, the black sentiment seemed to really stand out, and not in a good way.  LOL!  So I added some doodled lines to frame the star window the the entire panel, and then popped everything onto a black card base to balance things out a bit better.


You're a Star!

Here you can see the shaker a little closer:


You're a Star!

Hope you like it!  Thanks for stopping by! :)

Supplies:
Stamps: Lawn Fawn So Jelly
Dies: Lawn Fawn So Jelly, Small Stitched Rectangles, Puffy Star Stackables
Other: Distress Ink, White Gel Pen, Copic Multiliner, Copic Markers, Foam Tape

Monday, August 17, 2015

Lawnscaping Challenge #112 - Embossing

Hello there!  It's time for another Lawnscaping Challenge!  Challenge #112 is all about Embossing... Heat embossing, dry embossing... whatever you prefer!


We are sponsored this week by the super fabulous Lawn Fawn!


For my card, I started off by diecutting a piece of white cardstock with the largest die from the Small Stitched Rectangles die set, and then I embossed that panel with a Darice embossing folder.  I added a yellow glow to the bottom right of the panel using an ink blending tool and Squeezed Lemonade distress ink.  Then I diecut a hill for my critters to stand on using the Stitched Hillside dies, and added it the panel with foam tape.  Before adhering it, I stamped a sentiment from Party Animal.  I stamped, colored and diecut the adorable little fox, birds, and party accessories from the Party Animal stamp set and arranged them on the hill.  I popped the entire panel up with foam tape on a white card base and added a bow with some Cloudy Lawn trimmings to finish things off.


Let's Party!

Be sure to check out the blog for lots more inspiration from the design team and to get all of the challenge details.  I hope you'll join us for a chance to win some Lawn Fawn goodies!

That's all for now!  Thanks for stopping by! :)

Supplies:
Stamps: Lawn Fawn Party Animal
Dies: Lawn Fawn Party Animal, Small Stitched Rectangles, Stitched Hillside, Darice Embossing Folder
Ink: Memento Tuxedo Black, Ranger Squeezed Lemonade Distress Ink
Other: Copic Markers, Foam Tape, Lawn Fawn Cloudy Lawn Trimmings

Saturday, August 15, 2015

Sparkle and Shine Challenge #12

Hi there!  It's time for another Sparkle and Shine Challenge!!  This week's challenge is Back to School themed!  Here is our inspiration photo:


We are sponsored by our friends at Winnie and Walter!


Here is my card!  As soon as I saw the mason jars in the picture, I knew I wanted to use my Paper Smooches Best Buds stamp set.  I stamped and colored the flower jar image using copic markers, and to mimic the inspiration photo, I colored the jar black.  I love the look!  I incorporate the school theme, I added the pencil and apple along with a sentiment from Paper Smooches Smarty Pants.  The scene was all stamped on a diecut panel using the Mama Elephant Sew Fancy Frames.  I diecut a piece of black card stock using the cross stitched die from the same die set, and added some white pigment ink using a paper towel to make it look like a chalk board.  To finish things off, I added a scattering of Pretty Pink Posh Sparkling Clear sequins.


Thanks Teacher

Be sure to visit the blog for lots more inspiration from the design team and for all of the challenge details.  I hope you'll join us for a chance to win some Winnie and Walter! :)

So funny that Curtain Call Challenge is featuring the same inspiration photo for their challenge this week!  I am going to enter this card there too :)


Thanks for stopping by!!

Supplies:
Stamps: Paper Smooches Best Buds, Smarty Pants
Dies: Mama Elephant Sew Fancy
Paper: PTI White, True Black
Ink: Memento Tuxedo Black, PTI Fresh Snow
Other: Copic Markers, White Gel Pen, Sakura Stardust Pen, Foam Tape, Pretty Pink Posh Sparkling Clear 4mm and 6mm sequins

Monday, August 10, 2015

Moments Inked Closed Planner Pocket

Papertrey Ink Moments Inked


Hello there!  Today I have a Papertrey Ink Moments Inked Planner project to share with you!  If you are anything like me, your planner is a catch-all for all of your important info, and things you want easily accessible.  While you might want to have all of your info at your fingertips, there might be some things that you don't want out in the open for everyone to see.  Today, I will share with you how I created a folding pocket for my planner, made out of an upcycled gift bag, making it easy to hide your more personal information.


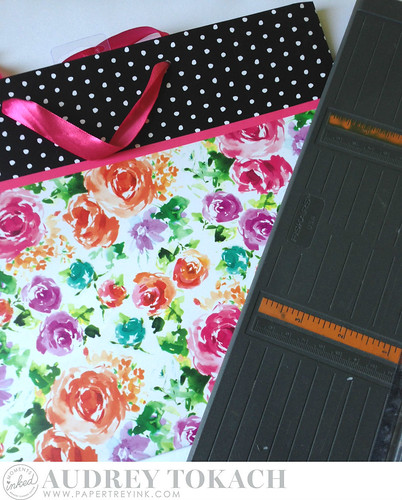
I was given a gift in this beautiful gift bag and the prints and patterns just make me happy!  I wanted to incorporate it in to my planner somehow, and it's large size made it perfect for this project.  I started off my cutting off one side of the bag using my scissors, then using my paper trimmer, I evened up the edges, and cut a piece that measured 6.75" high by 10" wide.  Then I scored it at 5" to make a fold in the middle.  I also cut a piece of Hibiscus Burst card stock to the same measurements, to serve as the inside of my pocket. I knew I would be opening and closing this pocket quite often, the extra sturdy gift bag, backed with the cardstock should hold up quite nicely.


Papertrey Ink Moments Inked

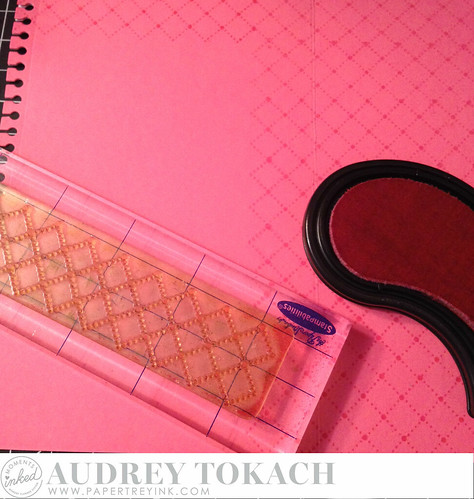
The inside of the pocket was looking pretty plain, so I did some tone-on-tone stamping with the Background Basics: Tin Types stamp set and Hibiscus Burst ink.  I also used the Moment Inked: Edged die to cut a notebook edge on the left side of the fold so that I can easily insert this into my planner, and move it around if necessary.

Papertrey Ink Moments Inked

Inside my pocket, I used the Moments Inked: Tabbed List die and the Moments Inked: Listed stamp set to create a place for me to write down all of my computer passwords.

Papertrey Ink Moments Inked

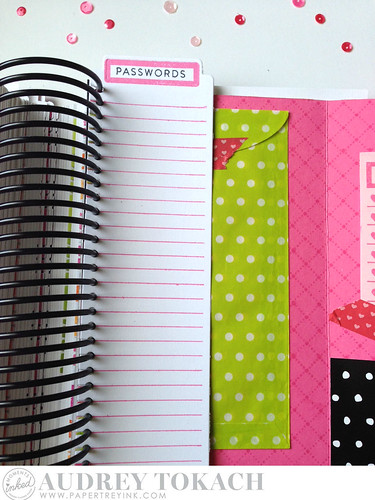
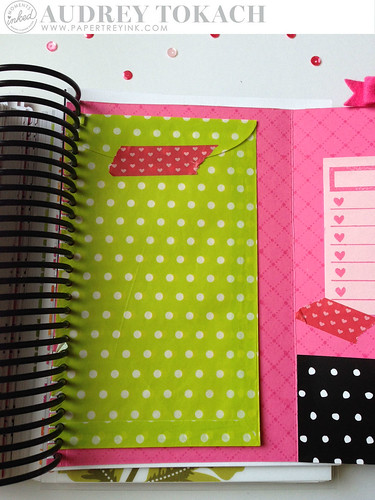
I added a printed glassine envelope to the inside of the pocket, behind the list.  Again, I used the Moments Inked: Edged die to add a punched edge.  I used a printed bag for added privacy, but Papertrey's Glassine Bags would also be a great option for this!


Papertrey Ink Moments Inked

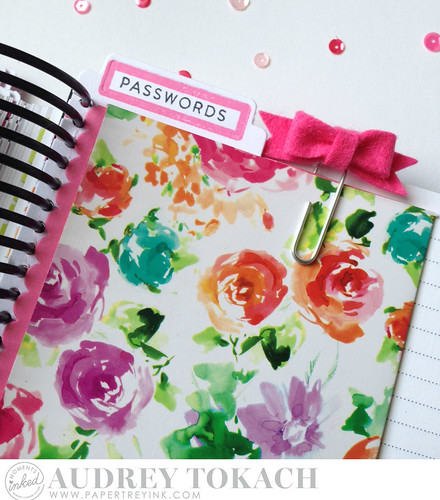
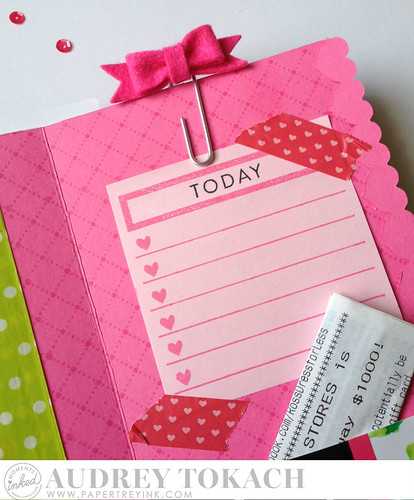
On the right side of my pocket, I added a post-it note list using the Moments Inked: Posted stamp set, and I added a small pocket on the bottom of that side using another snippit of the gift bag.

Papertrey Ink Moments Inked

Here is you can see the entire pocket, when opened.

Papertrey Ink Moments Inked

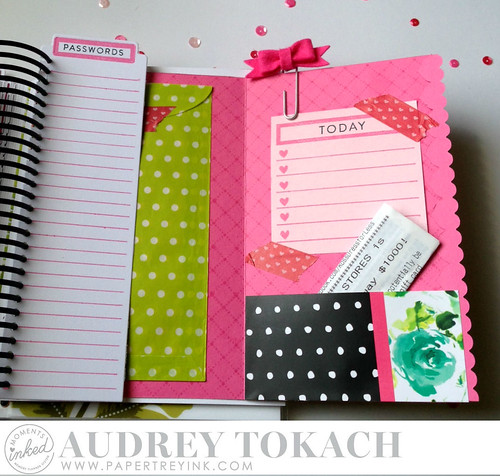
To keep my pocket closed, I made a felt bow clip using the Bow Clips die and some Raspberry Fizz felt.

Papertrey Ink Moments Inked


I hope you are feeling inspired by my post today!  Be sure to share all of your planner projects with us on instagram using the #momentsinked hashtag!  We'd love to see what you are up to!


Thanks so much for stopping by!!  Have a great day! :)


Supplies:
Stamps: Moments Inked: Listed, Moments Inked: Posted, Background Basics Tin Types
Dies: Moments Inked: Tabbed List, Moments Inked: Edged, Bow Clips, Heart Border
Paper: PTI White, Hibiscus Burst, Gift Bag, patterned glassine bag (Target)
Ink: True Black, Hibiscus Burst
Other: Rasberry Fizz Felt. Post It notes, Washi Tape


Thursday, August 6, 2015

Pretty Pink Posh New Release Blog Hop!


Hello there!  I am so excited to be part of the August Release Blog Hop for Pretty Pink Posh!  Three new amazing dies and a bunch of new sequins were just released, including new colors of my favorite iridescent sequins PLUS a new size and new mix of my other favorite, Sparkling Clear!  You can see the entire new release here.

This release includes the new Storybook 1 die, and boy is it a fun one!  It is so versatile, and I can't wait to play with it some more!  I made two cards using this die, and the possibilities are endless!  For my first card, I diecut a piece of white cardstock using the Lawn Fawn Small Stitched Rectangles largest die, and then ran that through my diecut machine again centering the Storybook 1 die on the stitched rectangle.  I knew I wanted to make a shaker using a  mix of the iridescent sequins, both the older and brand new colors.  They all look so gorgeous together!  I added acetate behind the panel and then created my shaker.  I glued the largest rectangle from the Storybook 1 die back into place over the acetate so that you can only see the sequins in the bottom two windows.  I used images from the Papertrey Ink Tremendous Treats Birthday stamp set, along with their coordinating dies, but the "Happy" and stars dies from the PTI Tipped Tops die collection.  The tiny stars are from the Lawn Fawn Stitched Journaling Card die collection.  I popped the shaker up onto a striped card base that I created with black strips of cardstock.

PPP August Release Hop

Here is a close up of those yummy sequins!  The entire collection of iridescent sequins work so beautifully together!

PPP August Release Hop

For my second card, I also used the Storybook 1 die.  This time, I created a horizontal shaker card.  I used the Paper Smooches Halloweenies stamp set and Papertrey Ink Spiderweb Trio dies to make my first halloween card of the season!  This time, I left all of the windows in the die open, and used some of the new Peacock Feathers sequins along with the Peridot Mist, Sparkling Clear and Sunshine Glow sequins in my shaker.  I also used the fun new Speech Bubbles dies!  There are three different sized bubbles in the set, and  each has fun stitched border!


PPP Hop

Here is a closer shot of the inside:


PPP August Release Hop


Be sure to visit all of these ladies to see what they have to share with you!  Leave comments along the way for your chance to win one of two $25 gift certificates to the Pretty Pink Posh store! Please comment before 11:59 PDT on August 9th. Winners will be chosen at random from all of the blog comments and the winners will be announced on the Pretty Pink Posh blog!

Happy Hopping! :)


Thanks so much for stopping by!! :)

Monday, August 3, 2015

Lawnscaping Challenge #111 - Back to School!

Hello there!  It's time for another Lawnscaping Challenge!  This week, the theme is back to school!  How is it possible that we are almost there again?  Didn't summer just start?!


We are sponsored this week by our friends at Ellen Hutson!


I don't have any school themed stamp sets really, but the Science of Love stamp set has a few images that will do the trick!  And that little fox from Party Animal?  Well, he's one of my new faves!  I stamped the center book first, then masked it off and stamped the fox.  Then I masked him off too, and starting stamping the line of books, masking off one before stamping the next.  When I was done, I colored them with my copics, and cut out the image.  I used patterned paper from the Sweater Weather 6x6 paper pad, diecut with the small stitched rectangles stackables dies.  Then I popped the fox and his books up with foam tape, and stamped a sentiment from Science of Love.  


You're tops in my book

Be sure to check out the blog for lots more inspiration from the design team and to get all of the challenge details.  I hope you'll join us for a chance to win a great prize! 

Thanks for stopping by!

Supplies:
Stamps: Lawn Fawn Science of Love, Party Animal
Dies: Small Stitched Rectangles
Paper: Sweater Weather 6x6 paper pad, PTI Classic Kraft
Ink: Memento Tuxedo Black. Ranger Antique Linen
Other: Copic Markers, Foam Tape, PTI Scarlet Jewel button, PTI Rustic Jute Twine

Sunday, August 2, 2015

Paper Smooches SPARKS Challenge - Anything Goes!

Hello there!  It's time for another Paper Smooches SPARKS Challenge, and this week, Anything Goes!


I love art supplies.  Paint splatters make me happy.  Color makes me happy.  The Paper Smooches I Heart Art and Positive Strokes Two stamp sets are a match made in heaven.  I love them  both so much!  I used both sets on my card today.  First I stamped the paint stripes from the Positive Strokes Two stamp set along the left edge of a card base.  Then I cut another pieces of white cardstock to stamp my other images on.  I first stamped the easel and sentiment, and then masked it off to stamp the paint splatters.  I also added a shadow underneath with the Shadows stamp set.  Isn't it just so bright and fun?  Love. :)

Hello Crafty Friend

Be sure to visit the blog for all of the challenge details, and check out what these amazing ladies have to share with you! :)

Audrey Tokach - you are here!
That's all for now!  Thanks for stopping by!!

Supplies:
Stamps: Paper Smooches Positive Strokes Two, I Heart Art, Shadows

Saturday, August 1, 2015

Sparkle and Shine Challenge #11

Hello there!  It's time for another Sparkle and Shine Challenge!  Just look at the gorgeous inspiration photo for this challenge!  I love that beautiful bright orange!


This challenge is sponsored by Pretty Pink Posh!


I was inspired by those amazing flowers, and pulled out my Paper Smooches Pretty Momma stamp set because the big rose image in that set is one of my favorites.  I colored the flowers with copic markers and then fussy cut them out. Before adhering them to the panel, I used a Tim Holtz stencil and an ink blending tool to add some polkadots to the background.  Then I popped the flowers up on foam tape, added a sentiment from the Good Gab stamp set and then finished up with a scattering of Pretty Pink Posh Sparkling Clear and Sunshine Glow sequins.


Merci

Be sure to check out the blog for lots more inspiration from the design team and for all of the challenge details. I hope you'll join us for a chance to win a great prize!

Thanks for stopping by! :)

Supplies:
Stamps: Paper Smooches Pretty Momma, Good Gab
Dies: Lawn Fawn Small Stitched Rectangles
Paper: PTI White, Orange Zest
Ink: Memento Tuxedo Black, PTI Summer Sunrise
Other: Tim Holtz stencil, Copic Markers, Foam Tape, Pretty Pink Posh Sparkling Clear and Sunshine Glow sequins
BLOG TEMPLATE BY DESIGNER BLOGS