Thursday, November 7, 2019

Countdown to Confetti - Day 3


Hello there!  It's time for the Countdown to Confetti with Reverse Confetti!  The November release is just around the corner!  All of the new goodies that the Confetti Crew will be showing off over the next few days will be available in the Reverse Confetti store and at your favorite retailers on November 8th!

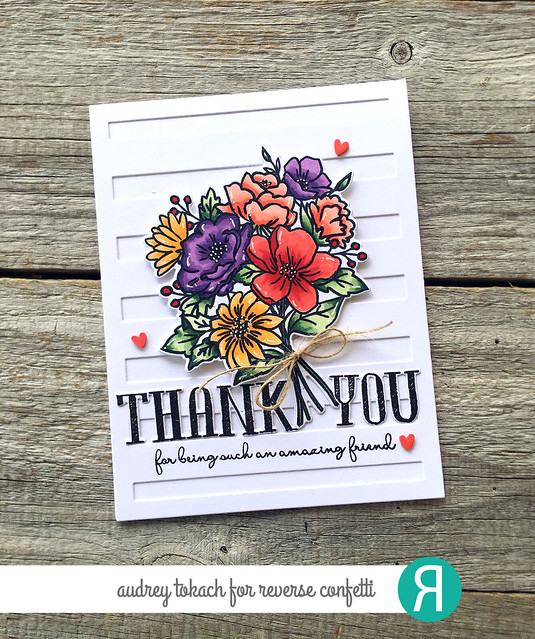
Today, my card uses two stamp sets from the new release, The Best Days and Thank You.  To create my card, I started off with an A2 card  base cut from Polar White cardstock, and on top of that, I layered the Big Stripes Cover Panel, also cut from white cardstock.  I stamped and colored the floral bouquet from the The Best Days stamp set with Copic Markers and diecut it with the coordinating The Best Days Confetti Cuts dies.
Thank You

The larger sentiment from the Thank You stamp set was stamped in Midnight ink on white cardstock and diecut with the Thank You Confetti Cuts dies.  A smaller sentiment from the set was stamped directly onto the Cover Panel.  To finish off my card, I added some white gel pen accents and a scattering of tiny clay hearts from my stash.

Thank You

 Be sure to hop along with the rest of the Confetti Crew and our special guests as they show off more of the November release. Comment along the way for your chance to win a Reverse Confetti gift certificate!  I hope you will stop back by tomorrow as I have another project to share with you! :)

Reverse Confetti Blog

Wednesday, November 6, 2019

Countdown to Confetti - Day 2


Hello there!  It's time for the Countdown to Confetti with Reverse Confetti!  The November release is just around the corner!  All of the new goodies that the Confetti Crew will be showing off over the next few days will be available in the Reverse Confetti store and at your favorite retailers on November 8th!

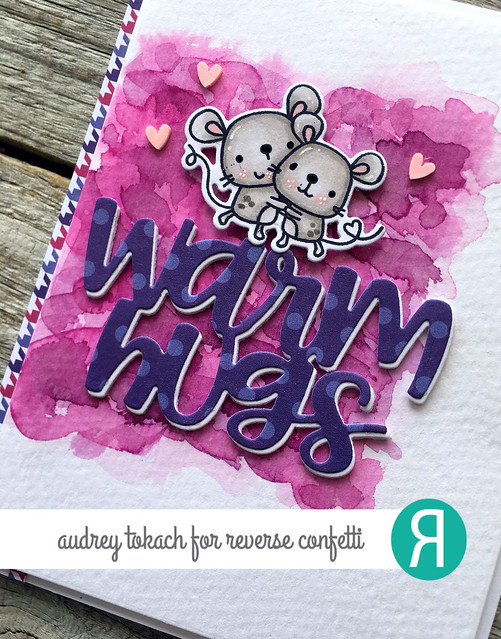
My card today features the adorable new Huggable stamp set and coordinating dies, the Warm Hugs Confetti Cuts die and the fun new Winter Wonder patterned paper pad.  To create my background, I cut a piece of watercolor paper to 4" x 5.25" and used Distress inks in Picked Raspberry and Seedless Preserves to watercolor a background on the left side of the panel.  I stamped and colored the adorable hugging mice from the Huggable stamp set with Copic markers and diecut them with the coordinating Huggable Confetti Cuts dies.  I diecut the Warm Hugs sentiment three times from white cardstock and again from Winter Wonder patterned paper, gluing them all together with a glue pen.  I perched the mice on top with foam tape.

Warm Hugs

Before adhering the panel to and A2 card base, I added a strip of Winter Wonder patterned paper in a coordinating pattern.  To finish off my card, I added some white gel pen accents and some tiny clay hearts that I had in my stash.

Warm Hugs

 Be sure to hop along with the rest of the Confetti Crew and our special guests as they show off more of the November release. Comment along the way for your chance to win a Reverse Confetti gift certificate!  I hope you will stop back by tomorrow as I have another project to share with you! :)

Reverse Confetti Blog

Tuesday, November 5, 2019

Countdown to Confetti - Day 1


Hello there!  It's time for the Countdown to Confetti with Reverse Confetti!  The November release is just around the corner!  All of the new goodies that the Confetti Crew will be showing off over the next few days will be available in the Reverse Confetti store and at your favorite retailers on November 8th!

Today, my card is sharing the new Beautiful Memories stamp set along with a few other new products.  To create my card, I started off with a piece of Polar White cardstock that I impressed with the new Stitched Burst Cover Panel Confetti Cuts die. There is no cutting edge on this die, which allows you to place this beautiful pattern any where on your card front.  My card shows it aligned straight on an A2 card base.  I used the new Circle Tag Confetti Cuts to frame out a sentiment from the new Beautiful Memories stamp set, which I stamped in Midnight ink.  The tag loop on this diecut was hidden behind a few stems of flowers, also included in the Beautiful Memories stamp set.  I colored them with copic markers and diecut them with the coordinating Beautiful Memories Confetti Cuts dies, and then popped them up with foam tape.


Every Life

To add a little finishing touch to the bottom of the bouquet, I added a tiny twine bow using jute twine.  I think this white on white layers is perfect for a sympathy card, and the flowers add just the right amount of subtle color.

Every Life

Be sure to hop along with the rest of the Confetti Crew and our special guests as they show off more of the November release. Comment along the way for your chance to win a Reverse Confetti gift certificate!  I hope you will stop back by tomorrow as I have another project to share with you! :)


Friday, November 1, 2019

Reverse Confetti November SYS Challenge


Hello there!  Audrey here with a new Stock Your Stash Challenge for Reverse Confetti!  The November challenge is Holiday/Winter!

Snowmen are my favorite!  I love them for holiday and winter, and living in Florida, stamped snowmen are all that I get!  To create my card, I started off with a piece of 4" x 5.25" watercolor paper.  I used Distress inks in Salty Ocean and Blueprint Sketch to watercolor a background for my snowmen.  I stamped the snowmen and snowball pile from the Cool Friend stamp set, colored them with Copic markers, and diecut them with the coordinating Cool Friend Confetti Cuts dies.  I popped them up on the panel with foam tape.

November SYS 1

I stamped a sentiment from the Cool Friend stamp set on a strip of white cardstock, and used that to ground the snowmen.  To finish off my card, I added some white gel pen accents and falling now using Nuvo Drops before mounting it on an A2 card base cut from Polar White cardstock.


November SYS 2


Tuesday, October 8, 2019

Reverse Confetti October Blog Hop


Hi there! It's the 8th of the month, and that means it's time for the Reverse Confetti monthly blog hop!  I have a fun halloween card to share with you!

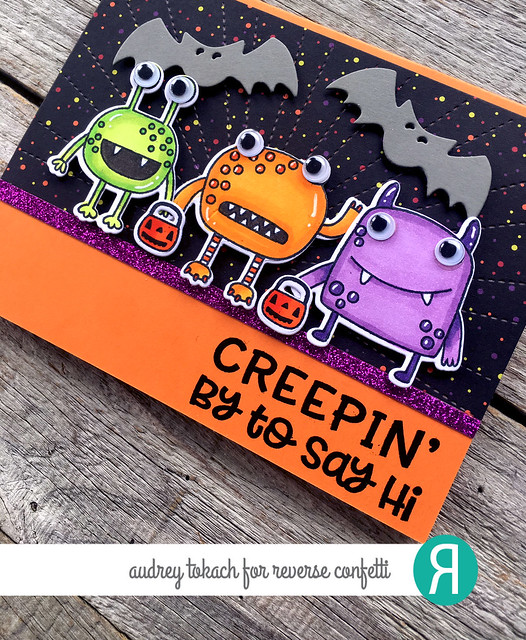
To create my card, I started off with a landscape A2 card base cut from Tangerine cardstock.  I diecut a piece of patterned paper from the This and That paper pad with the Stitched Rays Cover Panel Confetti Cuts die, and trimmed it down a bit.  I adhered that to the card base, and added a strip of glitter paper from my stash underneath.  I stamped and colored the three adorable monsters from the Monsterous stamp set, and diecut them with the coordinating Monsterous Confetti Cuts dies.  I popped them up with foam tape.  Above them, I added a pair of diecut bats using the Halloween Bits Confetti Cuts dies.

Reverse Confetti October Blog Hop

Under my little halloween trio, I stamped a sentiment from the Haunt It stamp set in Midnight ink.  To finish off my card, I added some white gel pen accents and googly eyes!

Reverse Confetti October Blog Hop

That's all for me today!  Be sure to hop along to see what the rest of the team has to share with you!  Thanks so much for stopping by! :)

Audrey Tokach - **you are here**

Tuesday, October 1, 2019

Reverse Confetti October Stock Your Stash Challenge

Hello there!  Today, I have a friendship card to share with you for our October Stock Your Stash Challenge at Reverse Confetti!  Holy Moly, how is it even October already?!  The friendship theme is perfect for me as I have lots of family and friends back home that I like to send cards to, just because.


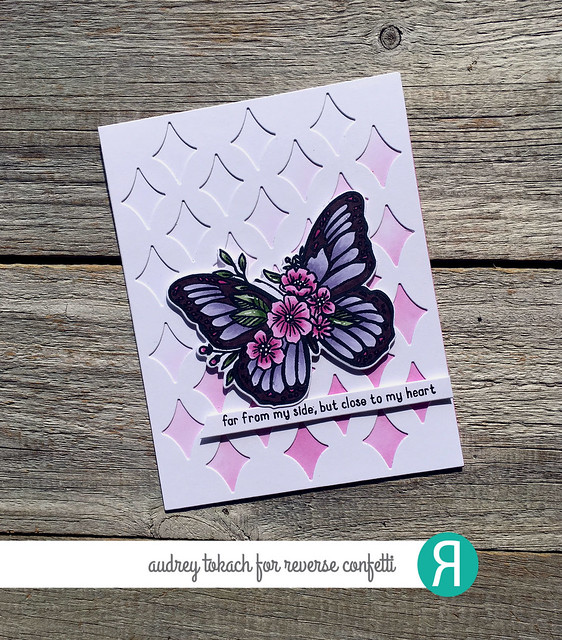
To create my card, I started off with an A2 card base cut from Polar White cardstock.  I used Magenta ink and an ink blending brush to add a subtle dusting of pink ink to the bottom right corner of the card base before adding the Large Diamond Cover Panel Confetti Cuts, cut from Polar White cardstock.  The addition of color to the bottom corner draws the eye down to the sentiment.  I stamped and colored the gorgeous butterfly from the Butterfly Blossoms stamp set, and diecut it with the coordinating Butterfly Blossoms Confetti Cuts dies.  I popped it up with foam tape on the ink blended area of the card front.

RC SYS October Challenge - Friendship

For my sentiment, I pulled out the So Many Sentiments stamp set.  I stamped one of the sentiments in Midnight ink onto a piece of Polar White cardstock and trimmed it with my paper trimmer.  Then, I popped it up tucked slightly underneath the butterfly's wing, and finished off my card with some white gel pen accents.

RC SYS October Challenge - Friendship

That's all for me today!  Be sure to play along for your chance to win a Reverse Confetti gift certificate!!  Thanks so much for stopping by! :)

BLOG TEMPLATE BY DESIGNER BLOGS