Friday, March 30, 2018

McGregor's Garden {Hello Bluebird}


Hello there!

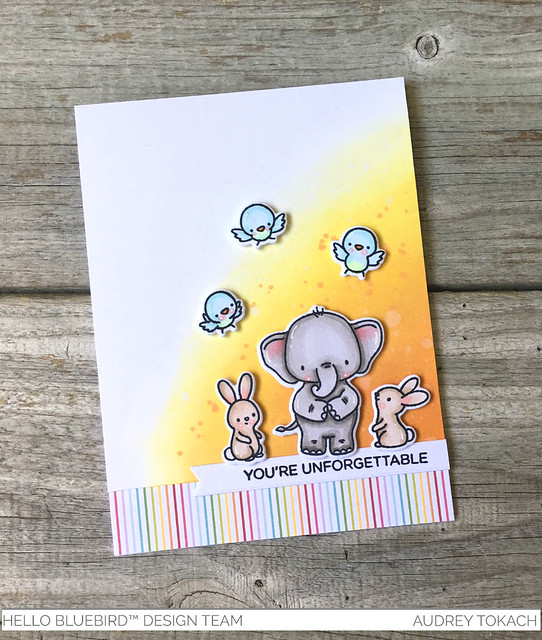
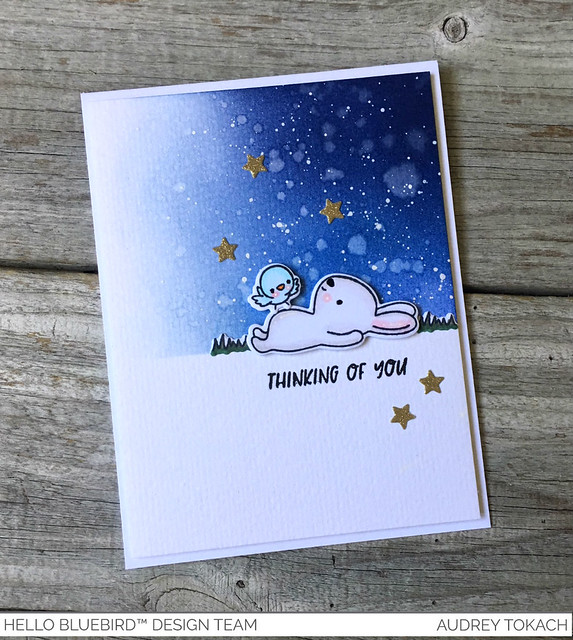
Today, I have another card to share with you using some of the new release goodies from Hello Bluebird stamps!  This lazy little bunny from McGregor's Garden is stargazing!  When I saw this image, I imagined him right away, laying in the grass, staring into a star filled sky.

To create my card, I started off with an A2 card base.  I cut a piece of watercolor paper 4" x 5.25" and  masked off the bottom half of the panel.  Then, I ink blended a night sky using Tumbled Glass, Blueprint Sketch, and Chipped Sapphire Distress inks.  I added some splatters of clean, clear water to bleach out some areas, then splattered on some white acrylic paint.  I stamped and colored one of the horizontal bunnies from McGregor's Garden, along with one of the tiny birds from the set.  I also pulled out the Springtime stamp set, and stamped a few clumps of grass for him to lay on.  Underneath him, I stamped a sentiment from McGregor's Garden and used the star dies from the new Gallery Frame #1 die set to cut a bunch of tiny starts from gold glitter paper.  I scattered the stars about, and added some white gel pen accents before popping the panel up on a white card base using foam tape.

McGregor's Garden

That's all for me today!  
Thanks so much for stopping by! :)

Wednesday, March 28, 2018

Oh Hello There {Reverse Confetti}


Oh hello there! :)  I have a card to share with you using goodies from Reverse Confetti!  I am loving the new Stitched Rays Cover Panel Confetti Cuts and want to use it on every card!

I started out with an A2 card base.  Then I used the Stitched Rays Cover Panel Confetti Cuts to add stitched detail to a piece of Premier Polar White cardstock.   I diecut a Scalloped Square from Premier Polar White as well and the inner frame from the same set from Midnight cardstock.  For the center of the square, I diecut a piece of the new Fun Times paper pad.  I stamped and colored one of the tiny mice from the Coffee and You stamp set, and diecut her with the coordinating Coffee and You Confetti Cuts.  For my sentiment, I stamped a speech bubble from the Figure of Speech stamp set in Midnight ink and diecut it with the coordinating Figure of Speech Confetti Cuts dies.  Then, I diecut three hearts from white cardstock and colored them with my copic markers.  I popped the mouse, sentiment and hearts up with foam tape, and added white gel pen accents to finish off my card.

Oh hello there

Oh hello there

That's all for me today!  Thanks so much for stopping by! :)


Tuesday, March 27, 2018

Elephant Friends {Hello Bluebird}


Hello there!!  I am soooo excited to share some awesome news with you here on my blog!  If you follow me on Instagram, you may have already heard that I have accepted a position on the Hello Bluebird design team!  Hello Bluebird Stamps is a brand new company, and they have just had their second release earlier this month.  I have a card to share with you using two of the new stamp sets, Elephant Friends and McGregor's Garden.

To create my card, I started off with an A2 card base.  I used ink blending tools and Distress Inks in Squeezed Lemonade and Carved Pumpkin to add a warm glow the bottom right side of the card base.  Then I added some ink splatters using Carved Pumpkin.  I added a strip of patterned paper from the scrap pile to the bottom edge of the card base.  I stamped and colored one of the adorable elephants from Elephant Friends along with two cute bunnies from the same set, and then diecut them with the coordinating Elephant Friends dies.  Then, I pulled out the new McGregor's Garden stamp set and stamped the trio of tiny birds (I want to put these birds on every card!), and diecut them with the coordinating McGregor's Garden dies.  To ground my images, I stamped a sentiment from Elephant Friends on a hand cut banner, and popped the images up on top of that.  To finish things off, I added some white gel pen accents.


Elephant Friends_McGregorsGarden_AudreyTokach


If you are as excited about this new stamp company as I am, I have some great news for you!  Hello Bluebird is hosting an open design team call!  If you think you would be a good fit for this team, head on over to the Hello Bluebird Blog to read all about how to apply!  Applications will be accepted until April 10th, and those selected will be notified shortly thereafter.  Good luck to you! :)

Thanks so much for stopping by! :)


Thursday, March 22, 2018

Lawn Fawn Inspiration Week: Bayou Backdrop


Hello there!  Welcome to the final day of Lawn Fawn inspiration week!  Today, the design team is showcasing the new Bayou Backdrop, one of my favorite things from this entire release!

To create my card, I started off with a horizontal A2 card base.  On top of that, I put a piece of Really Rainbow patterned paper.  I added a sand bank by cutting a piece of Paper Bag cardstock with the Stitched Hillside Borders die.  Then I added the Bayou Backdrop layer cut from Cilantro cardstock.  I love that you can use this die turned either direction for a totally different look.  Then to create my underwater scene, I stamped and colored images from the Mermaid For You, Duh-Nuh, and Fintastic Friends and arranged them.  Some are adhered flat with the Glue Tube, and others are popped up using foam tape.  I stamped a sentiment from Duh-Nuh onto a hand cut banner, and added some white gel pen accents.  My final touch was a scattering of tiny bubbles using Nuvo Drops in Morning Dew.

Bayou Backdrop

That's all for me today!  Be sure to visit the Lawn Fawn blog for lots more inspiration from the design team!  I sincerely hope that you are feeling inspired after this week! :)

Thanks so much for stopping by!!

Wednesday, March 21, 2018

Lawn Fawn Inspiration Week: Toadally Awesome


Hello there!  Today, I have a Toadally fun card to share with you as Lawn Fawn inspiration week continues!  Today, the design team is showcasing the new Toadally Awesome stamp set!

To create my card, I started off with a horizontal A2 card base, which I layered with a piece of Watercolor Wishes patterned paper.  On the bottom third of the panel, I added a piece of Knock on Wood patterned paper.  I diecut the water puddle from the Bayou Backdrop die set out of Watercolor Wishes patterned paper and added some distress ink to the edges to give it some more dimension.  Then I stamped and colored the cute little frogs, cat tails, lily pad, log and dragonfly from Toadally Awesome and adhered some with the Glue Tube, and some with foam tape.  The last layer is the Bayou Backdrop frame, cut from Cilantro cardstock, and inked with green distress ink.  I stamped a sentiment from the set in the bottom right corner, and added some white gel pen accents to finish off my card.

Toadally Cute

That's all for me today!  Be sure to visit the Lawn Fawn blog for lots more inspiration from the design team, and come back tomorrow as I have one last project to share with you as we close out inspiration week!

Thanks so much for stopping by! :)

Tuesday, March 20, 2018

Reverse Confetti Spring Fling Blog Hop


Hello there!  Today, the Reverse Confetti team is hopping along with the gang from My Sweet Petunia for our Spring Fling Blog Hop!

We will choose two lucky commenters from the hop to win one of two prizes: a $60 shopping spree at www.mysweetpetunia.com and a $60 shopping spree at www.Reverseconfetti.com! For a chance to win, hop and comment no later than Sunday, March 25th, at 11:59 PM Central time and winners will be announced on Tuesday March 27th, on the Reverse Confetti and My Sweet Petunia blogs.

I created this card and matching treat box for the occasion!  The MISTI stamping tool from My Sweet Petunia makes masking and one layer cards a breeze!  Read on to find out how I created this little ensemble!

Happy Spring

To create my card, I started off by putting a A2 horizontal card  base in my mini MISTI and arranging all of my animals on the card front.  I used the bunnies from Hippity Hop, the chick from The Tweet Life, and the sheep and little bird from All About Ewe.  I then removed the sheep and boy bunny from the panel, and stamped the chick and girl bunny, once on the card from and again in a post it note to create my masks.  I fussy cut the masks, and covered the chick and girl bunny, then put the boy bunny and sheep and tiny bird in the MISTI and stamped them.  I created masks for all of those critters too, and covered them all to add an ink blended background for my sky and grass.  Once I inked the background, I removed all of the masks and colored everything with Copic Markers.  Things felt a little bare, so I added a few flowers and butterflies as well, and well as a sentiment from Hippity Hop.  I especially love the MISTI for ensuring my sentiments are straight and nice and dark and crisp.  

Happy Spring

I created a matching treat box.  The MISTI tool comes in handy for lining up border stamps.  I created this wonky striped pattern on the Tube Treat Topper, cut from Premier Polar White cardstock.  I stamped the wonky stripe from Elemental Stripes in bright colors to coordinate with my card colors.  I used Piggy Bank, Bellini, Buttercup, Lime Green, Baby Blue and Royal Purple inks.  then I cut a tag using the Dashed Line Tag Confetti Cuts from Premier Polar White, and I inked the background in the same way that I did the card front.  Then I stamped the girl bunny from Hippity Hop, and stamped a sentiment from the same set onto a Bitty Banners diecut.  I filled the treat tube with candy eggs, added the topper, and tied the tag on with some  Solid Caribbean Twine.

Happy Spring

That's all for me today!  But be sure to hop along with the rest of the gang to see what everyone has to share with you!

Audrey Tokach - You are here!

Thanks so much for stopping by!!


Lawn Fawn Inspiration Week: Mini Picture Frames


Hello there!  Welcome to another day of Lawn Fawn inspiration week!  Today, the team is showcasing the Mini Picture Frames dies and the Gotta Have Gingham patterned paper collection.  I have used the Gotta Have Gingham papers a lot in my previous projects, and today, my project focuses on the Mini Picture Frames!

To create my card, I started off with an A2 card base cut from white cardstock.  Then I diecut four of the square Mini Picture Frames from white cardstock as well.  I added color to the frame inserts using different colors of distress inks.  Then I pulled out my Life Is Good stamp set, and my Ahoy Matey stamp set, and colored several images with copic markers which I then diecut with the coordinating Life Is Good Dies and Ahoy Matey Dies.  I popped those pieces up on the squares with foam tape, and stamped a sentiment from the new Simply Sentiments stamp set underneath.  Then I added some white gel pen accents as a final touch.

Mini Picture Frames

That's all for me today, but be sure to visit the Lawn Fawn blog for lots more inspiration from the design team, and come back tomorrow because I have more to share with you!!

Thanks for stopping by! :)

Monday, March 19, 2018

Lawn Fawn Inspiration Week: Simply Celebrate


Hello there!  Welcome to another day of Lawn Fawn inspiration week!  Today, the design team is showcasing the cute new border set, Simply Celebrate!

To create my card, I started off with a white card base.  I cut a piece of Really Rainbow patterned paper with the Small Stitched Rectangles Stackables, slightly smaller than the card base to allow for a 1/8" border around the edge.  I stamped and colored the star border from Simply Celebrate with copic markers and diecut it with the coordinating Simply Celebrate dies.  Then I diecut the new Cloudy Hillside Pop Up Add on dies from white cardstock, and ran it through my diecut machine again with the Stitched Rectangles die to add a stitched edge.  I stamped a sentiment from the Lucky Charm stamp set onto the cloud diecut, and adhered the star border along the top edge of the cloud before popped the entire piece up with foam tape.  To finish things off, I added a scattering of sequins and some white gel pen accents.

Simply Celebrate_ReallyRainbow


That's all for me today, but be sure to visit the Lawn Fawn blog for lots more inspiration from the design team!  Hope you will join me again tomorrow as Lawn Fawn inspiration week continues!

Thanks for stopping by! :)

Sunday, March 18, 2018

Lawn Fawn Inspiration Week: Happy Village


Hello there!  Welcome to another day of Lawn Fawn inspiration week!  Today, the design team is featuring the new set, Happy Village!

To create my card, I started off with a white A2 card base.  On top of that I added a panel that was diecut using the Stitched Woodgrain Backdrops die.  I pulled out my Zig Zag Squares Stackables, cut one from Chili Pepper cardstock.  On top of that, I added a Dotted Square Stackable cut from blue Gotta Have Gingham patterned papers, with a Knit Picky Simple Stitched Hillside Border.  I stamped and colored images from Happy Village with my copic markers and then diecut them with the coordinating Happy Village dies.  I glued some pieces of my scene down with the Glue Tube, and popped others up with foam tape, and then popped the square panel up in the center of the card front.  To finish things off, I added some white gel pen accents.

Happy Village

That's all for me today, but be sure to visit the Lawn Fawn blog for lots  more inspiration from the design team!  Hope to see you again tomorrow!!

Thanks for stopping by! :)


BLOG TEMPLATE BY DESIGNER BLOGS