Sunday, November 26, 2017

Reverse Confetti November SFYTT


Hello there!  Today, I have a card to share with you for the Reverse Confetti November Sketch For You To Try!

Here is the sketch:


And here is my card...

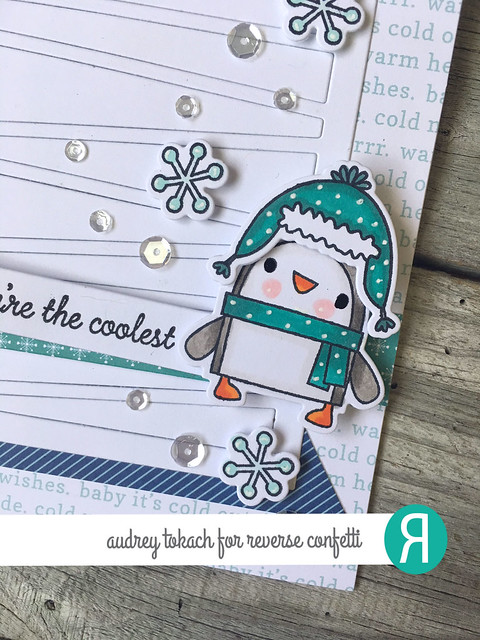
To create my card, I started off with an A2 card base.  I cut a piece of patterned paper from the Warm Heart paper pad and adhered it to the card front.  Then I cut another piece of patterned paper from the same paper collection on an angle to follow the sketch.  I diecut the Wonky Stripe Panel Confetti Cuts die from Premier Polar White cardstock and then added a strip of snowflake paper near the bottom of the panel.  I stamped and colored a cute little penguin from the S'more Love stamp set, and diecut him along with a few snowflakes using the coordinating S'more Love Confetti Cuts dies.  I popped all of those pieces up with foam tape, and stamped a sentiment from the same set onto a strip of white cardstock that I angled at one end.

November SFYTT

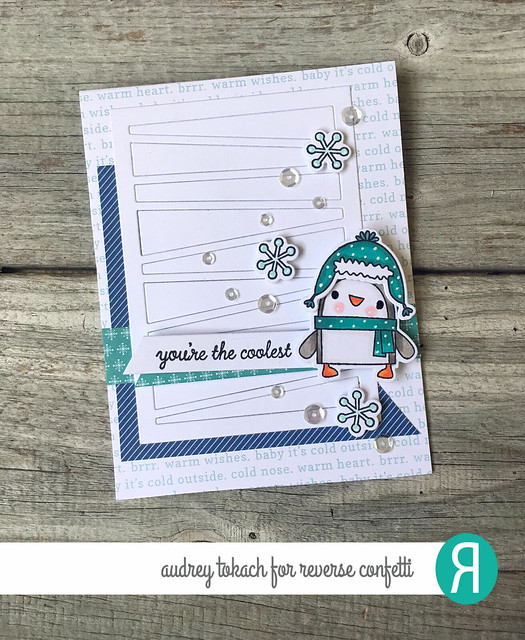
  To finish things off, I added a scattering of clear sequins and some white gel pen accents.

November SFYTT

There is still time to play along with the SFYTT challenge this month for your chance to win a Reverse Confetti gift certificate!

Thanks so much for stopping by! :)


Friday, November 24, 2017

Lawn Fawn Black Friday Exclusive - One in a Chameleon


Hello there!  Today, I have a fun card to share with you using an adorable Black Friday 2017 exclusive stamp set from Lawn Fawn!  The One in a Chameleon is available while supplies last with every $35 purchase through November 27.  And, you can get the stamp set WITH the matching dies with any $60 purchase.  Lawn Fawn is also offering FREE shipping on all US orders, and a $4 discount on international orders.

Now that we have all of that out of the way, here is my card using the One in a Chameleon set!  I paired him with the previously released You Color My World stamp set.  To create my card, I started off with a piece of Tim Holtz watercolor paper which I diecut with the largest die in the Outside In Stitched Rectangles dies.  Then, I watercolored some rainbow scribbles on the bottom 1/3 of the panel using my Zig Clean Color Real Brush markers.  I stamped and colored a bunch of crayons from the You Color My World stamp set with copic markers, and fussy cut them out with my scissors.  I popped them up side by side using foam tape.  Then, I stamped the chameleon, and colored him with copic markers before fussy cutting him out.  I stamped a sentiment from the One in a Chameleon stamp set just above the crayons, and popped the chameleon up just to the left of the sentiment.  Finally, I added a googly eye, and some white gel pen accents before popping the entire panel up on a white A2 card base.

One In A Chameleon

I just love this adorable little lizard, and I think  he is the perfect addition to the Lawn Fawn lineup!  Be sure to check out the Lawn Fawn blog for lots more inspiration using this limited edition stamp set, and get it while you can!

Thanks for stopping by! :)

Friday, November 17, 2017

From the Elf Gift Tags {Reverse Confetti}


Hello hello!  Today, I have a pair of fun tags to share with you using the adorable new Christmas Cheer elves from Reverse Confetti!  It's so hard to believe that elf season is upon us already!  What happened to this year?!

To create my tags, I used the variations of the same elements and did them assemble line style.  I cut two tag bases with the Topped off Tag Confetti Cuts dies from Premier Polar White cardstock.  For the girl tag, I diecut the Big Stripes Tag Layer Confetti Cuts from Lime cardstock, and for the boy, I added some polka dots using the Dots Tag Layer Confetti Cuts from Salsa cardstock.  Each is topped with a stitched topper using the Top 'o the Tag Confetti Cuts dies.  Each has a sentiment from the Sentimental Christmas stamp set stamped onto a Figure of Speech talk bubble.

From the Elf Tags

For the girl tag, I had to incorporate some pink, of course!  I paper pieced her hat with patterned paper from the True Love paper pad, and colored her in shades of pink, green and red.

From the Elf Tags

For the boy elf, I added some blue to the design and paper pieced his hat with pretty plaid paper from the new Cheerful & Kind paper pad.  A scattering of tiny wood stars and some white gel pen accents finishes off the tags nicely.

From the Elf Tags

And before I go... Reverse Confetti is having a Black Friday sale! It lasts a whole week long!  Do some holiday shopping, or clear your wishlist and save 25%!


That's all for me today!  Thanks for stopping by!! :)


Thursday, November 16, 2017

Lawn Fawn Holiday Week!


Hello there!  Today, I have a card to share with you for Lawn Fawn holiday week!  My card features the super cute Frosty Fairy Friends stamp set.  Read on the find out how I created my card. :)

I started off with a Narwhal A2 card base.  I also used the Stitched Rectangles Stackables to diecut a stitched panel slightly smaller than the card base.  I heat embossed the Snowy Backdrops on the panel with white embossing powder, and diecut some snowy hills with the Stitched Hillside Borders dies.  Then, I cut some Birch Trees out of white cardstock, and adhered them to the panel with a glue pen.  The front hill is popped up with foam tape for some fun added dimension, but before I adhered it, I stamped my sentiment in Narwhal ink.  I stamped and colored images from Frosty Fairy Friends, and diecut them with the coordinating Frosty Fairy Friends dies.  I popped everything up with foam tape, and added some white gel pen accents and some glittery Stickles.

Frosty Fairy Friends

That's it for me today!  Thanks so much for stopping by! :)

Sunday, November 12, 2017

25 Days of Christmas Tags {Lawn Fawn}


Hello there!  Today, I am super excited to be participating in the 25 Days of Christmas Tags with our host, Tracey McNeeley!  Tracey has been hosting this 25 day long event for 7 years now, and it's packed with so much inspiration!  Today, my project features products from Lawn Fawn!  Read on to find out more!

To create my tag, I pulled out my Puffy Star Stackables dies, and diecut the largest star from Chili Pepper cardstock.  Then I cut the second largest star twice from white cardstock and again from Licorice cardstock.  I ran the black star through my diecut machine with the Snowy Backdrops die over top and back it with one of the white stars.  Then I cut the second white start with the Simple Stitched Hillside border dies to give me a snowy hill.  I stamped and colored the tree from the Christmas Dreams stamp set, and diecut it with the coordinating Christmas Dreams dies.  To assemble my tag, I first punched a hole in the red star with a hold punch.  Then I popped the black star up on top with foam tape, and centered the tree within the black star.  For the sentiment, I pulled out the Plan on It: Holidays stamp set, and stamped Happy Christmas on a Bannertastic banner.

LF 25 days tag

I added some white gel pen accents, and some Christmas Red Stickles to the tree ornaments, and some glitter pen to the tree star.  Finally, I added a Peppermint Lawn Trimmings bow.

LF 25 days tag

That's it for me today!  Be sure to visit Tracy's blog for lots more Lawn Fawn holiday tag inspiration!  Join us next week for Fawny Holiday Week on the Lawn Fawn blog!


Thanks for stopping by!

Friday, November 10, 2017

More Reverse Confetti November Release!


Hello there!  Today, I have another card to share with you using the new Kitchen Love stamp set from the Reverse Confetti November release.  To create my card, I started off with an A2 card base.  I diecut some Premier Polar White cardstock with the All Framed Up Confetti Cuts die, and adhered the two largest frames to the card base with a glue pen.  I love that the new Scallop Stripe Panel Confetti Cuts die fits perfectly inside!  I stamped and colored images from Kitchen Love, and diecut them with the coordinating Kitchen Love Confetti Cuts dies.  I arranged them where I wanted them on the panel, and popped everything up with foam tape.  I stamped a sentiment from the set on the tag die from the In the Bag Confetti Cuts die set, and threaded a button with some Solid Carribean twine.  Finally, I added some white gel pen accents to finish off my card.


Baking 1

I love all of the white on white.  It really makes the images the star of the show.  This stamp set is so cute, and perfect for holiday baking!

Baking 2

That's all for me today... thanks so much for stopping by! :)


Wednesday, November 8, 2017

Reverse Confetti November Blog Hop


Hello there!  It's Reverse Confetti November blog hop and release day!  All of the amazing new November goodies are available NOW in the Reverse Confetti store and at all of your favorite retailers!


I have another card to share with you today using a bunch of new release goodies!  To create my card, I started off with an A2 card base.  I added a piece of Cheerful & Kind patterned paper to the card front.  Then, I cut the Small Diamond Tiles Cover Panel from Salsa card stock and adhered it on top of the patterned paper.  For my focal point, I diecut the largest square from the new Scalloped Squares Confetti Cuts die set from Lime card stock and again from white card stock.   I used the Jingle All The Way Confetti Cuts die to cut a sentiment out of the white square center, and backed it with Salsa cardstock before nestling it inside the lime green frame.  I stamped the colored the cute little boy elf from the Christmas Cheer stamp set, along with a sack of presents and some single presents, and diecut them with the coordinating Christmas Cheer Confetti Cuts.  I popped them all up with foam tape on the bottom right, below the sentiment, and added some white snowflakes cut using the Snowflake Trio Confetti Cuts dies.


Christmas Cheer 1

To add a little holiday sparkle, I added a scattering of clear sequins and a border of Icicle Stickles around the sentiment panel, and finished off my card with some white gel pen accents.

Christmas Cheer 2

That's all for me today,  but be sure to hop along to see what the rest of the design team has to share with you!

Audrey Tokach - **You are here**
And, ‘Fetti Friend... Laurel Seabrook
Thanks so much for stopping by! :)


BLOG TEMPLATE BY DESIGNER BLOGS