Monday, March 8, 2021

Reverse Confetti March Creative Hop


Today is the day!  The new release from Reverse Confetti is available NOW in the Reverse Confetti store and at your favorite retailers!  I have one more card to share with you using the new You Coordinates stamp set, coordinating You Confetti Cuts, my new favorite, the Along the Dotted Lines Cover Panel, and the previously released Multi Step Cacti stamp set and coordinating dies.

I started off diecutting a piece of white cardstock with the Along the Dotted Lines Cover Panel.  I splattered it with black watercolor, and added a strip of patterned paper at the bottom.  I stamped and colored the cacti plants, then added their detail layer.  This set is so fun to play with!!  I popped them up with foam take along the bottom of the card.


You Coordinates

Behind them, I tucked the large YOU dietcut, cut from black and white cardstock using the You Confetti Cuts die, and just above that, I used the You Coordinates stamp set to complete the sentiment.

Sunday, March 7, 2021

Reverse Confetti Countdown to Confetti - Day 3


Hello there!  It's day three of the Countdown to Confetti with Reverse Confetti!  All of the goodies that we will be sharing with you will be available in the Reverse Confetti store and at your favorite retailers on March 8th.

I have two cards to share with you today!  The first one uses the new Enchanted Garden stamp set and coordinating Enchanted Garden Confetti Cuts. I started off by diecutting a piece of patterned paper with the Along the Dotted Lines Cover Plate from patterned paper, then I ran it through the diecut machine again with the previously released You're Super Duper Confetti Cuts dies.  I mounted the panel on Piggy Bank cardstock.  Then I cut the Head in the Clouds Cover Panel twice; once from white cardstock and once from vellum.  I shift the vellum layer up a bit and adhered it to the white layer, then added that to the card front.

Enchanted Garden

I stamped an colored on the of the adorable fairies from the Enchanted Garden stamp set, and diecut it with the coordinating Enchanted Garden Confetti Cuts.  Before, I  popped her up with foam tape, I went around the edges of the frame and clouds with Diamond Stickles.  To finish off the card, I added some white gel pen accents.

Enchanted Garden

My next card uses the new Hop Into Spring stamp set and coordinating Hop Into Spring Confetti Cuts.  I started off by diecutting a piece of patterned paper with the Along the Dotted Lines Cover Panel.  Then, I cut the Head in the Clouds Cover Panel from teal and green cardstock.  I cut the green piece to minic grass in my scene.  I added a rainbow to the sky using the Over the Rainbow Confetti Cuts dies.

Hop Into Spring

I stamped and colored some of the images from the Hop Into Spring stamp set, and diecut them.  I popped them up with foam tape, and added some white gel pen accents to finish off my card.

Hop Into Spring

 That's it for me today,  but be sure to hop along and comment as you go for your chance to win a Reverse Confetti gift certificate!  Hope to see you back tomorrow! :)

Amy Kolling

Tricia Barber

Lisa Henke

Deanne Kuntz

Kathy Schweinfurth

Dana Joy

Jeanne Jachna

Dilay Nacar

Audrey Tokach

Tina Smith

Candice Fisher

Olga Matyushevskaya

Amy Tsuruta


Saturday, March 6, 2021

Reverse Confetti Countdown to Confetti - Day 2

Hello there!  It's day two of the Countdown to Confetti with Reverse Confetti!  All of the goodies that we will be sharing with you will be available in the Reverse Confetti store and at your favorite retailers on March 8th.

I've got a big post for you today, so grab a cuppa something and settle in!

My first card uses the new YOU Confetti Cuts, You Coordinates stamp set and the new Big Flower Cover Plate.  This card took lots of diecutting but I think it was totally worth it.  I started out by diecutting the Big Flower Cover Panel from black and white cardstock and a rainbow of colors.  I adhered the  white diecut panel to a white card base.   Then I inlaid each rainbow petal like a puzzle.

You Coordinates

With a background like this, you need a bold sentiment and the new You Coordinates stamp set and accompanying YOU Confetti Cuts die are the perfect solution!  I diecut the large YOU from black and white cardstock and adhered one on top of the other.  Then, I used the You Coordinates stamp set to heat emboss the rest of the sentiment in white embossing powder on black cardstock.  I popped a red heart, also from the die set, up in the center.

You Coordinates

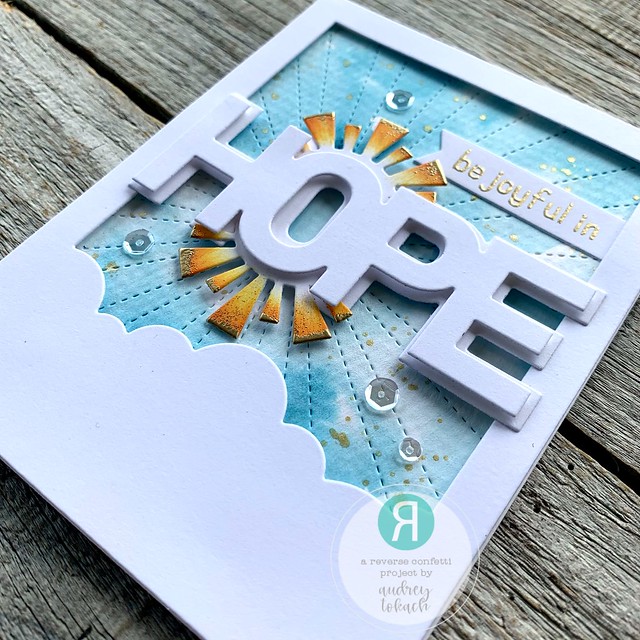
Next up is Hope Coordinates, HOPE Confetti Cuts and the new Head in the Clouds Cover Panel.  To create this card, I started off by watercoloring a piece of watercolor paper with blue to create the sky, then spattering it with metallic gold watercolor.  I diecut the panel with a previously released Stitched Rays Cover Panel.  Over top of that, I popped up the new Head in the Clouds Cover Panel cut from white cardstock. 

Hope Coordinates

Next, I diecut the HOPE Confetti Cuts from white cardstock.  I ink blended Wild Honey and Spiced Marmalade Distress Oxide inks over the rays of the sun.  Then I swiped the edges with an embossing pad, and heat embossed the tips of the rays with  gold embossing powder before popping the diecut up with foam tape.  I embossed a sentiment from the Hope Coordinates stamp set onto a banner, and added a scattering of clear sequins to finish things off. 

Hope Coordinates

Finally, Adorned Egg!  I made a little 4.5" x 4.5" square card using the basket image from the new Adorned Egg stamp set.  I diecut a square using the Along the Dotted Lines Cover Panel.  I ran it through my machine once, turned it sideways and ran it through again.  The result is a checked square.  I ink blended some Spun Sugar Distress Oxide ink over it, then stamped and colored the image before diecutting it with the coordinating Adorned Egg Confetti Cuts.  I popped everything up and gramed it with a scalloped frame before mounting it to a Piggy Bank cardstock base.

Adorned Egg

The sentiment is also included in the set, and I added some white gel pen accents to finish off the card.

Adorned Egg

 That's it for me today,  but be sure to hop along and comment as you go for your chance to win a Reverse Confetti gift certificate!  Hope to see you back tomorrow! :)

Amy Kolling

Tricia Barber

Lisa Henke

Deanne Kuntz

Kathy Schweinfurth

Dana Joy

Jeanne Jachna

Dilay Nacar

Audrey Tokach

Tina Smith

Candice Fisher

Olga Matyushevskaya

Amy Tsuruta


Friday, March 5, 2021

Reverse Confetti Countdown to Confetti - Day 1

Hello there!  It's day one of the Countdown to Confetti with Reverse Confetti!  All of the goodies that we will be sharing with you will be available in the Reverse Confetti store and at your favorite retailers on March 8th.

Today, we are highlighting two new stamp sets and their coordinating dies, along with what may be my favorite Reverse Confetti die EVER!

First up, Orange Blossoms!  To create this card, I started off by diecutting some white cardstock with the new Along the Dotted Lines Cover Panel.  Do you hear the angels singing?  This die is PERFECT.  It adds just the right amount of something to the background without taking away from those gorgeous orange blossoms!  I may have used this die on 90% of my projects this release, and I am not putting it away any time soon!  After I diecut the panel, I splattered it with some black watercolor and added a strip of patterned paper to the left edge of the panel.

Orange Blossoms

I stamped the colored the large spray of Orange Blossoms and the little leaf trio from the set in black ink, then colored the images with copic markers.  Then I shaded everything with colored pencils.  I really love the extra shading and dimension you get by combining these two coloring mediums.

I dicut them with the coordinating Orange Blossoms Confetti Cuts dies and popped them up with foam tape and added a sentiment from the set on a banner, tucked in to let the Orange Blossoms steal the show!

Orange Blossoms

My second card today is all about my very favorite flower, Lily of the Valley.   I started off by diecutting a piece of white cardstock with the Along the Dotted Line Confetti Cover Panel (I warned you!) LOL!  Then I stamped and colored the Lily of the Valley vase image with copic markers and colored pencils and diecut it with the coordinating Lily of the Valley Confetti Cuts dies.  I framed the image with the smaller of the two Scalloped Squares Confetti Cuts.

Lily of the Valley

Before popping everything with foam tape, I stamped a sentiment from the sent in black ink underneath the image.  I love that the sentiment fits perfectly in between the dotted lines.  It almost looks as if someone hand write it with an ink pen.

Lily of the Valley

That's it for me today,  but be sure to hop along and comment as you go for your chance to win a Reverse Confetti gift certificate!  Hope to see you back tomorrow! :)


Amy Kolling

Tricia Barber

Lisa Henke

Deanne Kuntz

Kathy Schweinfurth

Dana Joy

Jeanne Jachna

Dilay Nacar

Audrey Tokach

Tina Smith

Candice Fisher

Olga Matyushevskaya

Amy Tsuruta


BLOG TEMPLATE BY DESIGNER BLOGS