Wednesday, March 20, 2019

Lawn Fawn Inspiration Week: Fancy Lattice Backdrop


Hello there!  Today, I have another card to share with you using goodies from the Lawn Fawn Spring release as Inspiration Week continues!

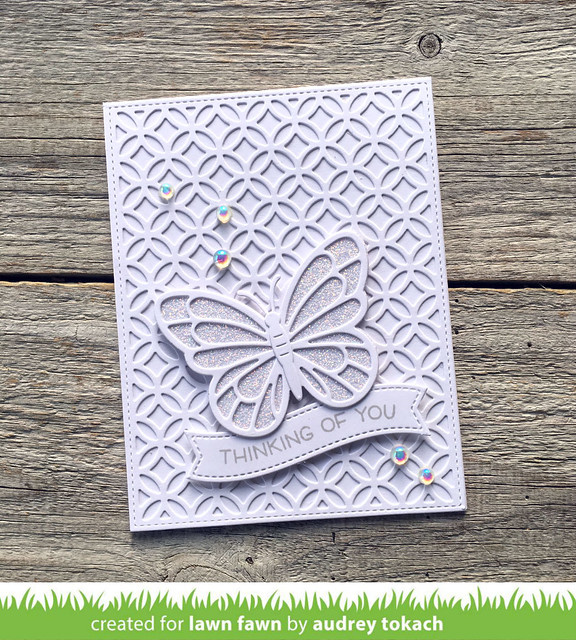
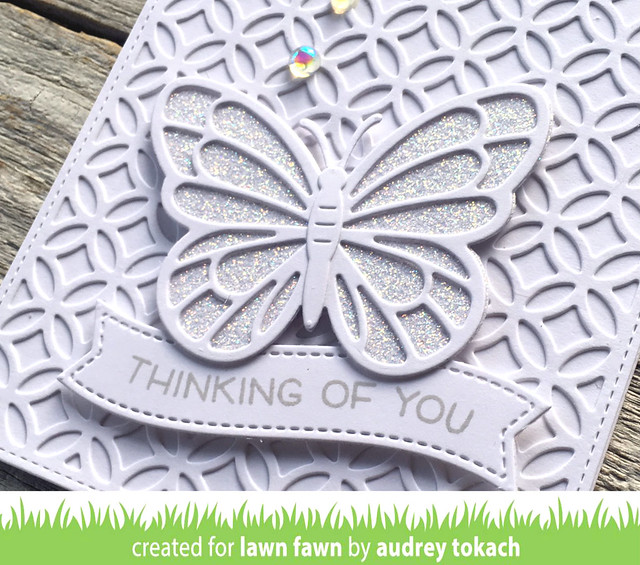
My card today features the gorgeous new Fancy Lattice Backdrop die.  To create my card, I started off with a white A2 card base.  I diecut the Fancy Lattice Backdrop from white and layered that on top using the glue tube.  Then I diecut the largest butterfly from the Layered Butterfies die set, with the outline layer cut from white and the solid layer cut from Pixie Dust Glitter Cardstock.  I glued those layers together and popped the butterfly up with foam tape.  Then, on a Fancy Wavy Banner diecut, I stamped a sentiment from the new Wavy Sayings stamp set in Manatee ink.  To finish off my card, I added some iridescent gems.

Layered Butterfly


Layered Butterfly


That's all for me today, but be sure to stop by the Lawn Fawn blog to see lots more from the design team!

Thanks for stopping by!!

Tuesday, March 19, 2019

Lawn Fawn Inspiration Week: Simply Celebrate Spring


Hello there!  I'm back with another project for Lawn Fawn Inspiration Week!  Today, I am sharing a card using the new Simply Celebrate Spring stamp set!  It is scaled perfectly to work with some of my other Lawn Fawn favorites!

To create my card, I started off with a horizontal A2 white card base.  On top of that, I layered the Itsy Bitsy Polka Dot Backdrop, also diecut from white.  To ground my focal point, I diecut a piece of the new Really Rainbow Scallops 6x6 paper and matted it with the Fancy Scalloped Rectangle Stackables.  I stamped and colored the Easter Eggs border from the Simply Celebrate Spring stamp set and diecut it with the coordinating dies.  Then, I pulled out one of my previously released favorites, Eggstra Special Easter, and colored those images with the same colors.  I popped everything up with foam tape, and stamped a sentiment from the Eggstra Amazing Easter stamp set on to an Everyday Sentiment Banner diecut.  I finished things off with some white gel pen accents.


Simply Celebrate Spring

That's all for me today, but be sure to stop by the Lawn Fawn blog to see lots more from the design team and stop back by tomorrow because I have another project to share with you as inspiration week continues! :)

Thanks for stopping by!!

Sunday, March 17, 2019

Lawn Fawn Inspiration Week: Outside In Stitched Flowers and Stitched Flower Frames


Hello there!  I'm back with another project today as Lawn Fawn Inspiration Week continues!  Today, I am using the new Stitched Flower Frames and Outside In Stitched Flowers.  I started off with an A2 card base cut from the new Fog cardstock.  Over top of that, I layered a Stripey Backdrop diecut cut from the  Spring Fling 6x6 paper pad.  I diecut my flower pieces from Cilantro, Sticky Note and Fake Tan cardstock and inked the edges with lightly darker shades of Distress Oxide inks.  I layered the flower pieces together using foam tape between each layer for dimension.  I stamped a sentiment from the Wavy Sayings stamp set onto a Fancy Wavy Banner diecut, and popped that up over top of a banner strip of floral Spring Fling paper.  To finish off my card, I added a scattering of yellow iridescent sequins and some white gel pen accents.

Stitched Flowers

That's all for me today, but be sure to stop by the Lawn Fawn blog to see lots more from the design team and stop back by tomorrow because I have another project to share with you as inspiration week continues! :)

Thanks for stopping by!!

Saturday, March 16, 2019

Lawn Fawn Inspiration Week: RAWRSOME


Hello there!  It's day 3 of the Lawn Fawn Inspiration Week, and today, I have a card to share with you using one of my favorite stamp sets from the new release, RAWRSOME!

To create my card, I started off by diecutting a piece of white cardstock with the largest die from the Outside In Stitched Rectangles dies.  I masked off the bottom 1/3 of the panel and inked the upper part with Mermaid Lagoon, Blueprint Sketch and Chipped Sapphire Distress Oxide inks.  I splattered on some clean clear water to bleach out some areas, then splattered again with the Gansai Tambi Starry Colors gold watercolor.  When it was dry, I added a flight trail in the sky using the Stitched Trails dies.  Then, I stamped and colored images from the RAWRSOME stamp set and diecut them with the coordinating RAWRSOME dies.  I glued the volcano down with the glue tube, and popped everything else up with foam tape.  A sentiment from the set was stamped in a Everyday Sentiment Banner diecut and popped up as well.  I added a trio of small clouds to the sky using the smallest Simple Puffy Clouds Frames dies, and some white gel pen accents finishes off my card.

RAWRSOME

That's all for me today, but be sure to stop by the Lawn Fawn blog to see lots more from the design team and stop back by tomorrow because I have another project to share with you as inspiration week continues! :)

Thanks for stopping by!!

Friday, March 15, 2019

Lawn Fawn Inspiration Week: Shadow Box Park Add-On


Hi there!  It's day 2 of Lawn Fawn Inspiration Week!  Today, I am showcasing the Shadow Box Park Add on!  To create my shadowbox, I diecut the  main box from white cardstock, then added the arched window using the die from the set.  I layered a piece of Spiffy Speckles patterned paper on the back of the box for the sky.  Then, I diecut the trees from brown cardstock and green Really Rainbow Scallops patterned paper.  I stamped and colored the horse and a few pieces of fence from the Hay There stamp set.  The fence pieces were adhered right to the back of the box between the trees with a glue pen, and the horse was positioned on the center layer of grass, cut from Cilantro cardstock.  The sentiment, from the Hay There stamp set was stamped in black ink onto a Simple Wavy Banner diecut.

Shadow Box Park Add On

That's all for me today, but be sure to stop by the Lawn Fawn blog to see lots more from the design team and stop back by tomorrow because I have another project to share with you as inspiration week continues! :)

Thanks for stopping by!!

Thursday, March 14, 2019

Lawn Fawn Inspiration Week: Get Well Before 'n After


Hello there!  It's time for Lawn Fawn Inspiration Week!  Today, we are showcasing the new Get Well Before 'n Afters stamp set and coordinating dies!  This adorable set is perfect to use with the Magic Picture Changer die, or by itself like I have done today.

To create my card, I started off with a white A2 horizontal card base.  On top of that, I layered the Itsy Bitsy Polka Dot Backdrop cut from kraft cardstock,  and a Stitched Ractangle Frame, also cut from kraft cardstock.  For my focal point, I cut a piece of Really Rainbow Scallops patterned paper.  On top of that, I layered the grass from the Bayou Backdrop die, cut from white cardstock and inked with shades of green Distress Oxide ink.  The grass is tucked behind a Simple Hillside Border.  I stamped and colored the poor little sick whale from the stamp set, a bandaid, and medicine bottle, both are included in the set, and popped them up with foam tape.  Then, I stamped a sentiment from the set onto the sign image from the Open Me stamp set and popped that up as well.  To finish off my card, I added some white gel pen accents, and bubbles using Nuvo Drops in Morning Dew.

Get Well BA

That's all for me today, but be sure to stop by the Lawn Fawn blog to see lots more from the design team and stop back by tomorrow because I have another project to share with you as inspiration week continues! :)

Thanks for stopping by!!

Wednesday, March 13, 2019

Spellbinders Just Add Color Collection


Hello there!  I am thrilled to be be a guest on the Spellbinders Team this month to show off the amazing new collection by Stephanie Low called Just Add Color!  This collection is full of gorgeous outline florals, feathers, and amazing mandalas!  I am so excited to be able to play with this collection because if you know me, I'm all about adding color! :)

My card today features the Large Peonies Cling Rubber stamp set.  I just love how these flowers are illustrated with lots of space to color and just the right amount of whimsy!

To create my card, I started off by watercoloring a background using my Zig Clean Color Real Brush Markers.  Then, I stamped the colored the Large Peonies images using my Copic Markers.  I fussy cut the images,  and popped them up on the watercolor panel, nestled next to a bold polka dot strip of patterned paper.  Then I heat embossed a sentiment in white on black cardstock and popped that up as well.  I finished off my card with a scattering of bright pink iridescent sequins.

Spellbinders-Miss You

Be sure to go take a peek at this collection! If you love to color, this one is for you!!

Thanks for stopping by! :)

Friday, March 8, 2019

Reverse Confetti March Blog Hop


Hello there!  It's release day at Reverse Confetti!  The March release is available now in the Reverse Confetti store and at your favorite retailers!

I have one more card to share with you using the new release!  This card uses the Spring Pals stamp set and coordinating Spring Pals Confetti Cuts, the Thanks & Hello Confetti Cuts die, the Stitched Note & Frames Confetti Cuts die, and the new Darling Dots paper pad.

To create my card, I started off with a white A2 card base.  On top of that I layered a piece of Darling Dots patterned paper.  Then, I diecut the Stitched Note & Frames Confetti Cuts die from white cardstock and popped that up over top of the patterned paper.  I stamped and colored the adorable little sheep, bird and tulip patch from the Spring Pals stamp set, and diecut them with the coordinating  Spring Pals Confetti Cuts dies.

Spring Pals

I did a combination sentiment using the Thanks & Hello Confetti Cuts die.  I diecut it three times from white cardstock, and stacked it together with a glue pen.  Before adhering it, I stamped a sentiment from the Spring Pals stamp set underneath, then popped the sheep, tulips and bird up with foam tape.  I added some white gel pen accents to finish off my card.


Thursday, March 7, 2019

Countdown to Confetti Day 3 - Floral Gem & Sentimental Gems


Hello there!  Welcome to day 3 of the Countdown to Confetti with Reverse Confetti!  All of the new goodies that we will be showcasing over the next few days will be available for purchase in the Reverse Confetti store and at your favorite retailers on March 8th!

My cards today use the new Floral Gem and Sentimental Gems stamp sets, the new Love & XOXO Confetti Cuts dies and the super cute Darling Dots paper pad!

To create my first card, I started off by watercoloring a background using shades of purple Distress inks, drying in between each layer with a heat tool.  When my watercolor was dry, I white heat embossed the frame image from the Floral Gem stamp set and colored it in with my Prismacolor pencils.  Then, I diecut the new Love & XOXO Confetti Cuts die three times from white cardstock and stacked them together with a glue pen.  To finish things off, I added a scattering of clear sequins and popped the panel up on a white card base using foam tape.

Floral Gem

I love how the sequins take on the color of the watercolor underneath.  Drying between each layer gives such a fun and different look to the watercolor!  LOVE!

Floral Gem

For my second card, I started off with a Stone card base.  On top of that, I diecut the Big Stripes Cover Panel from some Darling Dots patterned paper.  I stamped and colored the Floral Gem frame image with Copic markers and stamped a sentiment from the Sentimental Gems stamp set in the center, then diecut it with the coordinating Floral Gem Confetti Cuts dies.

Sentimental Gems

I popped the frame image up in the center of the card with foam tape, and added some white gel pen accents to finish off my card.

Sentimental Gems

That's all for me today,  but be sure to hop along with the Crew to see what they have to share with you today, and comment along the way for a chance to win a Reverse Confetti gift certificate!  Thanks for stopping by, and see you tomorrow! :)

Audrey Tokach - **you are here**


Wednesday, March 6, 2019

Countdown to Confetti Day 2 - So Super


Hello there!  Welcome to day 2 of the Countdown to Confetti with Reverse Confetti!  All of the new goodies that we will be showcasing over the next few days will be available for purchase in the Reverse Confetti store and at your favorite retailers on March 8th!

My card today shows off my favorite products from the release, the So Super stamp set and coordinating So Super Confetti Cuts along with the You're Super Duper Confetti Cuts die!

To create my card, I started off by diecutting a piece of the new Darling Dots patterned paper with the Diagonal Stitches Cover Panel Confetti Cuts die.  Then, I ink blended the top corners of the panel with Black Soot Distress Oxide ink, and splattered the panel with watered down white acrylic paint.  I then diecut the sentiment in the panel using the new You're Super Duper Confetti Cuts die, and mounted the panel on a Bumblebee cardstock base.  I used the All Framed Up Confetti Cuts die and some Brick cardstock to add a stitched frame around the panel.  Then, I stamped and colored images from the So Super stamp set, and diecut them with the coordinating So Super Confetti Cuts dies.

So Super

I adhered the skyline image flat to the panel, and popped up the super hero and BAM bubble using foam tape.  I pulled out my Moon Men stamp set and stamped a few stars from the set into the sky, then added white gel pen accents to finish off my card.

So Super

That's all for me today, but be sure to visit the Crew and hop along to comment for your chance to win a Reverse Confetti gift certificate!  See you tomorrow! :)

Audrey Tokach - **you are here**


BLOG TEMPLATE BY DESIGNER BLOGS