Thursday, December 21, 2017

A Warm Hello {Reverse Confetti}


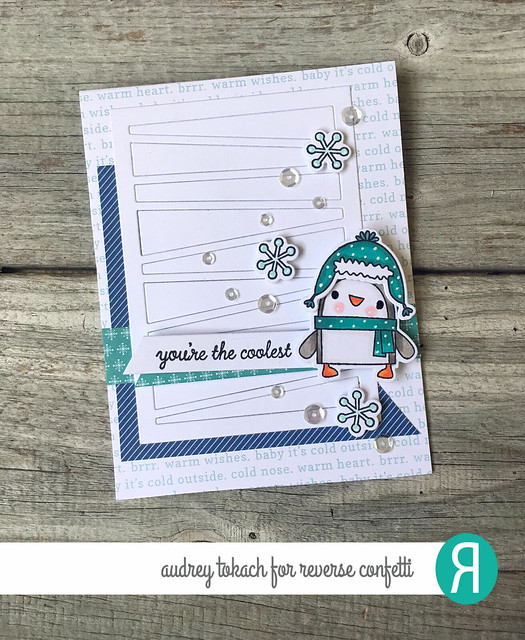
Hello there!  Today, I have a card to share with you using some adorable snowmen from the latest Reverse Confetti release!  I am always smitten with snowmen, and these two are some of my favorites!

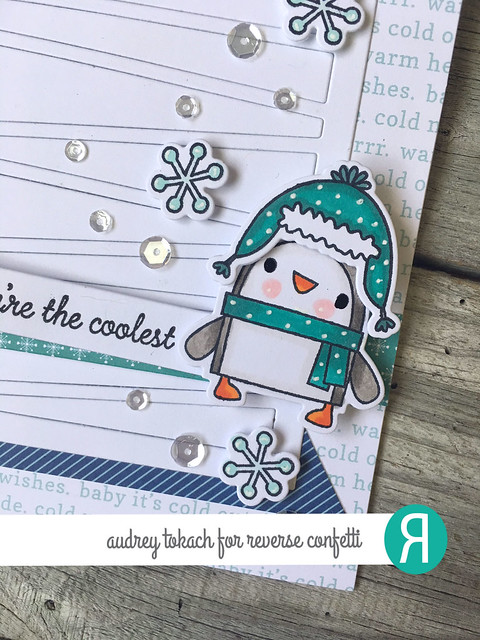
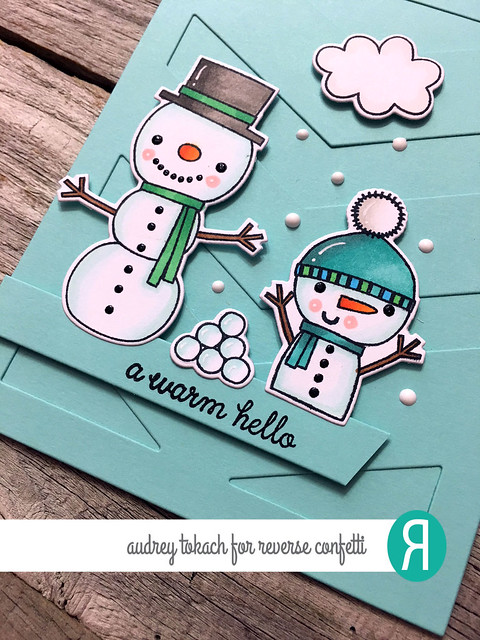
To create my card, I started off with an Iced Aqua card base, and I diecut the Big Chevies Cover Panel from Iced Aqua as well.  I glued the chevrons on top of the card base with a glue pen.  I really love subtle tone on tone backgrounds, and the cover panels are perfect for that!  Then I stamped and colored the super cute snowmen pair from the Cool Friend stamp set, along with the snowball pile and cloud from the same set, and diecut them with the coordinating Cool Friends Confetti Cuts Dies I stamped a sentiment, also from the set, onto a strip of Iced Aqua cardstock and used that to ground my snowmen.    I popped everything up with foam tape.  To finish things off, I added some white gel pen accents, and some falling snow using Pure White Nuvo Drops.

Warm Hello

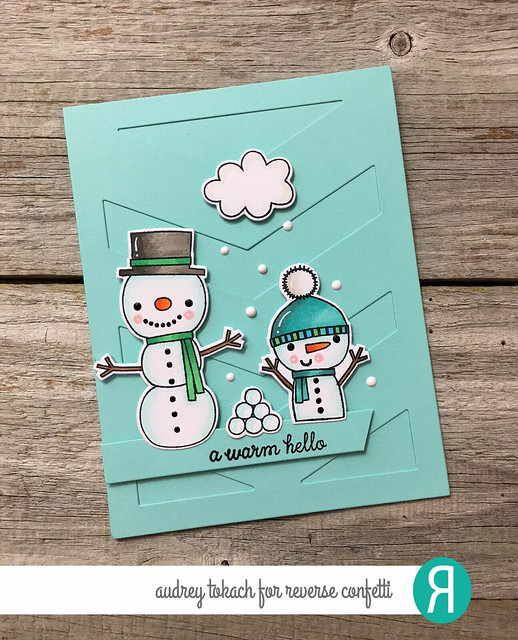
Sometimes, the smallest details make the biggest impact.  I used a black glaze pen to darken the eyes, mouths and buttons on each snowman.  It gives a shiny, slightly raised effect, and it makes such a huge difference!  It gives them extra life I think.  And those Nuvo Drops... I only have a few bottles in pretty neutral colors (black, white, clear, clear glitter and icy blue) but I am loving them so much!

Warm Hello

That's all for me today!  I'll be back in a few days with a card using the December SFYTT!  I hope you will join us for a chance to win a Reverse Confetti gift certificate! :)

Thanks for stopping by!!


Saturday, December 16, 2017

Essentials By Ellen Celebration Lady


Hello hello!!  I am so excited to be sharing a project for the newest Ellen Hutson release today!  My card features the fun Celebration Lady stamp set and coordinating Celebration Lady dies.  The newest leading lady is ready to party! :)


I have been trying to push myself out of the box lately, and I am loving colored card bases right now.  It is such a fun change from white!  To create my card, I started off with a black A2 card base, and diecut a panel slightly smaller to add a stitched edge.  I splattered the panel with some gold metallic watercolor to add a festive feel.  I stamped and colored Celebration Lady with copic markers, and paper pieced her skirt with some polka dot paper from my stash.  Then I diecut her with the coordinating Celebration Lady dies.  I did not like how the white edge looked against the dark background, so I colored around the edges of the diecut with a black marker, then popped her up with foam tape.  Of course, it can't be a celebration without some bubbly!  I added a glittery champagne glass to her hand, and coated it with some glossy accents for shine.  For some more festive touches, I stamped and colored the streamer from the set and adhered a few of them with a glue pen.  I stamped a sentiment from the set onto a hand cut banner of black cardstock, and heat embossed it with white embossing powder to make it pop.  And to finish things off, I added a scattering of sequins, and some white gel pen accents before popping the panel up on the card base with some foam tape.

Celebration Lady

There's lots more to see today!  Be sure to hop along to visit these wonderful ladies and see what they have to share with you today!!

Audrey Tokach  **you are here**

Thanks so much for stopping by!! :)

Thursday, December 14, 2017

Grande Hugs {Paper Smooches}

Hello there!  I took advantage of the Paper Smooches Black Friday sale, and picked up the adorable Baby Birds stamp set and coordinating dies!  I colored a bunch the other day and used a few to create a card that I wanted to share with you!

I stamped and colored the Baby Birds with Copic Markers and diecut them with the Baby Birds Icons dies.  Then I diecut the Cozy Coffee die from black cardstock for the outline and white cardstock for the inner pieces.  I used Copics to add some shading, and cut the center sleeve from some polka dot patterned paper from my stash.  I colored the heart from the set with some red shades, and added some gel pen accents.  Before gluing down the cup, I used the Stitched Flourishes 2 dies to add some steam behind the cup, and stamped some Shadows in light gray ink at the bottom to ground the cup and yellow bird.  Then I glued down the cup, and popped up the birds with foam tape.  The sentiment is from Winter Sampler, and to finish things off, I added a scattering of diecut Tiny Hearts.

Grande Hugs

Hope you like it!  Thanks so  much for stopping by! :)

Tuesday, December 12, 2017

Lawn Fawn Inspiration Week: RAWR and Lacy Heart Stackables


Hello hello!  Welcome to another day of Lawn Fawn Inspiration Week!!  Today, I have a few little treat bags to share with you using the new RAWR stamp set and Lacy Heart Stackables!

I filled some polka dot vellum treat bags with candy.  I got the bags years ago at Target.  I am not sure if they carry them anymore, but you might be able to find some similar online.  I created two tags, by diecutting the second largest of the new Lacy Heart Stackables dies from Blue Jay and Raspberry cardstock.  Then I used a slightly smaller Outside In Stitched Heart Stackables to diecut some hearts from ink blended backgrounds.  I stamped and colored the adorable dino from the new RAWR stamp set, along with the little speech bubble for each tag.  Behind then, I added a palm tree, and popped them up in front.  Each treat bag is tied with some coordinating Lawn Trimmings Twine, and the tags are attached with tiny clothes pins.

RAWR 3

For the boy version, I used shades of blues and greens.  Blue Jay cardstock and twine coordinate perfectly with my ink blended background.

RAWR 1

For the girly version, I did an ink blended background in shades of pink and orange, and added a tiny  pink bow to her hair before added a Peppermint Lawn Trimmings bow.

RAWR 2

There's lots more on the Lawn Fawn blog to see!  Check back again tomorrow as I have one more project to share with you using the new Lawn Fawn release, available December 14th!

Thanks for stopping by! :)

Monday, December 11, 2017

Lawn Fawn Inspiration Week: Love Ya and You're Sweet Line Borders

Hello there!  Lawn Fawn inspiration week is in full swing and I have another project to share with you today!  All of the new goodies will be available in the Lawn Fawn store and at your favorite retailers on December 14th, which is just a few days away!

To create my card today, I started off by watercoloring a background with Distress ink onto Tim Holtz Distress watercolor paper.  When it was dry, I diecut it with the largest of the Outside In Stitched Rectangles dies.  I stamped and colored an image from the new Sweet Friends stamp set, and diecut it with the coordinating Sweet Friends dies.  I can't even handle the cuteness of those little hands and feet!  I needed to ground my little yogurt cup, so I perched him on top of two new dies, which also create my sentiment - the You're Sweet Line Border and Love Ya Line Border.  I just love these dies.  The font is fantastic... just the perfect amount of whimsy to compliment Lawn Fawn images perfectly.  I glued each down with a glue pen, using the grid lines on my desk mat to make sure they were straight.  I popped the panel up on a white card base, and added a scattering of iridescent sequins and some white gel pen to finish off my card.


You're Sweet Love Ya

There's lot more to see on the Lawn Fawn blog today, including an adorable little dinosaur who is also being showcased today!  I will have a project starring him to share with you tomorrow.

Thanks so much for stopping by! :)

Sunday, December 10, 2017

Lawn Fawn Inspiration Week - Conversation Hearts


Hello there!  It's Lawn Fawn Inspiration Week!  The new release will be available on December 14th in the Lawn Fawn store and at your favorite retailers!

Today, we are showcasing an adorable add on to the How You Bean series called How You Bean: Conversation Hearts Add On.  While you can certainly add these candy hearts to the jar in the How You Bean stamp set, you can also use them alone or paired with other Lawn Fawn favorites.  For my card today, I started off by ink blending some Ballet Slippers Ink onto a white card  base.  I diecut the Stripey Backdrop from white cardstock and layered it on top.  Then I stamped and colored the pile of candy hearts from the How You Bean: Conversation Hearts Add On stamp set, along with a single heart, also from the same set.  I popped those up in the center of the card front, and stamped and colored a bird from the Love Letters stamp set to perch on top.  The sentiment, from the same set, is stamped on a hand cut banner.  To finish things off, I added a scattering of diecut hearts, cut from the Journaling Card dies, some white gel pen accents and a Peppermint Lawn Trimmings bow.

Candy Hearts


There's lot more to see on the Lawn Fawn blog!  Be sure to check back here tomorrow, because I have another fun project to share with you! :)

Thanks for stopping by!!

Saturday, December 9, 2017

Lawn Fawn Inspiration Week - Sweet Friends


Hello there!  It's Lawn Fawn Inspiration Week!  The new release will be available on December 14th in the Lawn Fawn store and at your favorite retailers!

Today, the team is showcasing the adorable new set, Sweet Friends!  To create my card, I ink blended some Picked Raspberry Distress ink onto a white A2 card base, then bleached out some spots with clean clear water, and splattered on some watered down Picked Raspberry.  When it was all dry, I diecut the largest of the new Lacy Heart Stackables dies from white cardstock, then ran it through my diecut machine again with the largest Stitched Heart Stackables dies to give me a frame.  I stamped and colored three cake stands from the previously released Baked with Love stamp set, and on top of each, popped up a frozen yogurt cup from the Sweet Friends stamp set.  I think these could also pass for cupcakes with LOTS of icing! :)  For my sentiment, I stamped the large "Happy" from the Happy Happy Happy stamp set and colored it with red copic markers, then finished the sentiment with an add on from the Happy Happy Happy Add-On stamp set.  I added some white gel pen accents, and stamped some tiny hearts from the Sweet Friends set in Lobster ink, and finished things off with a scattering of pink iridescent sequins.

Sweet Friends

There's lot more to see on the Lawn Fawn blog!  Be sure to check back here tomorrow, because I have another fun project to share with you! :)

Thanks for stopping by!!

Friday, December 8, 2017

Reverse Confetti December Blog Hop


Hello there!  It's time for the December Reverse Confetti blog hop!

For my card today, I pulled out an old favorite, Mouse Mail.  I just love these little mice!  To create my card, I started off with a Stone cardstock base.  On top of that, I put a piece of striped patterned paper from the Free Spirit paper pad.  I stamped the mice, mailbox and a few piles of letters from Mouse Mail in Midnight ink onto Stone cardstock, colored them with my Prismacolor Colored Pencils, and diecut everything with the coordinating Mouse Mail Confetti Cuts.  I cut a strip of stone cardstock to stamp my sentiment on, which is from the A Friend Like You stamp set, which I sandwiched between two scalloped stripes from the Elemental Stripes stamp set. One either side of the sentiment, I popped up a pile of letters.  I adhered the panel up with foam tape, and used it to ground my little scene.  To finish things off, I added a scattering of sequins, and some white gel pen accents.

Hello My Friend 

Stamping and coloring on the stone cardstock was a nice change from my usual white backgrounds.  Reverse Confetti cardstock takes colored pencil beautifully, too!

Hello My Friend

That's all for me today,  but be sure to hop along to see what the rest of the design team has to share with you!

Audrey Tokach - **You are here**
And, ‘Fetti Friend... Laurel Seabrook
Thanks so much for stopping by! :)


Monday, December 4, 2017

Advent Calendar Extravaganza with Taheerah Atchia

Hello, hello!  Today, I have a super fun project to share with you!  I am so honored to part of the Advent Extravaganza again this year!  Read on to find out more!


Advent Calendar Extravaganza is -the- festive event of the season! This ‘hop with a twist’ was dreamed up by Taheerah Atchia and features surprise destinations each day! Joining in the fun with Taheerah are ONE HUNDRED special guests - each serving up some fantastic Christmas inspiration! Just like an Advent Calendar, you’ll never know where you’re going to be visiting next until you ‘open the door’!

And that’s not all! With 25 *amazing* sponsors taking part as guests as well, your crafty wish list is bound to get a boost with a chance to win a prize EVERY SINGLE DAY!!

Join in the fun every day at taheerah-atchia.com to see what special surprises await behind the door!

Onto my project!  To create my fun holiday card, I started off with a Premier Polar White A2 card base, and I added some candy can stripes using the Striped Frame Cover Panel Confetti Cuts, cut from Salsa cardstock.  I ink blended a sky on the center cut out panel making sure to create an ombre effect so that the bottom of the panel would look snowy.  I stamped and colored images with my copic markers from the Bearing Gifts stamp set, and diecut them with the coordinating Bearing Gifts Confetti Cuts.  Then I stamped a sentiment from the Sentimental Christmas stamp set in Midnight ink, and popped the card and trees up with foam tape.

Merry Christmas

I added some white gel pen accents, and used Pure White Nuvo Drops for some whimsical snow falling in the background.

Merry Christmas

It’s not a party without a prize - and with prizes every day there are several chances to win! Today’s prize is generously supplied by Reverse Confetti so you’ll definitely want to win! Simply leave a comment on this post - then head back to taheerah-atchia.com and leave a comment there too! You must leave a comment on Taheerah’s blog as well as mine in order to be eligible to win! Don’t forget to grab the other surprise destinations from Taheerah’s blog and head over to them to leave comments there as well to improve your odds even more! You have until 23:59 EST on 31st December 2017 to enter.


Don’t forget Advent Calendar Extravaganza runs from 1st-25th December inclusive so make sure you visit taheerah-atchia.com every day for fabulous inspiration and amazing prizes every single time! Merry Christmas!

Thanks so much for stopping by! :)

Sunday, November 26, 2017

Reverse Confetti November SFYTT


Hello there!  Today, I have a card to share with you for the Reverse Confetti November Sketch For You To Try!

Here is the sketch:


And here is my card...

To create my card, I started off with an A2 card base.  I cut a piece of patterned paper from the Warm Heart paper pad and adhered it to the card front.  Then I cut another piece of patterned paper from the same paper collection on an angle to follow the sketch.  I diecut the Wonky Stripe Panel Confetti Cuts die from Premier Polar White cardstock and then added a strip of snowflake paper near the bottom of the panel.  I stamped and colored a cute little penguin from the S'more Love stamp set, and diecut him along with a few snowflakes using the coordinating S'more Love Confetti Cuts dies.  I popped all of those pieces up with foam tape, and stamped a sentiment from the same set onto a strip of white cardstock that I angled at one end.

November SFYTT

  To finish things off, I added a scattering of clear sequins and some white gel pen accents.

November SFYTT

There is still time to play along with the SFYTT challenge this month for your chance to win a Reverse Confetti gift certificate!

Thanks so much for stopping by! :)


Friday, November 24, 2017

Lawn Fawn Black Friday Exclusive - One in a Chameleon


Hello there!  Today, I have a fun card to share with you using an adorable Black Friday 2017 exclusive stamp set from Lawn Fawn!  The One in a Chameleon is available while supplies last with every $35 purchase through November 27.  And, you can get the stamp set WITH the matching dies with any $60 purchase.  Lawn Fawn is also offering FREE shipping on all US orders, and a $4 discount on international orders.

Now that we have all of that out of the way, here is my card using the One in a Chameleon set!  I paired him with the previously released You Color My World stamp set.  To create my card, I started off with a piece of Tim Holtz watercolor paper which I diecut with the largest die in the Outside In Stitched Rectangles dies.  Then, I watercolored some rainbow scribbles on the bottom 1/3 of the panel using my Zig Clean Color Real Brush markers.  I stamped and colored a bunch of crayons from the You Color My World stamp set with copic markers, and fussy cut them out with my scissors.  I popped them up side by side using foam tape.  Then, I stamped the chameleon, and colored him with copic markers before fussy cutting him out.  I stamped a sentiment from the One in a Chameleon stamp set just above the crayons, and popped the chameleon up just to the left of the sentiment.  Finally, I added a googly eye, and some white gel pen accents before popping the entire panel up on a white A2 card base.

One In A Chameleon

I just love this adorable little lizard, and I think  he is the perfect addition to the Lawn Fawn lineup!  Be sure to check out the Lawn Fawn blog for lots more inspiration using this limited edition stamp set, and get it while you can!

Thanks for stopping by! :)
BLOG TEMPLATE BY DESIGNER BLOGS