Friday, September 24, 2021

Sunny Studio Stamps - Crisp Autumn


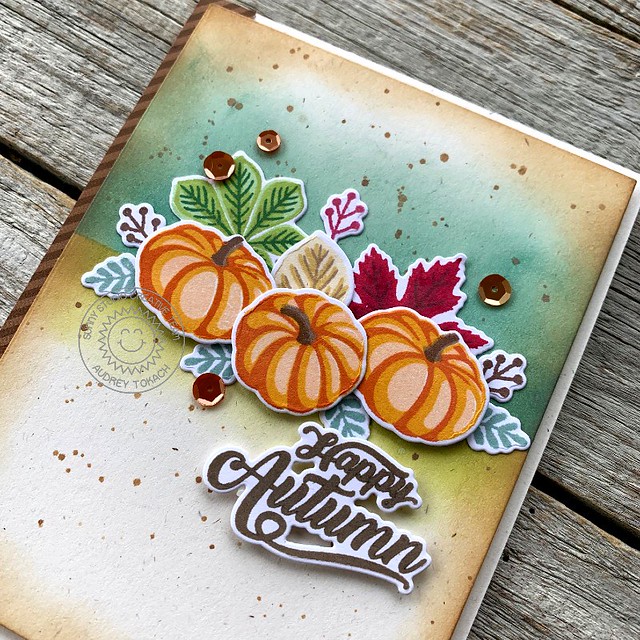
Hello friends!  Today I have a fun autumn card to share with you!  To create my card, I started off with a piece of ivory cardstock cut to 4" x 5.25".  I masked off the top portion of the panel and ink blended on some Evergreen Bough Distress Oxide.  Then, I reversed the mask and ink  blended on some Peeled Paint Distress Oxide ink.  To give a  more rustic feel to the panel, I blended Walnut Stain Distress Oxide around the edges, and splattered some all over the panel.  I stamped and diecut images from the Crisp Autumn layering stamp set.  I used dye inks in shades of orange, green, red, gold and teal then diecut them with the coordinating Crisp Autumn Dies

Crisp Autumn

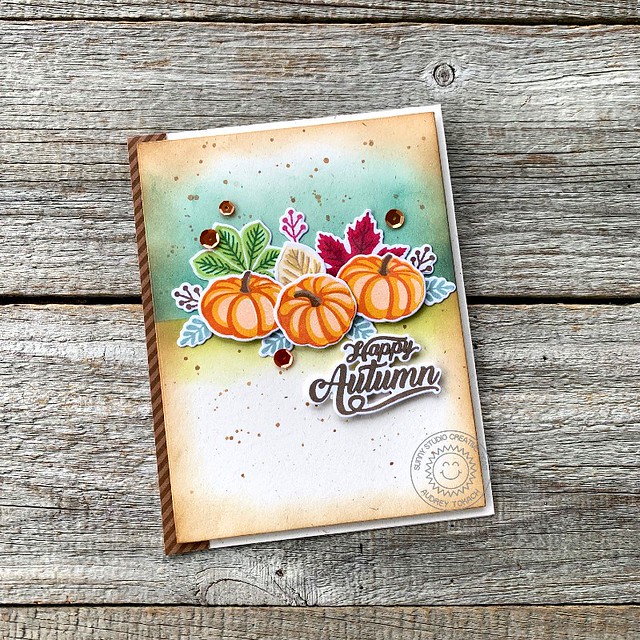
 I arranged the images, and adhered some flat with glue pen, while others were popped up with foam tape.  Then, I stamped the sentiment from the set, which I also diecut and popped up.  I adhered the panel to an A2 card base, and added a strip of Dots & Stripes Jewel Tones patterned paper to the left edge.  To finish off my card, I added some bronze sequins.

Crisp Autumn

That's all for me today!  Thanks so much for stopping by! :)

Friday, September 17, 2021

Sunny Studio Stamps - Chloe Numbers Dies


Hello friends!  I am here today with a birthday card to share with you!  I love personalized cards.  The recipient knows that it was made especially for them.  My card today is an 18th birthday card for my shark-loving son.  He has always had a fascination with sharks and ocean life since he was a little boy, and the majority of his birthday cards have been ocean themed.  I was able the really personalize his card this year to celebrate his milestone birthday with the new Chloe Number dies!  

To create my card, I started off with a piece of mint green cardstock cut to 4" x 5.25".  I ink blended the edges with Distress Oxide inks in Cracked Pistachio, Peacock Feathers, and Chipped Sapphire.  Then, I splattered on some clean water, teal watercolor and watered down white acrylic paint for added interest.  I stamped and colored images from the Best Fishes stamp set and diecut them with the coordinating Best Fishes dies.  I added a sandy bottom to my scene with the Slimline Nature Borders dies, cut from kraft cardstock and inked with Walnut Stain Distress Oxide.  I arranged the images, and popped them up with foam tape.  

Sunny Studio Stamps

I used several sentiments from the stamp set to build a custom greeting.  I started by stamping the text images, leaving room for the Chloe Number diecuts.  I diecut the numbers from the same mint cardstock, and stacked 4 of them on top of each other for dimension.  I inked the top layer with Peacock Feathers Distress Oxide ink.  To finish off my card, I added some white gel pen accents and some bubbles using Morning Dew Nuvo Drops.

Sunny Studio Stamps

That's all for me today!  Thanks so much for stopping by! :)

Friday, September 10, 2021

Sunny Studio Stamps - Bewitching


Hello there!  Today I am here with a card using the new Bewitching stamp set by Studio Studio Stamps!  One of the things I love most about Sunny Studio images is that they can me mixed and matched for endless possibilities!  For this card, I paired the adorable little cat from the Bewitching stamp set with images from several other sets to create a fun birthday scene.  

To create my card I started off with a piece of white cardstock cut to 4" x 5.25".  I masked off the bottom portion of the panel, and used Distress Oxide inks in Picked Raspberry, Kitsch Flamingo and Spun Sugar to ink blend some color on the top of the panel.  I splattered on clean water, and some pink watercolor paint to add interest.  Then I stamped and colored my images using Copic Markers, and diecut them with their coordinating dies.  The cat is from the Bewitching stamp set, the large stack of presents is from the Lazy Christmas stamps set, the large boxes and mice are from the Christmas Critters stamp set, the smaller presents are from the Holiday Express stamp set, and the tiny Balloons are from the Bear Hugs stamp set.  

SS_BewitchingBirthday

I arranged my scene, and adhered everything to the panel, gluing some images flat with glue pen and popping some up with foam tape for dimension.  Then, using the Basic Mini Shape II dies, I added a scattering of tiny stars.  The sentiment is a combination of words from the Sealiously Sweet stamp set.  Before, I popped the panel up on an A2 card base, I added a tiny strip of bright striped paper from the new Sweater Weather 6x6 paper collection.  Lastly, I added some white gel pen accents to finish off my card.

SS_BewitchingBirthday2

That's all for me today!  Thanks so much for stoping by! :)

Wednesday, September 8, 2021

Reverse Confetti September Release Blog Hop


Hello there!  It's Reverse Confetti release day!  The new release is available NOW in the Reverse Confetti store and at your favorite retailers!

Before you go shopping, I have one more project to share with you!  My card today uses the new Layered Peace and Tree Confetti Cuts dies!

I started off with a piece of light blue cardstock, diecut with the Starstruck Cover Panel.  I ink blended Blueprint Sketch, Chipped Sapphire and Black Soot Distress Oxide inks over it to create a night sky, then splattered on water and white acrylic paint.  I diecut the Tree Confetti Cuts from the right side of the panel, and added a green watercolor panel behind it to fill in the tree.  Then, I adhered that to a white A2 cardbase.  I stamped and colored one of the angel images from the previously released Joyous Holiday stamp set, and diecut it with the coordinating dies.  

RC_Peace1

I popped her up with foam tape, and added a gold start to the top of the tree.  For the sentiment, I diecut the Layered Peace Confetti Cuts dies from white and gold glitter paper and adhered them near the bottom of the tree.  To finish off my card, I added some white gel pen accents and a trio of gold sequins.

RC_Peace2


Be sure to hop along to see what the rest of the team has to share with you today!  Happy shopping! :)


Reverse Confetti

Candice Fisher

Cheiron Brandon

Dilay Nacar

Ali Farmer

Heather Ruwe

Audrey Tokach - **  youre here **

Michelle Short

Tiffany Pryce-Russom

Kelly Lunceford

Jeanne Jachna

Lisa Henke

Susan Wymer

Amy Rohl

Amy Kolling

Becky Roberts

Andrea Shell

Lien Leysen

Keia Shipp-Smith

Tricia Barber

Dana Kirby

Jenny Colacicco

Amy Tsuruta

Olga Moss

Deanne Kuntz


Tuesday, September 7, 2021

Reverse Confetti Countdown to Confetti - Day 3


Hello there!  It's day three of the Countdown  to Confetti at Reverse Confetti!  All of the products that we will be showcasing over the next few days will be available for purchase on September 8th in the Reverse Confetti store and at your favorite retailers!

Today, my projects showcase the new Patterned Panels and Sparkle and Shine Sentiments stamp sets and the Circle with Burst Confetti Cuts die.  Tehse stamp sets pair perfectly with so many of your other Reverse Confetti favorites as you will see with my projects today!

Here is my little card and tag ensemble!  I pulled out some of my other holiday favorites including Yuletide Mice and Joys of the Season.


RC_PatternStripes2

To create my card, I started off by stamping the geometric pattern from Patterned Panels at the bottom of a white cardstock panel in red ink.  Above that, I stamped the text panel from the set, and then the geometric pattern again.  I used the panels as a grounding for my Christmas scene.  I stamped and colored two images from the previously released Yuletide Mice stamp set, and diecut them with the coordinating Yuletide Mice Confetti Cuts dies.  For my sentiment, I stamped "a holiday hello" from the new Sparkle and Shine Sentiments stamp set on a hand cut banner.  I popped everything up with foam tape, and added some white gel pen accents to finish off my card.

RC_PatternStripes1

I used another image from Yuletide Mice and another sentiment from the Sparkle and Shine Sentiments to create a matching tag.  I diecut the new Circle with Burst Confetti Cuts from red and white glitter cardstock.  I glued the bursts into the tag flat with a glue pen.  Then I stamped the little mouse with the candy cane taffy to mimic the pattern of the tag.  I stamped the holly image from the Joys of the Season stamp set, colored it, and diecut it with the coordinating Joys of the Season Confetti Cuts and tucked a banner stamped with one of the Sparkle and Shine Sentiments behind the holly.  I also tucked the mouse behind the banner a bit so it looks like he is peeking out.  To finish off my tag, I added some green satin ribbons and red and white twine, and white gel pen accents to the images.

RC_SparkleShineSent

That's all for me today!  Be sure to hop along and see what the rest of the team has to share with you! Comment along the way for your chance to win a Reverse Confetti gift certificate!  Be sure to stop back by tomorrow to see my blog hop project.  It's almost release day!


Reverse Confetti

Dilay Nacar

Audrey Tokach - *you are here*

Tiffany Pryce-Russom

Lisa Henke

Amy Kolling

Andrea Shell

Amy Tsuruta

Keia Shipp-Smith

Dana Kirby


Monday, September 6, 2021

Reverse Confetti Countdown to Confetti - Day 2


Hello there!  It's day two of the Countdown  to Confetti at Reverse Confetti!  All of the products that we will be showcasing over the next few days will be available for purchase on September 8th in the Reverse Confetti store and at your favorite retailers!

Today, we are showcasing the adorable new Fall Flowers stamp set and coordinating Fall Flowers Confetti Cuts, along with the Autumn Apple Cider stamp set and coordinating Autumn Apple Cider Confetti Cuts.

To create my first card, I started off with a white A2 case base.  On top of that, I  added another layer by diecutting the All Lined Up Cover Panel, also cut from white cardstock.  I stamped and colored the large floral spray from Fall Flowers and diecut it with the coordinating Fall Flowers Confetti Cuts.  To ground the image, I dicut the new Large Detailed Circle Frame from white, and filled the center with patterned paper from the Hello Holidays 6x6 paper pad.

RC_AutumnFlorals1

I popped the floral image up with foam tape, and tucked a banner behind it, which was stamped with a sentiment from the Autumn Apple Cider stamp set.  To finish off my card, I added some white gel pen accents.

RC_AutumnFlorals2

My second card uses the new Autumn Apple Cider stamp set.  I started off by diecutting the Diagonal Stitches Cover Plate from white cardstock.  To the left side of the panel, I added a strip of patterned paper from the new Hello Holidays 6x6 paper pad.  I stamped and colored several images from the Autumn Apple Cider stamp set, and diecut them with the Autumn Apple Cider Confetti Cuts dies.

RC_AppleCider1

I arranged the images in a cluster, and popped them up with foam tape, and tucked them behind a banner stamped with a sentiment from the same stamp set.  After I adhered the panel to a white A2 card base, I added some gel pen accents to finish off my card.

RC_AppleCider2

That's all for me today!  Be sure to hop along and see what the rest of the team has to share with you! Comment along the way for your chance to win a Reverse Confetti gift certificate!  Be sure to stop back by tomorrow to see more projects as the Countdown to Confetti continues!


Reverse Confetti

Dilay Nacar

Audrey Tokach - *you are here*

Tiffany Pryce-Russom

Lisa Henke

Amy Kolling

Andrea Shell

Amy Tsuruta

Keia Shipp-Smith

Dana Kirby


Sunday, September 5, 2021

Reverse Confetti Countdown to Confetti - Day 1


Hello there!  It's Day one of the Countdown  to Confetti at Reverse Confetti!  All of the products that we will be showcasing over the next few days will be available for purchase on September 8th in the Reverse Confetti store and at your favorite retailers!

Today, we are showcasing the adorable new Boo Day stamp set and coordinating Boo Day Confetti Cuts, along with the Halloween Sentiments stamp set.

My first card uses both of the new stamp sets together.  I started off by diecutting the Along the Dotted Lines Cover Panel from white cardstock.  Then, I stamped several images from the Boo Day stamp set and colored them with my Copic markers before diecutting them with the Boo Day Confetti cuts dies.  I arranged them on the panel and adhered them with foam tape.

RC_BooDay1

The sentiment was stamped directly on the panel using a cute phrase from the new Halloween Sentiments stamp set.  For some added interest, I added a strip of striped paper from the new Hello Holidays 6x6 paper pad.  I finished off my card with some white gel pen accents.

RC_BooDay2

For my second card, I started off by diecutting an oval window from a piece of the new Hello Holiday paper pad using the Oval Window Cover Panel.  Behind that, I ink blended a night sky using Distress Oxide inks in Blueprint Sketch, Dusty Concord and Black Soot.  Then, I splattered it with water and gold watercolor to create a galaxy effect.  I stamped and colored images from Boo Day, and diecut them with the Boo Day Confetti Cuts.  Before adhering them to the panel, I added a black frame around the panel using the Stitched Note & Frames Cover Panel.

RC_BooDay3

For my sentiment on this card, I diecut the Layered Boo Confetti Cuts die from both black and white cardstock and layered them together.  Then, to finish off my card, I added some white gel pen accents.

RC_BooDay4


That's all for me today!  Be sure to hop along and see what the rest of the team has to share with you! Comment along the way for your chance to win a Reverse Confetti gift certificate!  Be sure to stop back by tomorrow to see more projects as the Countdown to Confetti continues!


Reverse Confetti

Dilay Nacar

Audrey Tokach - *you are here*

Tiffany Pryce-Russom

Lisa Henke

Amy Kolling

Andrea Shell

Amy Tsuruta

Keia Shipp-Smith

Dana Kirby


Friday, September 3, 2021

Sunny Studio Stamps - Forest Trees Stencils


Hello friends!  Today, I am here to share my first post as a new(returning) design team member for Sunny Studio Stamps, and I couldn't be more thrilled!  I have a card today using the fun new Forest Trees Stencils!  To  create my card, I started off with a piece of light aqua cardstock measuring 4" x 5.25".  I used all three layers of the stencils, starting at the top of the panel with the lightest ink, getting darker with each layer.  For this particular card, I used Salvaged Patina, Peacock Feathers and Lucky Clover Distress Oxide inks.  Then, I splattered on some watered down white acrylic paint to add some snow.  

Sunny Studio Stamps Forest Stencils

I stamped and colored three adorable snowmen from the Feeling Frosty stamp set, along with two trees from the set, and diecut them with the coordinating Feeling Frosty dies.  To set the scene, I added a snow bank using the Slimline Nature Borders dies, and for some fun color, I added a tiny strip of striped paper from the new All is Bright 6x6 paper pad.  I added a trio of Lacy Snowflakes to the sky, and stamped a sentiment from Feel Frosty onto a banner diecut from the Stitched Rectangles die set to finish off my card.

Sunny Studio Stamps Forest Stencils

That's all for me today!!  Thanks so much for stopping by! :)
BLOG TEMPLATE BY DESIGNER BLOGS