Friday, August 26, 2016

Reverse Confetti August SFYTT!

August SFTYY


Hello there!  Today I have a card to share with you following the Reverse Confetti August SFYTT!  Here is the sketch:
And here is my card:

 I started off with a white card base.  I added some plaid patterned paper to the bottom right corner to follow the sketch.  Then I diecut the Double Panel Circles dies from aqua and green cardstock and adhered that on top of the patterned paper.  I diecut the large tag from the Tag Me Confetti Cuts die set from white cardstock and added some blue ink with an ink blending tool  I added some more patterned paper to the bottom of the tag as a ground for my chick to stand on.  I stamped and colored the bird from Tweet Life and diecut him with the coordinating Tweet Life Confetti Cuts.  I stamped the birdhouse directly on the tag, and paper pieced it with some polka dot paper.  I added a trio of clouds from the Weather it Together stamp set to cover up the hole in the tag.

August SFYTT

I hope you will join us and create a card following this month's sketch!  You could win a Reverse Confetti Gift Certificate!!

I will be entering this in the current Color Throwdown Challenge!


Thanks so much for stopping by! :)


Thursday, August 25, 2016

You Rule! {Reverse Confetti}


Hello there!  Today I have a card to share with you using some of the August Release from Reverse Confetti!  I started off my card by diecutting the ABC Cover Panel from white cardstock and adhering it to a white card base.  Then, to create a chalk board, I diecut the All Framed Up Confetti Cuts from brown, kraft and back cardstock.  I nested the diecuts inside eachother, and swiped the black panel with white pigment ink to look like chalk dust,  I stamped and colored the worm, apple, ruler and pencil from the Worm Wishes stamp set, and diecut them with the coordinating Worm Wishes Confetti Cuts.  I popped them all up with foam tape, then stamped and embossed the "you rule" sentiment from the set in white embossing powder.  Finally, I added a scattering of tiny wooden stars.


You Rule

I just love that little worm!  How cute would he be on a bookmark?  I love the white on white look of the cover panel on the card base.  It adds something extra, without taking the spotlight off of the focal point.

You Rule


That's all for me today!  Thanks so much for stopping by! :)


Wednesday, August 24, 2016

Lawn Fawn Inspiration Week - Simple Pop-ups and Stitched Hillside Pop-ups

Hello there!! One more day until the Lawn Fawn Fall/Winter release!  There are so many amazing things coming your way!!  The new release will be available in the Lawn Fawn store, tomorrow, August 25th!

Today the team is showcasing the new Stitched Hillside Popups and Everyday Popups dies!  These dies are so much fun!

To create my card, I first cut and scored a horizontal A2 sized card.  I used the Snowy Backdrops die for my sky.  I cut it from white cardstock, and then used Tumbled Glass Distress Ink to add a pale blue hue to the snowy background.  I added a row of trees using the Forest Border.  Then I diecut the Stitched Hillside Popups from white cardstock, and adhered them in front of my forest border.  Kelly Marie is sharing a great how-to video on the Lawn Fawn blog today.  These dies are so easy to use!  Be sure to check it out!!  Then, I stamped and colored images from the Cheery Christmas stamp set, another one that is coming out tomorrow.


Hillside Popups

I stamped a sentiment from Cheery Christmas in the bottom right corner of my card using Black Licorice and Lobster inks.

Hillside Popups

I just love the surprise that the recipient receives when they open these popup cards!  So much fun!  Be sure to check out the Lawn Fawn blog for lots more inspiration from the design team!

What are your favorites from the new release?

Thanks so much for stopping by! :)

Supplies:
Stamps: Cheery Christmas
Dies: Cheery Christmas, Stitched Hillside Popups, Forest Border. Snowy Backdrops
Ink: Black Licorice, Lobster, Freshly Cut Grass, Walnut
Other: Copic Markers, White Gel Pen

Tuesday, August 23, 2016

Lawn Fawn Inspiration Week - Thanks a Bushel and Cutie Pie


Hello there!  Every day we inch closer to the new Lawn Fawn release being available!  Today, we are showcasing the new Thanks a Bushel and Cutie Pie stamp sets, which will be in the Lawn Fawn store on August 25th!

I started off my card by watercoloring a pale yellow background on watercolor paper using Squeezed Lemonade.  I diecut the Leafy Tree Backdrops Portrait from the Perfectly Plaid Fall papers, and used that as a guide to watercolor the tree top of grass too.  When everything was dry, I glued the tree to the watercolor piece.  I stamped and colored the cute little apple basket from Thanks a Bushel, along with the single apple from the set.  I also stamped and colored the little sheep from Baaah-humbug along with the tiny pie from Holiday Party Animal.  Oh, and the trio of birds from Hello Sunshine.  I arranged my scene, and adhered everything with foam tape.  I diecut the leaves from the Leafy Tree Backdrop from Noble Fir cardstock, and finally, stamped a sentiment from the new Cutie Pie stamp set.


Cutie Pie

Be sure to visit the Lawn Fawn blog for more inspiration from the design team, and stop back by tomorrow for a super fun project! :)

Thanks so much for stopping by!

Supplies:
Stamps: Thanks a Bushel, Cutie Pie, Baaah-humbug, Holiday Party Animal, Hello Sunshine
Dies: Thanks a Bushel, Baaah-humbug, Holiday Party Animal, Hello Sunshine, Leafy Tree Backdrop Portrait
Paper: Perfectly Plaid Fall, Noble Fir, watercolor paper
Other: Copic Markers, White Gel Pen, Foam Tape

Monday, August 22, 2016

Lawn Fawn Inspiration Week - Perfectly Plaid Fall


Hello there!  Lawn Fawn inspiration week continues!  Remember, all of the new products that we have been highlighting this week will be available for purchase on August 25th!

Today, we are showcasing one of three new paper collections, Perfectly Plaid Fall.  This beautiful paper collection will be available in both 6x6 and 12x12 sizes.  There are also 2 new cardstock and ink colors - Narwhal and Storm Cloud.  I have used Storm Cloud on my card today.

I started off by watercoloring a piece of Tim Holtz Distress watercolor paper with Peacock Feathers distress ink.  When it was dry, I diecut it with the new Dotted Rectangles Stackables dies.  I stamped, colored and diecut a bunch of images from the Happy Harvest stamp set, which was released last year.  I paper pieced the scarecrow's shirt and pocket with papers from the 6x6 Perfectly Plaid Fall Petite Paper pack, and also used the same paper for the ground that my scene is built on.  I stamped the corn stalks with Celery Stick ink, and the sentiment is stamped on a hand cut banner using the new Storm Cloud ink.  Such a beautiful, dark, warm grey!

Fall Plaid Papers

Be sure to stop by the Lawn Fawn blog for more inspiration from the design team, and stop back by here tomorrow for another project using the new release goodies!

Thanks so much for stopping by! :)

Supplies:
Stamps: Happy Harvest
Dies: Happy Harvest, Dotted Rectangles Stackabales
Paper: Strorm Cloud cardstock, Perfectly Plaid Fall Petite Paper Pack
Ink: Storm Cloud, Celery Stick, Distress ink in Peacock Feathers
Others: Copic Markers, White Gel Pen, Foam Tape

Sunday, August 21, 2016

Lawn Fawn Inspiration Week - Scalloped Treat Box


Hello there!  Welcome back to day 3 of Lawn Fawn inspiration week!  Today we are featuring the adorable new Scalloped Treat Box and the new Put a Bow On It dies (I didn't use this yet, but look for it on a future project).

To create the treat box, you simply run the die through your diecut machine twice and fold the pieces on the score lines.  Then glue the sides together!  I diecut my box pieces from the new Perfectly Plaid Christmas 12x12 papers.  Then I stamped and colored the bucket of apples from the new Thanks a Bushel stamp set.  I added a Stitched Scalloped Border cut from kraft cardstock and glued that to the bottom of the front of the box.  I popped the apples up with foam tape.  I created a little tag using the new Tiny Tags dies, and stamped a sentiment from the new Tiny Tags Sayings stamp set.  Then I tied it on the box with some Peppermint Lawn Trimmings.

Treat Box

Be sure to visit the Lawn Fawn blog for lots more inspiration from the design team, and stop back by tomorrow for another project featuring new goodies available on August 25th.

Thanks for stopping by! :)

Supplies:
Stamps: Thanks a Bushel, Tiny Tags Sayings
Dies: Scallop Treat Box, Tiny Tags, Stitched Scalloped Borders, Thanks a Bushel
Paper: Perfectly Plaid Christmas 12x12
Ink: Black Licorice, Lobster
Other: Peppermint Lawn Trimmings, Copic Markers, White Gel Pen, Foam Tape

Saturday, August 20, 2016

Lawn Fawn Inspiration Week - Happy Holwoween and Stitched Tree Borders


Hello there!  Today is day 2 of Lawn Fawn Inspiration Week!  All of the products that you will so over the next few days will be available for purchase on August 25th!  Today, the design team is showcasing a super adorable new halloween set called Happy Howloween, and the new Stitched Trees Border dies.  I used both on my card today, along with other new products!

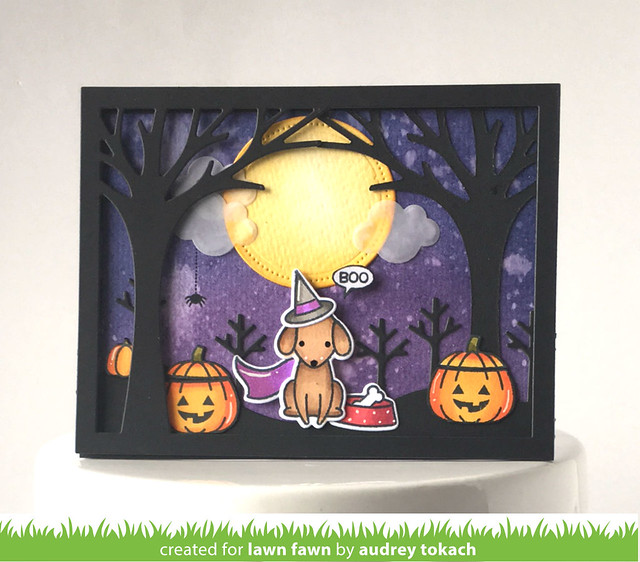
To create my card, I started of by inking up a piece of watercolor paper using Dusty Concord and Chipped Sapphire distress inks and a sponge blending tool.  After I blended the ink, I splattered some water on the paper to bleach out some spots.  I diecut 2 of the Leafty Tree Backdrops - Horizontal from black card stock, along with the Stitched Trees Border, also from black cardstock.  I turned one of the Leafy Tree Backdrops diecuts around, and adhered the "good" side down to the watercolor piece.  On top of that, I adhered the Stitched Trees Border diecut, and then finally, the other Leafy Tree Backdrop diecut, right side up, using foam tape for some dimension.  I diecut one of the new Dotted Circle Stackables from watercolor paper, and inked it with Squeezed Lemonade and Wild Honey Distress inks, then slid that underneath the trees, and glued it down with a glue pen.  I diecut the smallest Simple Puffy Clouds from vellum and adhered them with a glue pen as well.  I stamped and diecut one of the little dogs from the Happy Howloween stamp set, along with his witch hat, cape, and dog bowl, and colored them with Copic Markers.  I stamped and colored 2 jack-o-lanterns, also from the set, and fussy cut those because I felt like they looked better without the white border.  I pulled out a few other Lawn Fawn Halloween sets, to fill is some spots in my scene.  The little speech bubble and spider on a string is from the Booyah stamp set.  The tiny pumpkin on the left behind the tree is from Happy Harvest stamp set.  I added accents with a white gel pen to finish things off.

Happy Howloween

Be sure to visit the Lawn Fawn blog for lots more inspiration from the design team!  And stop back by tomorrow for another look at the new goodies coming your way on the 25th!

Thanks so much for stopping by! :)

Supplies:
Stamps: Happy Howloween, Booyah, Happy Harvest
Dies: Happy Howloween, Leafy Tree Backdrops Horizontal, Stitched Tree Borders, Dotted Circle Stackables, Puffy Clouds
Ink: Distress: Dusty Concord, Chipped Sapphire, Squeezed Lemonade, Wild Honey
Paper: Lawn Fawn Black Licorice, Masters Touch Watercolor paper, vellum
Other: Copic Markers, White Gel Pen, Foam Tape

Friday, August 19, 2016

Lawn Fawn Inspiration Week - Jump For Joy and Leafy Tree Backdrops

Hello there!  I am SOOOO excited, because today I have a card to share with you for Lawn Fawn Inspiration Week!  This is my first post as an official team member, and I couldn't be more thrilled!  For the entire week, the design team will be showcasing projects using the newest release from Lawn Fawn which will be available on August 25th!

Today we are showing off the adorable new Jump For Joy stamp set, coordinating dies, and the new Leafy Tree Backdrops.  The Leafy Tree Backdrops are available in horizontal and vertical orientation, and I have to tell you, they are one of my most favorite products from the entire release!

To create my card, I started off by adhering a piece of the new Perfectly Plaid Fall 6x6 paper pad on a white card base.  For the hill, I cut another piece of the patterned paper using the Simple Hillside Borders dies.  I diecut the vertical Leafy Tree Backdrop from kraft cardstock and inked the edges with Vintage Photo Distress Ink.  Then I adhered that to the card base.  I stamped, colored and diecut the adorable squirrel, porcupine, and leaves from the Jump for Joy stamp set, and popped everything up with foam tape.  Finally, I stamped a sentiment amidst the falling leaves.

Jump For Joy

Gah... I just love love love these new products!  Be sure to visit the Lawn Fawn blog to see lots more inspiration from the design team!

That's all for me today, but stop back by tomorrow to see more new Lawn Fawn!!  Have a fantastic day! :)

Supplies:
Stamps: Jump For Joy
Dies: Jump For Joy, Vertical Leafy Tree Backdrop. Simple Hillside Borders
Paper: Perfectly Plaid Fall 6x6, kraft, white
Ink: Black Licorice
Other: Copic Markers, Foam Tape, White Gel Pen

Wednesday, August 17, 2016

Oh Baby! {Reverse Confetti}


Hello there!  Today I have a pair of baby tags to share with you using goodies from the Reverse Confetti August release.  You can find all of the new products in the Reverse Confetti store!

I started off my tags by diecutting two of the Topped Off Tags Confetti Cuts from white card stock.  Then I diecut the new Big Stripes Tag Layer from yellow and pink card stock, along with matching tag toppers using the new Hang Ups, Too Confetti Cuts.  I stamped two baby onesies from the Cute as a Button stamp set, and diecut them with the coordinating Onesie Confetti Cuts, then I cut another set of onesies from patterned paper using the same die.  I adhered them t the tag, one flat, and the other popped up with foam tape.  I added a sentiment banner to each using the Bitty Banners stamp set and coordinating Bitty Banners Confetti Cuts.


Oh Baby

Then I added a few extra details.  I added a fun ric-rac border to the bottom of each tag using the Top 'o the Tag Confetti Cuts.  To cover the hole in the tags, I threaded a button with some coordinating twine, and adhered that with some glossy accents.  Because every girl needs a little sparkle, I added some clear sequins to the pink tag :)


Oh Baby

That's all for me today!  Thanks for stopping by! :)


Monday, August 15, 2016

Papertrey Ink Moments Inked


Hello there!  Today I have a post to share with you using products from the Moments Inked line from Papertrey Ink!  With all of the craziness of school starting, and football season upon us, I wanted to simplify my pages a bit.  Life is crazy as it is, and I didn't want to be overwhelmed when I opened my planner.  I love the Moments Inked Everyday Symbols and Moments Inked Active Symbols for this purpose.  The little icons are perfect for stamping a quick image that is easier for the eye to catch than a bunch of written words.  Here is a look at my full page spread for the week.


PTI Moments Inked

I like to pair the symbols with other stamp sets too.  The Brushed Off stamp set is perfect for highlighting or blocking out an area in your planner, plus it just looks so fun!  Here you can see one of the images from that stamp set, which fits almost perfectly in the planner column.  I used Hibiscus Burst ink to coordinate with the color scheme for August.  The little circle images from the Moments Inked Divided Stamp set are also great for documenting important things.  You could even color code them to make it even easier to see things at a glance.  Here I used the "school" circle to note an appointment with my boys' school.  The patterned rectangles from the Moments Inked Planner Banners stamp set are more great images for this purpose.


PTI Moments Inked

I love the variety of symbols that you have between the two Moments Inked Symbols stamp sets.  Here I used the little football helmet and practice stamp from the Moments Inked Active Symbols stamp set and the finger tied with a string from the Moments Inked Everyday Symbols stamp set.  They are all illustrated in the same manner so they work perfectly together.


PTI Moments Inked

There will be times where I need more info.  Sometimes you just can't get away from writing stuff down, but I love that it can all be included within the daily columns as long as I keep it short and sweet.  It eliminates the need for a separate list, keeping the clutter to a minimum.  Here I used the "shopping" icon from the Moments Inked Divided stamp set as a header from my shopping list, and just added bullet points below.

PTI Moments Inked

I hadn't been doing much with my monthly layout. With my son's crazy football schedule, I wanted to see the entire month laid out, and the little icon images fit perfectly in the squares of the monthly calendar.  I added all of his practices and games, and made quick notes about location.  On the left side of the page, I used to column to keep track of the game scores.  It will be fun to look back on I think.

PTI Moments Inked

Here is another example where color coding came in handy.  I can see at a quick glace that practices are noted in orange and games are noted in green.  It coordinates, it looks pretty, and it makes things easier to decipher on the run!

PTI Moments Inked

That's all for me today!  We'd love to see how you are using your Moments Inked Planner!  Share your photos on instagram and use the hashtag #momentsinked so we can find you!


Thanks so much for stopping by!!  Have a great day! :)


BLOG TEMPLATE BY DESIGNER BLOGS