Tuesday, November 17, 2020

Lawn Fawn Holiday Week!


Hello there!  It's Fawny Holiday Week at Lawn Fawn and this week the team is sharing holiday themed cards and projects with you using a wide range of new and older Lawn Fawn products!

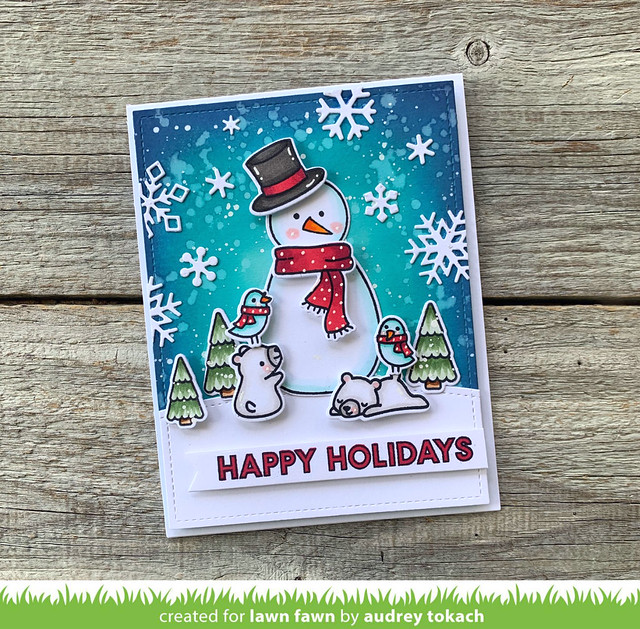
For my card today, I pulled out my very first, and my very favorite Lawn Fawn stamp set, Making Frosty Friends.  This stamp set was the one that started it all for me, and I go back to it year after year.  For this card, I paired it with one of my favorites from the Fall/Winter 2020 release, Den Sweet Den.  One of the things I love most about Lawn Fawn products is their versatility.  You can mix and match everything for endless possibilities! :)

To create my card, I started off with the largest die from the Outside In Stitched Rectangles die set, and cut some Mermaid cardstock.  I used Distress Oxide inks in Peacock Feathers, Blueprint Sketch and Chipped Sapphire to add an ombre look to the background.  Then I splattered it with clean water and watered down white acrylic paint.  I stamped and colored images from the Making Frosty Friends stamp set and Den Sweet Den stamp sets, and diecut them with their coordinating dies.  Then I popped everything up with foam tape on a Simple Stitched Hillside.  I used the Mini Snowflakes dies (another Lawn Fawn favorite) to add a scattering of snowflakes to the sky, and added some white gel pen accents to the snowman and critters.  The sentiment, from Offset Sayings stamp set, was stamped on an Everyday Sentiment Banner in black for the outline, and Lobster ink to fill in the letters.  To finish off my card, I popped it up on a white A2 card base.

Fawny Holiday Week

That's all for me today, but be sure to visit the Lawn Fawn blog to see lots more holiday inspiration! 

Thanks for stopping by! :)

Saturday, November 14, 2020

25 Days of Christmas Tags - Lawn Fawn


Hello there!  Every year, my sweet friend Tracey McNeely hosts the 25 days of Christmas Tags over on her blog.  Today is day 14 and it's Lawn Fawn day!

For my tag, I started out with the largest tag from the Stitched Circle Tags set, cut from Mermaid cardstock.  I used finger daubers and Distress Oxide inks in Peacock Feathers and Blueprint Sketch to add some more color variation then splatted on clean water to bleach out some areas.  I used the Simple Stitched Hillside borders to add a sandy bank to the bottom of the tag, cut from Kraft cardstock and sponged with Vintage Photo Distress Oxide.  To create my underwater scene, I stamped and colored images from the Christmas Fishes stamp set, diecut them with the coordinating Christmas Fishes dies, and popped them up on the tag with foam tape.  I added some white gel pen accents, some clear bubbles using Morning Dew Nuvo Drops, and a bit of Peppermint Lawn Trimmings to finish off my tag.

25 Days Of Christmas Tags - Lawn Fawm

That's all for me today, but be sure to visit Tracey's blog to see a ton of other amazing tags made using Lawn Fawn products!  There's even a prize to we won! :)

Thanks for stopping by! :)

Tuesday, August 11, 2020

Spellbinders Sparkling Christmas Collection


Hello there!  Today, I have a project to share with you as a guest for Spellbinders to kick off their beautiful Sparkling Christmas Collection!  The collection is available NOW on the Spellbinders website.  You can see it all HERE.

I created a set of clean and simple holiday gift tags using the new Kaleidoscope Plaid Etched dies and the new Christmas Mixed and Match Sentiments Etched dies from the new collection.  The Kaleidoscope Plaid dies are so fun and versatile. For my gift tags, I diecut each of the three layers once, all from white cardstock, but you can diecut them four times to cover a card front!  Cut them all from the same color cardstock, or each from a different color to create your own plaid color combinations.  Each layer was adhered with a glue pen and I used a tiny hole punch to add some red and white twine to each.  The sentiment was diecut from red cardstock using the new Christmas Mixed and Match Sentiment dies, which are a beautiful script font!  So pretty!

Spellbinders Tags

For a little sparkle, I added a scattering of clear flat sequins.  It adds just a little something without taking away from the beauty of the plaid and that gorgeous scripty font!  The possibilities are truly endless with these versatile dies!

Spellbinders Tags

That's all for me today!  Thanks so  much for stopping by! :)

Thursday, July 16, 2020

Lots of Happy {SugarPea Designs}

Hello there! I have a fun card to share with you today using products from SugarPea Designs!  This was my first time trying this technique but it won't be the last!  It's so fun and relaxing to do!

I started off with a piece of white cardstock cut to 4" x 5.25".  I used the Leaf Canopy Stencil and Shabby Shutters Distress Oxide ink to create a leaf patter, in the top left corner of the panel, white I faded into white.  Then, I used colored pencils to add shading to the leaves and make them pop off the panel.  This is was easy to do, and it really makes a huge difference!

Lots of Happy

I used the Happy Thoughts stamp set, and the coordinating Happy Word SugarCuts for the sentiments on my card.  I diecut the Happy Word from dark green cardstock and mounted it on a white shadow, then heat embossed the sentiment from the Happy Thoughts on dark green cardstock with white embossing powder.  I over lapped the diecuts to pull the sentiment together, and added a scattering of green gems before popping the panel up on a white A2 card base.


Lots of Happy

That's all for me today!  Thanks so much for stopping by! :)

Wednesday, July 8, 2020

SugarPea Designs July Mix It Up Challenge

Hello and welcome to our monthly Mix It Up challenge at SugarPea Designs! You have all month to play along with us.  Remember the more times you play along during the month using SugarPea Designs product, the better chance you have of winning a $50 gift certificate to our store!

Here is this month's Mix it Up Challenge!


To play along, make a project using just the inspiration, just the sketch or Mix it Up and use both! It is totally up to you!

Here is my take on the challenge. I used both the sketch and the color palette.  I started off with a piece of light grey cardstock cut to an A2 card base.  I masked off a circle and used the Geo Tri Hex Stencil and some Pumice Stone Distress Ink to create the focal point for my card.   I stamped and colored the adorable alligator from the Later Gator stamp set, along with a few accessories from the stamp set.  They were colored with colored pencils on the same light grey cardstock, and diecut with the coordinating Later Gator Sugar Cuts.


Later Gator 

I arranged the pieces to create my little scene, and popped everything up with foam tape.  A sentiment from the set was stamped on a scrap of matching cardstock and also popped up with foam tape.  I added some tiny wood stars, google eyes, and white gel pen accents to finish off my card.


Later Gator

That's all for me!  Thanks so much for stopping by! :)

Wednesday, June 10, 2020

June Mix It Up Challenge {SugarPea Designs}

Hello there!  Today, I have a card to share with you for the June Mix It Up Challenge at SugarPea Designs!


This time, I used the card sketch only.  I started off with a piece of white cardstock, cut 4" x 5.25".  I added a strip of patterned paper from my stash in the center of the panel.  Then, I used the largest cloud on the Outdoor Scene Builder Stencil and some white pigment ink to add a cloud for my little astronaut to stand on.  I outlined the cloud with a white gel pen.  I stamped and colored one of the astronauts and one of the planets from the To Infinity and Beyond stamp set, and fussy cut them with my scissors.  Then, I stamped a sentiment from the set below my focal point, and added some tiny wood stars and white gel pen accents before popping the panel up on an A2  card base.

June Challenge

That's all for me today! I  hope you will play along with the challenge!  All of the details can be found on the SugarPea Designs blog!

Thanks for stopping by! :)

Monday, June 8, 2020

Reverse Confetti 7th Birthday Blog Hop!


WOOHOO!  It's Reverse Confetti's 7th Birthday!  I am so thankful to have been part of the RC family for 4 of those birthdays and I am so excited to be back to help one of my favorites celebrate!!

My card today uses the adorable new Corgi Cuties stamp set and the FREE gift with purchase, Friendly Rainbow.  I LOVE them both! :)

To create my card, I started off with a piece of white cardstock cut to 4" x 5.25".  I stamped the rainbow from Friendly Rainbow in black ink, then masked it off.  I used my distress inks in Peacock Feathers and Blueprint Sketch to ink blend a background over the rainbow, splattered on some clean clear water and watered down Blueprint Sketch ink.  I removed the mask and colored the rainbow with my Copic markers.

Hello Friend

I stamped and colored the outline cloud from the Friendly Rainbow stamp set several times, then fussy cut them with my scissors.  Then, I stamped and colored one of the Corgi Cuties and diecut him with the coordinating Corgi Cuties Confetti Cuts dies.  I popped the clouds and the Corgi up with foam tape, and before I popped the panel up on an A2 card base, I added a strip of rainbow paper from the Cue The Confetti paper pad.  To finish off the card, I added some white gel pen accents and a scattering of tiny clay hearts.

Hello Friend

That's all for me today, but you have so much more to see!  Hop along with these talented designers to see more of the June release, available NOW, then go shopping!!  Thanks so much for stopping by! :)

Reverse Confetti Blog
Audrey Tokach - **You are here**
BLOG TEMPLATE BY DESIGNER BLOGS