Showing posts with label Pretty Pink Posh. Show all posts

Tuesday, December 1, 2015

Sparkle and Shine Challenge #19

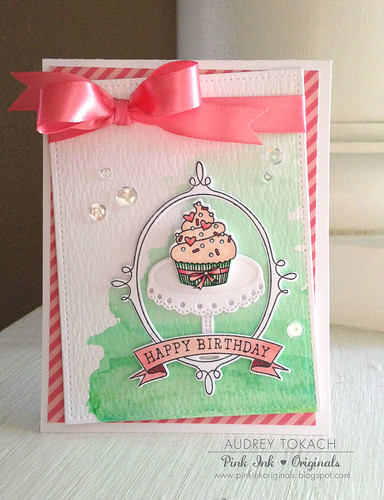
Hello there! It's time for another Sparkle and Shine Challenge!  Here is the inspiration photo for this challenge:


We are sponsored this week by our friends at Pretty Pink Posh!


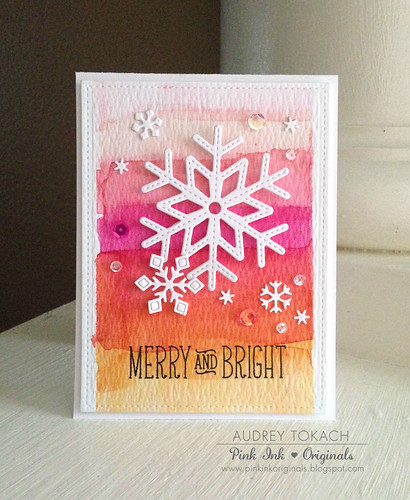
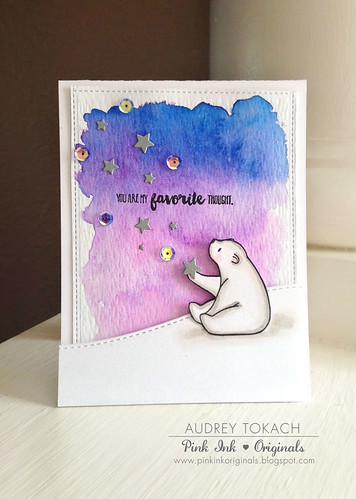
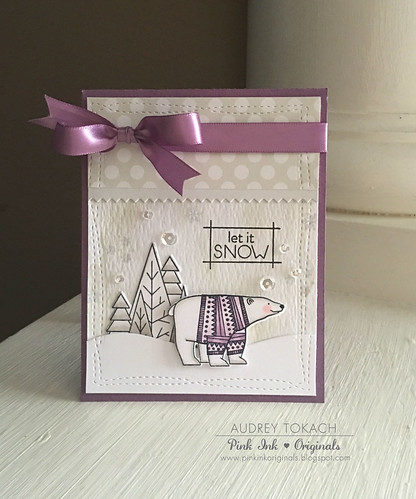
Here is my card, inspired by the photo!  I love the warm grey, the pops of cool white, and that purple satin blanked!  So much so, that I pulled out my satin ribbon for this card, which I haven't done in ages!  I forgot how difficult tying a nice bow can be! LOL!

To create my winter wonderland scene, I first watercolored a piece of Tim Holtz Distress Watercolor paper with Pumice Stone distress ink.  I diecut, stamped and colored some images from the Papertrey Ink Warmest Wishes stamp set.  I used the In the Meadow Hills dies to create a bank for the polar  bear to stand on and adhered that to the watercolor piece with foam tape. Before doing that, I added a stitched edge to all of my pieces with the Avery Elle Wonky Stitches dies.  For a little extra interest I added some Soft Stone patterned paper to the top of the panel, and added a pinked border with the PTI Pinking Shears border die.  I stamped a sentiment from the same stamp set, added the bear foam tape, and then adhered the panel to a purple card base before tying my satin bow and adding a scattering of my favorite Sparkling Clear sequins from Pretty Pink Posh!


Let It Snow

Be sure to visit the blog to get all of the challenge details and to see lots more inspiration from the design team!  Thanks so much for stopping by! :)


Supplies:
Stamps: PTI Warmest Wishes
Dies: PTI Winter Wishes, In the Meadow Hills, Pinked Edge Border, Avery Elle Wonky Stitches
Paper: PTI White, Soft Stone, Plum Pudding, Soft Stone Pattern Pack, Tim Holtz Distress Watercolor Paper
Ink: Memento Tuxedo Black, Versafine Onyx Black, Ranger Pumice Stone Distress Ink, Mama Elephant Moonlight
Other: Pretty Pink Posh 4mm, 6mm, Sparkling Clear Sequins, PTI Plum Pudding Satin Ribbon, Copic Markers, Foam Tape

Thursday, October 15, 2015

Sparkle and Shine Challenge #16

**This is my second post today!  Please scroll down to see the sneak peek of a project that I am sharing on the Butterfly Reflections Ink blog today**

Hi there!  It's time for another Sparkle and Shine Challenge!  We have a super fun inspiration photo today!  I love the pink pumpkins, and the mix of glittery and matte finishes!  Can't wait to see how other people are inspired by it!


This challenge is sponsored by our friends at Winnie and Walter!


I am still working on my halloween tags for this year... I can't believe that halloween is only about two weeks away!  Where is time going!?  For my tag, I used a super cute set by Reverse Confetti called Too Cute to Spook!  I started off using the Tag Me die and cut it from some hot pink cardstock.  Then I stamped, colored and diecut my images.  I added some patterned paper to the bottom of the tag to give the cute little cat something to stand on.  Then I used the smallest web from the Papertrey Ink Spider Web trio die set to cut a place for the spider to sit.  I popped the images up with foam tape, added a scattering of Strawberry Burst and Sparkling Clear sequins by Pretty Pink Posh, and some Lawn Fawn Black Tie twine to finish things off.

Too Cute To Spook

That's it for me today!  Be sure to check out the blog for all of the challenge details and lots more inspiration from the design team.  Thanks for stopping by! :)

Supplies:
Stamps: Reverse Confetti Too Cute to Spook
Dies: Reverse Confetti Took Cute to Spook, Reverse Confetti Tag Me, PTI Spiderweb Trio
Paper: PTI White, Raspberry Fizz, Smokey Shadow Pattern Pack
Other: Pretty Pink Posh Strawberry Burst sequins, 4mm Sparkling Clear Sequins, copic markers, foam tape, Lawn Fawn Black Tie Lawn Trimmings

Sunday, October 4, 2015

Paper Smooches SPARKS Challenge - Anything Goes!


Hi there!  It's time for another Paper Smooches SPARKS Challenge! This week, anything goes!!  I started off my card by stamping the large "thanks" sentiment from Chit Chat near the bottom right of a white card panel.  Then, using the Calico stamp set, I stamped the flowers and leaves in several colors of ink until I got an arrangement that I was happy with.  I colored in the "thanks" with a black copic marker, and added a scattering of sequins before adhering the panel to a white card base using foam tape.


Thanks

Be sure to check out what the other design team members have to share with you today!

Audrey Tokach - you are here!

Stop by the blog to check out all of the challenge details.  I hope you'll join us for a chance to win some Paper Smooches stamps! :)

Thanks for stopping by!

Supplies:
Stamps: Paper Smooches Calico, Chit Chat
Paper: PTI White
Ink: Various from PTI, WPlus9 and Lawn Fawn
Other: 4mm, 6mm, and 8mm Sparkling Clear sequins by Pretty Pink Posh, Foam Tape, Copic Markers

Thursday, October 1, 2015

Sparkle and Shine Challenge #15

Hello there!  It's time for another Sparkle and Shine Challenge!  This inspiration for this challenge is a fun one that could take you in many directions... watercolor, rainbow, circles, etc!


We are sponsored this week by Pretty Pink Posh!


I am participating in the Online Card Classes Watercolor for Card Makers: Exploring Mediums class, and one of the lessons is on watercoloring shapes.  I got quite excited, because I knew this challenge was coming, so I kept that in mind when I did my class homework for the day.  I started off by stamping circles from the Papertrey Ink Polka Dot Basics stamp set in Fine Linen distress ink.  Then I used my Zig Clean Color Real Brush Markers to watercolor in the circles, careful to keep one side of the circle darker to make them look more rounded.  Then I stamped a sentiment from the Paper Smooches Spreading Sunshine stamp set in the bottom right corner.  I used the Easel die, also from Paper Smooches, to create a frame for my sentiment.  The paint brush is from the Paper Smooches I Heart Art stamp set, and though it's a bit hard to see in the photo, I added a stamped shadow under the easel with the Paper Smooches Shadows stamp set.  I mounted it on a black card base, and then added a scattering of Pretty Pink Posh iridescent sequins in several colors.


Paint it.

Be sure to stop by the blog to get all of the challenge details and see all of the inspiration from the design team!!  Thanks for stopping by! :)

Supplies:
Stamps: Paper Smooches Spreading Sunshine, I Heart Art, Shadows, PTI Polka Dot Basics
Dies: Paper Smooches Easel
Paper: Tim Holtz Distress Watercolor Paper, PTI True Black
Ink: Versafine Black Onyx, Memento Tuxedo Black, Ranger Antique Linen Distress
Other: Copic Markers, Zig Clean Color Real Brush Markers, Pretty Pink Posh sequins in Ballerina Pink, Strawberry Burst, Fairytale Fuchsia, Peacock Feathers, Ocean Spray, Lavender Moon, Sunshine Glow, Foam Tape

Monday, September 28, 2015

Sharing on the Lawn Fawn blog today!

Hi there!  Today, I am SO SO SO excited to be sharing a few projects on the Lawn Fawn blog!  In addition to the halloween tags that I shared here, I also made a card to share!

If you've visited my blog before, it's no secret that I love Lawn Fawn and I love watercolor.  More than just a little.  Obsessed is a good word.  So on this card, I combined the two! :) I used distress inks to create this ombre striped background (a technique that I learned in the newest Online Card Class).  When it was dry, I diecut the watercolor piece with the largest die from the Small Stitched Rectangles die set.  Then, using the Stitched Snowflakes dies and the new Mini Snowflakes dies, I cut a bunch from white card stock.  I adhered some with foam tape, and others with a glue pen.  I stamped a sentiment from the Snow Day stamp set (I just love the sentiment and the font!!), and added a few sequins for sparkle before adhering the panel to a white card base.  I am SO excited to see smaller snowflakes to go with the large set!  I think these two die sets pair beautifully together, and I think they are definitely going to get a workout this winter *wink* :)

Merry and Bright

Thanks so much for stopping by! :)

Supplies:
Stamps: Lawn Fawn Snow Day
Dies: Lawn Fawn Stitched Snowflakes, Mini Snowflakes, Small Stitched Rectangles Stackables
Paper: Tim Holtz Distress Watercolor Paper, PTI White
Ink: Memento Tuxedo Black, Ranger Distress Inks in Spun Sugar, Worn Lipstick, Picked Raspberry, Abandoned Coral, Spiced Marmalade
Other: Pretty Pink Posh sequins in 4mm Sparkling Clear, Ballerina Pink, Fairytale Fuchsia, Strawberry Burst, Foam Tape

Saturday, September 19, 2015

Reverse Confetti SFYTT!

Hi there!  Today I wanted to share a card that I just finished up for the Reverse Confetti Sketch For You To Try!  Here is the September sketch:


And here is my card!  I LOVE all of the Reverse Confetti animals and I have been wishing for a cat set for a long time.  I was so excited to see Too Cute To Spook!  I also used the Diagonal Stripe Pretty Panels on my card too.  I watercolored the background with Twisted Citron Distress Ink and then used some Lawn Fawn patterned paper to ground things a bit.  Finally I finished things off with some Pretty Pink Posh Peridot Mist iridescent sequins.


Reverse Confetti SFYTT September

That's all for now!  Thanks for stopping by! :)

Supplies:
Stamps: Reverse Confetti Too Cute To Spook
Dies: Reverse Confetti Too Cute To Spook, Diagonal Stripe Pretty Panels
Paper: Ranger Distress Watercolor Paper, PTI White, PTI True Black, Lawn Fawn Let's Polka in the Dark 6x6 paper pad
Ink: Memento Tuxedo Black, Ranger Twisted Citron
Other: Copic Markers, Pretty Pink Posh Peridot Mist sequins, Foam Tape

Tuesday, September 15, 2015

Sparkle and Shine Challenge #14 - Green

Hello there!!  It's time for another Sparkle and Shine Challenge!  This week, it's all about the color GREEN!


We are sponsored by our friends at Winnie and Walter!


I have a green halloween card to share with you today!  I started out by stamping stripes on a white card base using Papertrey Ink's Watercolor Wonder stamp set and Lawn Fawn Celery Stick ink.  Then I diecut the medium sized spider web using the Papertrey Ink Spider Web Trio die set.  I stamped, colored and fussy cut the adorable franken-ghost and the pumpkins from the Booyah and Happy Harvest stamp sets by Lawn Fawn, popped them up with foam tape onto my striped card base, and then added some stars and a sentiment from the Booyah stamp set, and finished things off with some Peridot Mist and Sparkling Clear sequins from Pretty Pink Posh.


Sparkle and Shine Challenge - Green

Be sure to check out the blog for lots more inspiration from the design team and for all of the challenge details!  I hope you'll join us! :)

Thanks so much for stopping by!

Supplies:
Stamps: Lawn Fawn Booyah, Happy Harvest
Dies: Papertrey Ink Spider Web trio
Paper: PTI White, True Black
Ink: Lawn Fawn Celery Stick, Juice Box, PTI Orange Zest, New Leaf, Memento Tuxedo Black
Other: Pretty Pink Posh Sparkling Clear and Peridot Mist sequins, Copic Markers

Tuesday, September 1, 2015

Sparkle and Shine Challenge #13 - Tags

Hello there!  It's time for another Sparkle and Shine Challenge and the theme for this challenge is Tags!  Make one.  Make a set.  Any occasion! :)


We are sponsored this week by Pretty Pink Posh!


Awhile back I shared a picture on instagram of a few pieces of watercolor that I did using Distress inks.  I wasn't sure what I wanted to do with them when I painted them, but decided to make a set of tags once I saw the theme for this challenge!  I started off with two pieces of watercolor paper, one for the pink pattern, and one for the blue pattern.  The process for both was the same, I just used different ink colors.  I started off by taping my paper to a board and wetting it pretty well with clean water.  I tapped my distress inks onto an acrylic block and added some water to them.  With a wet paint brush, I took the color to the wet paper, dabbing color in a random pattern.  Because both the paper and ink was very wet, the colors were more muted.  I dried that layer with a heat tool.  Then, without rewetting the paper, I picked up more ink with very little water, and dabbed more saturated color onto the dry paper, then I dried that layer with my heat tool.  I used the Papertrey Ink Tag Sale 10 die to diecut my tags, and then diecut some Paper Smooches butterflies from white cardstock.  I adhered on the center of the butterfly to the scalloped frame, also from the Tag Sale 10 die set, and folded the wings up.  A scattering of Pretty Pink Posh Sparkling Clear sequins and some Lawn Fawn Silver Sparkle Lawn Trimmings finished them up.


Sparkle and Shine Tag Challenge

Be sure to check out the blog to see what else the design team has to share with you, and to get all of the challenge details!  We hope you'll play along! :)

Thanks for stopping by!!

Supplies:
Dies: Papertrey Ink Tag Sale 10, Paper Smooches Butterfly Duet
Paper: Masters Touch Watercolor Paper (Hobby Lobby), PTI White
Ink: Ranger Distress Inks in Abandoned Coral, Picked Raspberry, Spiced Marmalade, Twisted Citron, Mowed Lawn and Mermaid Lagoon
Other: Pretty Pink Posh Sparkling Clear 4mm, 6mm, and 8mm sequins, Lawn Fawn Silver  Sparkle Lawn Trimmings

Tuesday, August 18, 2015

You're a Star! {Lawn Fawn}

Hello there!

I want to apologize in advance if these pictures aren't the greatest.... it's rainy season in Florida, and with daily rain, my window for picture taking isn't a very long one.  LOL!

Today, I am sharing this under the sea shaker over on the Lawnscaping Challenges Blog!  I started off by watercoloring a piece of  watercolor paper with Distress inks.  When it was dry, I diecut it with the largest die from the Small Stitched Rectangles Stackables die set.  From that, I also diecut a star shaped window using the Puffy Star Stackables die set.  Before filling my shaker, I stamped a sentiment from the So Jelly stamp set, and then added my shaker contents.  I popped up some Copic colored Jelly fish and a cute little starfish, also from the So Jelly Stamp set, up on the front of the shaker window with foam tape. After seeing it all put together, the black sentiment seemed to really stand out, and not in a good way.  LOL!  So I added some doodled lines to frame the star window the the entire panel, and then popped everything onto a black card base to balance things out a bit better.


You're a Star!

Here you can see the shaker a little closer:


You're a Star!

Hope you like it!  Thanks for stopping by! :)

Supplies:
Stamps: Lawn Fawn So Jelly
Dies: Lawn Fawn So Jelly, Small Stitched Rectangles, Puffy Star Stackables
Other: Distress Ink, White Gel Pen, Copic Multiliner, Copic Markers, Foam Tape

Saturday, August 15, 2015

Sparkle and Shine Challenge #12

Hi there!  It's time for another Sparkle and Shine Challenge!!  This week's challenge is Back to School themed!  Here is our inspiration photo:


We are sponsored by our friends at Winnie and Walter!


Here is my card!  As soon as I saw the mason jars in the picture, I knew I wanted to use my Paper Smooches Best Buds stamp set.  I stamped and colored the flower jar image using copic markers, and to mimic the inspiration photo, I colored the jar black.  I love the look!  I incorporate the school theme, I added the pencil and apple along with a sentiment from Paper Smooches Smarty Pants.  The scene was all stamped on a diecut panel using the Mama Elephant Sew Fancy Frames.  I diecut a piece of black card stock using the cross stitched die from the same die set, and added some white pigment ink using a paper towel to make it look like a chalk board.  To finish things off, I added a scattering of Pretty Pink Posh Sparkling Clear sequins.


Thanks Teacher

Be sure to visit the blog for lots more inspiration from the design team and for all of the challenge details.  I hope you'll join us for a chance to win some Winnie and Walter! :)

So funny that Curtain Call Challenge is featuring the same inspiration photo for their challenge this week!  I am going to enter this card there too :)


Thanks for stopping by!!

Supplies:
Stamps: Paper Smooches Best Buds, Smarty Pants
Dies: Mama Elephant Sew Fancy
Paper: PTI White, True Black
Ink: Memento Tuxedo Black, PTI Fresh Snow
Other: Copic Markers, White Gel Pen, Sakura Stardust Pen, Foam Tape, Pretty Pink Posh Sparkling Clear 4mm and 6mm sequins

Thursday, August 6, 2015

Pretty Pink Posh New Release Blog Hop!


Hello there!  I am so excited to be part of the August Release Blog Hop for Pretty Pink Posh!  Three new amazing dies and a bunch of new sequins were just released, including new colors of my favorite iridescent sequins PLUS a new size and new mix of my other favorite, Sparkling Clear!  You can see the entire new release here.

This release includes the new Storybook 1 die, and boy is it a fun one!  It is so versatile, and I can't wait to play with it some more!  I made two cards using this die, and the possibilities are endless!  For my first card, I diecut a piece of white cardstock using the Lawn Fawn Small Stitched Rectangles largest die, and then ran that through my diecut machine again centering the Storybook 1 die on the stitched rectangle.  I knew I wanted to make a shaker using a  mix of the iridescent sequins, both the older and brand new colors.  They all look so gorgeous together!  I added acetate behind the panel and then created my shaker.  I glued the largest rectangle from the Storybook 1 die back into place over the acetate so that you can only see the sequins in the bottom two windows.  I used images from the Papertrey Ink Tremendous Treats Birthday stamp set, along with their coordinating dies, but the "Happy" and stars dies from the PTI Tipped Tops die collection.  The tiny stars are from the Lawn Fawn Stitched Journaling Card die collection.  I popped the shaker up onto a striped card base that I created with black strips of cardstock.

PPP August Release Hop

Here is a close up of those yummy sequins!  The entire collection of iridescent sequins work so beautifully together!

PPP August Release Hop

For my second card, I also used the Storybook 1 die.  This time, I created a horizontal shaker card.  I used the Paper Smooches Halloweenies stamp set and Papertrey Ink Spiderweb Trio dies to make my first halloween card of the season!  This time, I left all of the windows in the die open, and used some of the new Peacock Feathers sequins along with the Peridot Mist, Sparkling Clear and Sunshine Glow sequins in my shaker.  I also used the fun new Speech Bubbles dies!  There are three different sized bubbles in the set, and  each has fun stitched border!


PPP Hop

Here is a closer shot of the inside:


PPP August Release Hop


Be sure to visit all of these ladies to see what they have to share with you!  Leave comments along the way for your chance to win one of two $25 gift certificates to the Pretty Pink Posh store! Please comment before 11:59 PDT on August 9th. Winners will be chosen at random from all of the blog comments and the winners will be announced on the Pretty Pink Posh blog!

Happy Hopping! :)


Thanks so much for stopping by!! :)

Saturday, August 1, 2015

Sparkle and Shine Challenge #11

Hello there!  It's time for another Sparkle and Shine Challenge!  Just look at the gorgeous inspiration photo for this challenge!  I love that beautiful bright orange!


This challenge is sponsored by Pretty Pink Posh!


I was inspired by those amazing flowers, and pulled out my Paper Smooches Pretty Momma stamp set because the big rose image in that set is one of my favorites.  I colored the flowers with copic markers and then fussy cut them out. Before adhering them to the panel, I used a Tim Holtz stencil and an ink blending tool to add some polkadots to the background.  Then I popped the flowers up on foam tape, added a sentiment from the Good Gab stamp set and then finished up with a scattering of Pretty Pink Posh Sparkling Clear and Sunshine Glow sequins.


Merci

Be sure to check out the blog for lots more inspiration from the design team and for all of the challenge details. I hope you'll join us for a chance to win a great prize!

Thanks for stopping by! :)

Supplies:
Stamps: Paper Smooches Pretty Momma, Good Gab
Dies: Lawn Fawn Small Stitched Rectangles
Paper: PTI White, Orange Zest
Ink: Memento Tuxedo Black, PTI Summer Sunrise
Other: Tim Holtz stencil, Copic Markers, Foam Tape, Pretty Pink Posh Sparkling Clear and Sunshine Glow sequins

Thursday, July 16, 2015

Guest Designing for Right At Home - Take 2

Hello there!  I'm back again with another post as guest designer for the Right At Home Shop!  I created this card using the WPlus9 Happy Mail stamp set.  


To create my card, I first started with a piece of watercolor paper which I watercolored in shades of pink, purple and dark blue.  Once it was dry, I used the Lawn Fawn Stitched Borders to add a stitched edge to the watercolored panel. I stamped, colored and fussy cut the adorable little polar bear from the WPlus9 Happy Mail stamp set. I then used the Lawn Fawn Stitched Hillside dies to diecut a bank for the little bear to sit on.  I adhered the watercolor piece to the card base, and then popped the hillside up with foam tape.  I positioned my bear where I wanted him, adhered him with foam tape, and then used copic markers to add a shadow under him.  I stamped a sentiment, also from the Happy Mail stamp set, using Verafine Black Onyx ink on the watercolor panel, and then diecut some tiny stars from silver shimmer cardstock using the  Mama Elephant Confetti die.  I adhered them down with a glue pen and then added some Pretty Pink Posh sequins for some added sparkle.


You're My Favorite Thought

Be sure to check out the Right at Home shop!  There are new additions to the shop all the time!  Recently added items include the My Favorite Things July release and the new Tim Holtz Blueprint Sketch distress ink!  Get yours now! :)

Thanks so much for stopping by! :)


Wednesday, July 15, 2015

Sparkle and Shine Challenge #10

Hello there!  Time for another Sparkle and Shine Challenge!  This week, we have a sketch challenge based on this sketch:


Challenge #10 is sponsored by our friends at Winnie and Walter!


I think I've said it before, but I'll say it again... Sketch challenges really ARE a challenge for me.  I don't feel like I follow the rules very well LOL!  Let me explain my thought process for my card...  I just got the Chance of Rain stamp set from Mama Elephant, and knew I wanted to use it for this card.  I started by watercoloring a peice of watercolor paper with my Zig Clean Color Real Brush markers, and then I diecut it with a Lawn Fawn Stitched Rectangles die.  I stamped, colored the images with my copics and then fussy cut them out.  I added the three clouds to the top of the card to mimic the circular element in the sketch, and added some Pretty Pink Posh Sparkling Clear sequins to the left side of the card where the flags are supposed to be.  I totally make up my own rules when it comes to sketches.  LOL!  I do love this stamp set though, so you can count on seeing a lot more of it around here. *wink*

Rain or Shine

Be sure to visit the blog for lots more inspiration from the design team and to get all of the challenge details! I hope you'll join us for a chance to win an awesome prize!

That's all for now... thanks for stopping by! :)

Supplies:
Stamps: Mama Elephant Chance of Rain
Dies: Lawn Fawn Small Stitched Rectangles
Paper: PTI White, Lawn Fawn Pink Lemonade 6x6 paper pad, Masters Touch watercolor paper
Ink: Memento Tuxedo Black
Other: Copic Markers, Zig Clean Color Real Brush Markers, Wink of Stella Glitter brush marker, Pretty Pink Posh 4mm and 6mm Sparkling Clear sequins, Foam Tape


Wednesday, July 8, 2015

Best Buds {Paper Smooches}

Hello there!  Today I have a quick card to share with you! As soon as I saw the new Best Buds, I knew I had to have it!  There are just some stamp sets that look so fun to color, and that's how I felt about this one!  I think it will be great for lots of coloring techniques!  For this card, I pulled out my Copics.  I wanted the flower jar image to take center stage, so I kept everything else pretty simple.  I added a yellow glow to the edges with several Copics, starting with the darkest Y08, to outline the image, followed by another outline of Y06, then Y02, and finally Y00.  I love the defused color.  When I was done coloring, I diecut the panel using the Avery Elle Wonky Stitches Rectangles dies, then I added a sentiment from the Pretty Momma stamp set, and a scattering of Sparkling Clear and Sunshine Glow iridescent sequins from Pretty Pink Posh.


Best Buds

That's all for now!  Thanks so much for stopping by! :)

Supplies:
Stamps: Paper Smooches Best Buds, Pretty Lady
Dies: Avery Elle Wonky Stitches Rectangles
Ink: Memento Tuxedo Black
Paper: PTI White, Raspberry Fizz
Other: Pretty Pink Posh 4mm and 6mm Sparkling Clear and 6mm Sunshine Glow sequins, Copic Markers, Foam Tape

Monday, June 15, 2015

Sparkle and Shine Challenge #8

**This is my second post today! If you are looking for my Lawnscaping Challenges post, please scroll down!**

Just a Note

Hello there!  It's time for another Sparkle and Shine Challenge!  This week we are having a sketch challenge based on this sketch:


Our sponsor this week is the super fabulous gang at Winnie and Walter!  You can win a $25 gift card!


Let  me start by saying that I struggle with sketch challenges.  They really ARE a challenge for me! LOL!  I knew I wanted to play with my new WPlus9 Doodle Buds stamp set.  This stamp set is pretty much perfection in my book.  Perfect for coloring techniques, and a whimsical style which I absolutely adore.  I knew as soon as I saw the peeks of this stamp set that I had to have it, and it does not disappoint!  I started off by stamping a bunch of flowers and leaves on Tim Holtz Distress Watercolor paper using Versafine Black Onyx ink.  Then I colored the images with my Zig Clean Color Real Brush Markers,  After they were dry, I diecut them with the coordinating dies.  For the different layers on my card, I used the larger frame from new Avery Elle Wonky Stitches die set, and the smaller banner from the  Lawn Fawn Stitched Party Banners die set.  I cut off the holes from the banner with my paper trimmer, and then ran the banner diecut back through my Big Shot with with Wonky Stitches frame to give the banner the same stitched edge as the other panel.  I arranged the blooms where I wanted them, and then before gluing them down, I stamped the stems.  The sentiment, from the Doodle Buds stamp set is stamped on a banner die cut from the Avery Elle die set, and then I added some of my favorite Sparkling Clear 4mm and 6mm Sparkling Clear sequins from Pretty Pink Posh to finish things off.

Just a Note

Be sure to stop over at the blog to check out all of the challenge details and get lots more inspiration from the design team! Thanks for stopping by! :)

Supplies:
Stamps: WPlus9 Doodle Buds
Dies: WPlus9 Doodle Buds, Avery Elle Wonky Stitches, Lawn Fawn Stitched Party Banners
Paper: PTI White, Tim Holtz Distress Watercolor Paper
Other: Zig Clean Color Real Brush Pens, Foam Tape, Pretty Pink Posh Sparkling Clear 4mm and 6mm sequins

Friday, June 5, 2015

Pretty Pink Posh Watercolor Blog Hop!


Hello there!  Happy Friday!  Today, I am so excited to be participating in a blog hop about one of my favorite things - Watercolor!  Even better is that it is hosted by my favorite sequin supplier, Pretty Pink Posh!

I was super inspired by the beautiful blog hop banner.  I knew I wanted to do a rainbow of watercolor, and I wanted to incorporate the gorgeous new iridescent sequins that Pretty Pink Posh is now offering exclusively in their store!

I started off with a piece of Tim Holtz Distress watercolor paper.  I taped to to a clipboard before I started painting.  That does two things... it keeps it fairly flat after the paper dries, and it also gives a nice masked edge.  Then I took my Zig Clean Color Real Brush Markers and scribbled a rainbow of colors overlapping each other across the bottom third of the watercolor paper.  Then I used a paint brush and some water to move the colors around until I was happy with how they looked.  I scribbled the marker on an acrylic block and then picked up the color with a wet brush, tapping the brush to make the tiny paint splatters.  After  the paper dried, I ran it through my diecut machine using the Mama Elephant Sew Fancy cross-stitched frame.  I diecut the largest butterfly from the Paper Smooches Butterfly Duet die set from white cardstock and then used the Paper Smooches Stitched Flourishes dies to add a stitched flight trail under the butterfly.  I stamped a sentiment from the Paper Smooches Word Salad stamp set, and adhered only the body of the butterfly using glossy accents. When the glossy accents was dry, I carefully folded up the wings of the butterfly.  I added 4mm Sparkling Clear sequins, and iridescent sequins in Strawberry Burst, Sunshine Glow, Bermuda Blue and Lavender Moon to finish things off.


PPP Watercolor Hop

I hope you like my card!  I can not wait to hop along and see all of the other amazing watercolor projects!  I have a feeling I will be pinning like a crazy lady! *wink*

Thanks for stopping by! :)

Supplies:

All linked above!!

Monday, June 1, 2015

Sparkle and Shine Challenge #7

**This is my third post for today!  If you are looking for my Papertey Ink Moments Inked post, or my Lawnscaping Challenge post, please scroll down!**


Hello there!  It's the first of the month, and that means that it's time for another Sparkle and Shine Challenge!  Check out this gorgeous inspiration photo!!

This challenge is sponsored by Pretty Pink Posh!


For my card today, I started off with a piece of Tim Holtz Distress watercolor paper.  I used my new Zig Clean Color Real Brush Pens to create a mint ombre along the right side of the paper. Since I only have a set of 12 markers, I mixed green with a smidge of blue to get mint. I just LOVE how easily these markers blend to create new colors.  It's really amazing!  After it was dry, I used my Lawn Fawn Small Stitched Rectangle dies to add a stitched edge to the panel, and then I diecut, stamped and colors images from the Papertrey Ink Bakers Dozen stamp set to create my focal point.  I also cute their adorable Cake Plate dies.  I cut an A2 card base from white cardstock, and then added some Lawn Fawn Let's Polka patterned paper.  I added a satin bow to the watercolor panel before popping it up with some foam tape onto the card base, and then to finish things off, I added a scattering of my favorite Sparkling Clear Pretty Pink Posh sequins! :)


Happy Birthday

That's all for me today!  Be sure to check out the blog for all of the challenge details and for lots more inspiration from the design team.  Thanks so much for stopping by! :)

Supplies:
Stamps: PTI Bakers Dozen
Dies: PTI Bakers Dozen, PTI Cake Plates, Lawn Fawn Stitched Rectangles
Paper: PTI white, Tim Holtz Distress Watercolor Paper, Lawn Fawn Let's Polka 6x6
Other: Zig Clean Color Real Brush Pens, Copic Makers, PTI Berry Sorbet satin ribbon, Pretty Pink Posh 4mm, 6mm and 8mm Sparkling Clear Sequins, Foam Tape

Tuesday, May 26, 2015

WPlus9 Get Sketchy Challenge #1


Hi there!  Today I have a card to share using the WPlus9 Get Sketchy with Joni #1 sketch as inspiration!  I created a bridal shower card, using the new Love Showers stamp set and Love Showers Layers dies.  I was also inspired to make a shaker card after seeing Joni's example for the challenge.

Love Showers

I will admit that I am still getting my feet wet with shaker cards.  I am intimidated by them because there is so much that can go wrong.  LOL!  But apart from this card taking a good bit of time, things came out pretty well.  I started with a white A2 card base and used Little Piggy ink to create a pink ombre.  Then I used the Love Showers Layers dies to create a rounded tag with a window for the shaker box.  On the inside of the shaker, I used Bo Peep ink to create a cloudy sky and then stamped the falling hearts using Little Piggy ink again.  I stamped the sentiment in black ink on the inside of the shaker and filled it with Pretty Pink Posh Sparkling Clear sequins before closing it up.  I diecut the clouds, umbrella,  hearts and "love" word from white cardstock, and then used Little Piggy Ink and a blending tool to color some of the pieces.  I adhered them on top of the window of the shaker using glossy accents for a secure hold.  To finish things off, I threaded some white satin ribbon through the tag hole and tied a bow with some white and silver twine, and then adhered the shaker to the card front.

Here is a close up of the shaker:

Love Showers


That's all for now!  Thanks for stopping by! :)

Supplies:
Stamps: WPlus9 Love Showers
Dies: WPlus9 Love Showers Layers dies
Ink: Memento Tuxedo Black, WPlus9 Little Piggy, Bo Peep
Paper: PTI White
Other: Pretty Pink Posh Sparkling Clear 4mm, 6mm and 8mm sequins, PTI Fresh Snow Satin Ribbon, Lawn Fawn Silver Sparkle Lawn Trimmings
BLOG TEMPLATE BY DESIGNER BLOGS