Wednesday, November 11, 2015

Card Maker Magazine & Sunny Studio Stamps Blog Hop!

Hello there!!  Today I am participating in the Card Maker Magazine and Sunny Studio Stamps Blog Hop!  Lots of inspiration coming your way, along with prizes and a discount code to go shopping!!


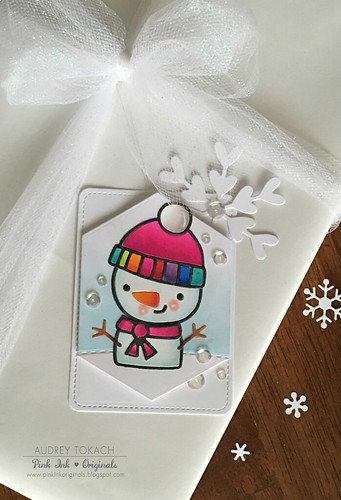
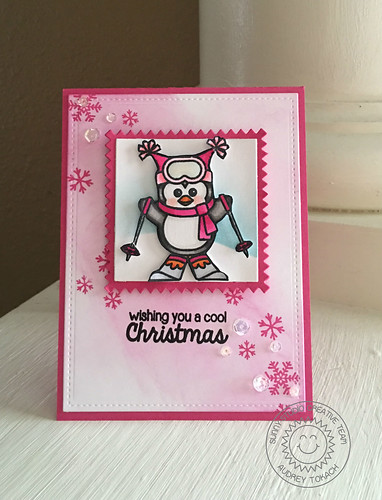
For my project, I used two Sunny Studio stamp sets - Snow Kissed and Bundled Up.  I stamped, colored and fussy cut the skiing penguin from the Snow Kissed stamp set,  It's  hard to tell in the picture, but I glittered her hat and scarf, and used glossy accents on her goggles to make them shiny.  I hand cut a hill using a post-it note and masked it off, then used Tumbled Glass distress ink to add some blue to the sky on my little square.  Then I popped the penguin up with foam tape, and matted the square with a pinked edge square.  I used Picked Raspberry distress ink very lightly to add some color to the background on a stitched rectangle die cut, and then stamped snowflakes in hot pink pink on a diagonal across the rectangle.  I popped the square up on the rectangle with foam tape, and stamped a sentiment from the Bundled Up stamp set.  Then I  added some sequins for a little sparkle, and adhered the panel on to a hot pink card base.

Cool Christmas

Be sure to hop along to see what everyone else on the hop has created!  Here is the hop order:

Melissa Bowden  http://melissabowden.com/
Audrey Tokach  http://pinkinkoriginals.blogspot.com/ - you are here!!
Gini Williams Cagle http://ginicagle.blogspot.com/

Don't forget - Sunny Studio is offering up two free stamp sets on the Sunny Studio Blog, and use the code CARDMAKER for 20% off your entire purchase now through Saturday, Noon PST.  Happy shopping!! :)

Thanks for stopping by!! :)

Tuesday, November 10, 2015

25 Days of Christmas Tags - Paper Smooches

Hello there! Today I am excited to be participating in the 25 Days of Christmas Tags!  This tradition was started by my friend Tracy McNeely.  Every day, for 25 days, a different stamp company is highlighted, and lots of awesome ideas for Christmas tags are shared!  Be sure to visit Tracy's blog so you don't miss a thing!


Today, we are highlighting Paper Smooches products!  You all know how much I love Paper Smooches! :)


I just got my most recent Paper Smooches order, and could not wait to play with the Snowman 2 die and the new  Lovely Snowflake die!  They are just adorable!  I diecut the snowman from white cardstock and colored all of his pieces with my copic markers and then pieces him back  together.  I diecut the largest Hexalong die, and used the Stitched dies to diecut a ground for my snowman to sit on.  I masked off the snow and added a subtle blue sky with distress ink.  I popped that up on a rectangular diecut, and then added the snowflake to the top right corner.  I scattering of sequins and some white gel accents finish things off.


Snowman Tag

That's all for me today,  but I will be back tomorrow with a few more projects to share!

Thanks for stopping by! :)

Supplies:
Dies: Paper Smooches Snowman 2, Hexalongs, Stitched, Lovely Snowflake, Stitched Journaling card
Paper: PTI White
Ink: Tumbled Glass Distress Ink
Other: Copic Markers, Pretty Pink Posh Sparkling Clear sequins, White Gel Pen, Foam Tape

Thursday, November 5, 2015

Happy Scarecrow for Butterfly Reflections Ink!

Hey there!  I am over on the Butterfly Reflections Ink blog today with a fall card featuring products from Lawn Fawn!

Here is a little peek:


Click here to see the entire card! :)

Thanks for stopping by!!

Wednesday, November 4, 2015

Home Is Where the Heart Is {Sunny Studio Stamps}


Hello there!  Today I have a card to share with you using Sunny Studio Stamps! The new Happy Home stamp set is perfect for lots of occasions.  With several house designs, you can build adorable little scenes.  I started off my card with a kraft card base.  On the top of the card base, I stamped the tiny sprinkle dot from the Birthday Smiles stamp set to make a subtle polkadot pattern.  On the bottom, I used a piece of gingham patterned paper from my stash.  To create the focal point for the card, I used my copic markers to add some color to a diecut rectangle.  Then I stamped, colored and fussy cut the house and tree from the Happy Home stamp set.  The tiny bush on the right side of the house is actually a cloud, but I think it works nicely as shrubs too.  I stamped a sentiment, also from the Happy Home stamp set, on the bottom of the scene, and added some clouds to the sky.  Of course, no happy home is complete without tiny hearts bursting out of the chimney. :)


Home is where the heart is

I hope you enjoyed my project today!  Be sure to check the Sunny Studio blog again tomorrow for lots more inspiration from the design team!  Have a great day!! :)

Thanks for stopping by! :)

Tuesday, November 3, 2015

Adorable Christmas Elves! {Just ME Digital Stamps}

Oh.My.Goodness.  I am SO excited.  One of my favorites, Elena Roussakis, of Just ME Prints, just opened up her etsy shop filled with a bunch of her ADORABLE hand drawn images!  Her Christmas/Winter collection consists of 8 sets of images, which you can buy individually (but I'm pretty sure you will agree that they are too cute to pass up... and you'll buy them ALL!)

Ok, so you might be asking "what are digital stamps?"  Digital stamps are image files that you purchase and then open up in a photo editing software program.  You don't need any fancy programs.  In fact, I use a free program called Pixlr.  You open up the file in the photo editing program and you can resize the image, move it around, combine it with other digital images to create scenes, etc.  SO fun!  Then you print them out, color them, and use them in your papercrafting projects!

For this card, I used the Christmas Elves digi image.  Eeeeek!  So cute I can't stand it!


Just ME Prints digi images

For this card, I combined several images.  I used the Christmas Boy Elf, and then I added the single girl elf from the Christmas Elves file and have them sitting on the banner image from the Sweet Christmas Deer Tag file.  Once I know who this card will be sent to, I will fill in the "to" spot on the front, and add a fun message and probably a gift card inside.

Just ME Prints digi images

I am having SO much fun playing with these adorable images.  Be sure to check out Elena's etsy shop and grab a few for yourself!

Thanks for stopping by!! :)

Monday, November 2, 2015

Lawnscaping Challenge #117 - Thinking of You

Hello there!  Today starts a new Lawnscaping Challenge!  This challenge has a thinking of you theme.  Perfect for messages of hope, love and encouragement!!


We are sponsored this week by our friends at Ellen Hutson!


I couldn't wait to use my new Baaah Humbug stamp set!  I started off by watercoloring a piece of Tim Holtz Distress Watercolor paper with some Picked Raspberry Distress Ink.  I created an ombre effect by fading the color as I went up the paper.  When it was dry, I dripped some water on the paper and let it sit for a few seconds before blotting it up with a paper towel, then added a stitched edge with the largest die from the Small Stitched Rectangles die set.  I used the Louie's ABCs dies to diecut my sentiment from white card stock, and adhered it to the watercolor piece with a glue pen.  I stamped, colored and fussy cut the cute little standing sheep from the Baaah Humbug stamp set, and the little heart from the Critters Ever After stamp set, for him to hold.  I popped him up with some foam tape. I added a scattering of stamped hearts from the Monster Mash stamp set. Then I diecut a piece of patterned paper from the Hello Sunshine 6x6 paper pad with the largest die from the Large Stitched Rectangles die set, and adhered that to my card base.  I popped the watercolor piece up wit foam tape and tied a bow using Cloudy Lawn Trimmings.


I love ewe

Be sure to check out the blog for all of the challenge details and for lots of inspiration from the design team!  I hope you'll join us for a chance to win a great prize!

Thanks for stopping by! :)

Supplies:

All supplies are listed and linked above :)

Sunday, November 1, 2015

Sparkle and Shine Challenge #17

Hi there!  It's time for another Sparkle and Shine Challenge!  This is our inspiration photo for the challenge:


We are sponsored this week by Pretty Pink Posh!


Here is my card!  I started off by watercoloring a piece of Tim Holtz watercolor paper with several shades of Distress Ink to match the color of the dresses in the inspiration photo.  I die cut the watercolor piece with the medium frame from the Tipped Tops die set by Papertrey Ink.  Then, using the largest die from the same set, I cut a mat from dark purple card stock.  I stamped a sentiment from the Carnival Toppers stamp set by Mama Elephant on a strip of white cardstock and cut a banner end on the left side.  I popped that up on the watercolor piece.  Then, I diecut, stamped and colored the frame and one of the cupcakes from the Papertrey Ink Bakers Dozen stamp set.  I adhered the frame with a glue pen, and popped the cupcake up with foam tape.  Then I added a scattering of Sparkling Clear and iridescent sequins from Pretty Pink Posh.


Happy Birthday

Be sure to check out the blog for all of the challenge details and for lots more inspiration from the design team.  I  hope you'll join us for a chance to win some Pretty Pink Posh goodies! :)

Thanks for stopping by!

Supplies:
Stamps: Papertrey  Ink Bakers Dozen, Mama Elephant Carnival Toppers
Dies: Papertrey Ink Bakers Dozen, Tipped Tops
Ink: Memento Tuxedo Black, Distress Ink in Twisted Citron, Cracked Pistachio, Mermaid Lagoon, Blueprint Sketch, Wilted Violet
Paper: PTI White, Royal Velvet, Tim Holtz Distress Watercolor Paper
Other: Copic Markers, Foam Tape, 4mm Sparkling Clear sequins, Peridot Mist, Blue Lagoon, Peacock Feathers and Lavender Moon iridescent sequins from Pretty Pink Posh
BLOG TEMPLATE BY DESIGNER BLOGS