Thursday, April 7, 2016

Countdown to Confetti - Day 3


Woo hoo!  It's day 3 of the Countdown to Confetti, and today the Reverse Confetti Crew is showcasing my favorite products from this release!  I know I say it every month, but I just ADORE the animals in the Reverse Confetti line... and every time I think I've picked a favorite, a new one comes out, and I have a new favorite.  They are just so fun and whimsical.  This month, koalas join the Reverse Confetti family in a stamp set called Bear Hugs.  Coordinating Bear Hugs Confetti Cuts will also be available.  All of the new products that we have been showcasing over the last few days will be available tomorrow, April 8th.  The wait is almost over! :)


I am just loving the gray and yellow color combination lately.  As I was coloring the cute little koala images, I knew immediately that I wanted my card to be yellow.  It's not a color that I use often, but it's so bright and happy... I am really loving it. I started off my card with a white card base.  I cut 1/2" strips of yellow cardstock, and used my grid mat to perfectly align them on the card base.  I diecut the new Insta-frame Confetti Cuts die out of dark gray cardstock, and cut a piece of white cardstock to fit inside.  I colored that piece with Tumbled Glass Distress Ink and splatter it with a little bit of clean water for some extra dimension, then I placed that piece inside the Insta-frame die cut. I stamped the little koala pair in the tree on white cardstock, and then paper pieced the tree bark with one of the new School Days Quick Card Panels.  The orange checked pattern was fun, but a little too bright for what I was wanting, so I added a later of Vintage Photo Distress Ink over top of it to darken it a bit.  I colored the leaves and bears with my copic markers.  To finish off my little scene, I stamped a few of the small clouds and the sun from the Weather It Together stamp set, and diecut them with the coordinating Weather It Together Confetti Cuts.  I popped everything up with foam tape in the frame, and then popped the frame up on the striped card base with more foam tape.  I diecut the banner from the Flowers for Mom Confetti Cuts die set out of white cardstock, and stamped a sentiment from Bear Hugs on it, and then added that across the bottom of the scene with, you guessed it, MORE foam tape. *wink*

Welcome Little One

I really love how adding cardstock stripes to a card base can give you some extra dimension too,  You can see here how the stripes almost look 3D.  And paper piecing the tree adds a little more fun than just a copic colored tree.

Welcome Little One

That's all for me today!  For a chance to win a $15 gift certificate, comment here, and then hop on over to the Reverse Confetti blog to comment there, and see how else has eye candy to share with you today!  And make sure to follow and comment on the Reverse Confetti Facebook page for a chance to with another $15 gift certificate!

It won't be long now before you can fill up your cart!  Happy shopping! :)

Thanks for stopping by!


Wednesday, April 6, 2016

Countdown to Confetti - Day 2


Hello there! Today is day 2 of the Countdown to Confetti!  The Reverse Confetti April release will be available in the Reverse Confetti store on April 8th!


Today the Confetti Crew is showcasing a new masculine set called Tie-rific, the coordinating Tie-rific Confetti Cuts, and a super awesome new Instaframe die!  I will be sharing a card using that die tomorrow.  Today, I have a fun and funky Father's Day card to share.  To make my card, I started off by taking one of the new School Days Quick Card Panels in a fun triangle geometric pattern.  I cut a window in the panel using the pinked circle die from the Flowers for Mom die set.  Then, using the circle die from the same set, I cut a window through both the pinked circle and quick card panel.  That gave me a pinked edge circle frame which I glued around the circle opening in the quick card panel.  I used my MISTI tool to position a sentiment from the Tie-rific stamp set in the middle of the circle.  I knew I wanted to pop the patterned panel up with foam tape, but I wanted the sentiment recessed behind it.  To add some more color, I added a pinked edge to the top and bottom of the patterned panel using the new Edge Essentials dies.  I stamped the tie from the stamp set in red ink on red cardstock and die cut it with the coordinating dies.  It was looking a little flat, so I added some dots with a white gel pen.

Happy Father's Day

I popped the panel up on a white card base using foam tape, and popped the tie up as well.  Since this is a masculine card, and I couldn't use sequins to accent things like I normally would, I added a few red buttons instead, and I think it's a really fun touch. :)

Happy Father's Day

That's all for me today!  Be sure to check out the Reverse Confetti blog to see a full list of everyone participating today.  Leave a comment there, here on my blog, and on the design team blogs as you hop along, for a chance to win a $15 Reverse Confetti gift certificate!  Visit the RC Facebook page for the chance to win a gift certificate for FB commenters!

Hope you will stop back by tomorrow as we showcase my favorite products from this release! :)

Thanks for stopping by!!


Tuesday, April 5, 2016

Countdown to Confetti - Day 1


Hey there!  Countdown to Confetti starts today over on the Reverse Confetti blog!  We will be showcasing the April release over the next few days and the new goodies will be available in the Reverse Confetti shop on April 8th!


My card today features the new All Apples stamp set and coordinating All Apples Confetti Cuts, along with the new Bitty Banners stamp set and coordinating Bitty Banners Confetti Cuts.  It's so hard to believe that we are winding down the school year already, and it's almost time for teacher thank you cards.  All Apples is perfect for that!  

To start my card, I watercolored a background using Cracked Pistachio distress ink.  I diecut one of the new School Days Quick Card Panels with the largest die in the Tag Me Confetti Cuts die set.  I stamped one of the apples, leaves and stem from the All Apples stamp set, and then cut them with their coordinating dies.  I added a little shading to the leaves with my copic markers.  I popped that up on the tag die cut using foam tape.  Then I stamped and diecut the "thanks" banner from the Bitty Banners stamp set.  The coordinating dies for this set have two dies; one will cut the banner with no border, and the other is slightly bigger to allow for a thin border around the banner.  On this card, I used the slightly bigger die because I wanted a  border.  I tied a double  bow with some jute twine, and then clipped the Bitty Banner to the top of the tag with an itty bitty clothespin.  Then I popped the tag up on the watercolor piece with foam tape, and added that to a white card base with more foam tape.


Class Act

I just love these sorts of sets that have images that doubles as a sentiments!  Sometimes I just feel like making a tag, and often I don't have an immediate use for them, but I love that with a bit of foam tape and a fun watercolor background, I can easily turn that tag into a card!

Class Act

That's all for me today!  Be sure to check out the Reverse Confetti blog for a full list of design team members participating in today's countdown, and leave a comment on the RC blog, here on my  blog, and comment as you hop along for lots of chances to win a $15 gift certificate that is up for grabs!

Thanks so much for stopping by! :)


Monday, April 4, 2016

Lawncaping Challenge #127 - Florals

Hello there!  It's time for another Lawnscaping Challenge!!  Challenge #127 is all about flowers!


We are sponsored by our friends at Ellen Hutson!


For my card today, I pulled out my favorite Lawn Fawn flowers from the Flutter By stamp set.  I started with a mermaid notecard as my card base.  I added a strip of Perfectly Plaid patterned paper and a white scalloped border to the bottom third of the card base. Then I stamped, colored and fussy cut the large mum, two leaves and one of the butterflies from the Flutter By stamp set.  I added some white gel pen accents, and popped the pieces up with foam tape.  Then I stamped a sentiment from the  Mom + Me stamp set, and added a bow with Aquamarine twine.


I love you Mom

Be sure to stop by the blog for all of the challenge details and for lots more inspiration from the design team!  Thanks so much for stopping by! :)

Supplies:

All supplies are listed and linked above.

Friday, April 1, 2016

Sparkle and Shine Challenge #27


Hello there!  It's time for a new Sparkle and Shine Challenge!  April Showers bring May flowers!! Here is our inspiration photo:

This challenge is sponsored by our friends at Create a Smile Stamps!


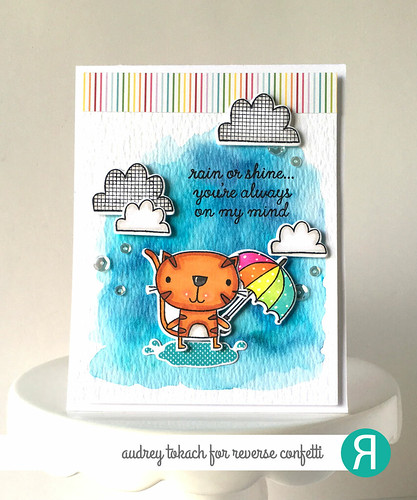
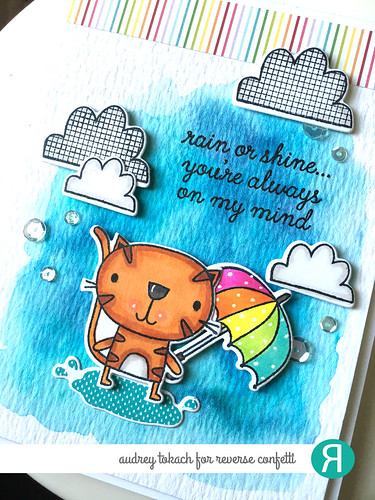
For my card, I pulled out my Reverse Confetti Weather it Together stamp set and the cute little cat from the Too Cute to Spook stamp set!  I just love how all of these sets coordinate!  I used my Zig Clean Color Real Brush Markers to watercolor a background on some watercolor paper.  Then I stamped, colored and diecut the images using the coordinating Weather it Together Confetti Cuts and Too Cute to Spook Confetti Cuts.  I added a few accents with a white gel pen and a fun strip of rainbow striped patterned paper across the top.  I added some Pretty Pink Posh Sparkling Clear sequins coming out of each cloud before popping the panel up on a white card base using foam tape.


Rain or Shine

I love using foam tape for lots of dimension.  Doesn't look like he's jumping off the page?


Rain or Shine

Be sure to visit the blog for all of the challenge details and for lots more inspiration from the design team!  I hope you will join us! :)

Thanks for stopping by!!


Saturday, March 26, 2016

Reverse Confetti March SFYTT


Hello there!  Today I have a card to share with you using the Reverse Confetti March SFYTT!  You can find all of the current challenge details here!

Here is our March sketch:


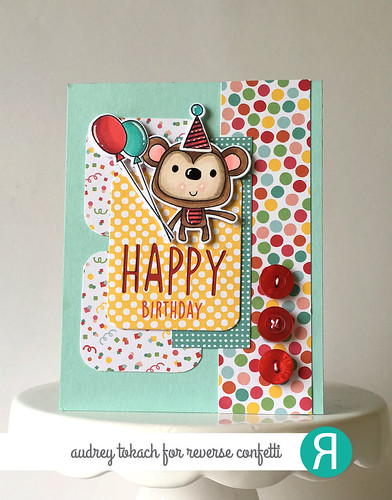
And here is my card!  I used a bunch of celebration themed patterned papers from my stash and paired them with the adorable monkey from the Monkey Business stamp set.  I stamped him and his balloons and party hat, colored them, and then diecut them with the coordinating Monkey Business Confetti Cuts.  I adhered my patterned papers to an aqua card base according to the sketch, and then used the  Pretty Panels Happy die to ground my little monkey.  I added a piece of red cardstock behind the HAPPY panel to make the diecut letters pop and then stamped the word "birthday" from the Whole Lotta Happy stamp set to complete the sentiment.  I popped the monkey up with foam tape and added a few red buttons to the bottom right side of the card to finish out the sketch.


Reverse Confetti March SFYTT

Be sure to click on the link above to add your creation to the inlinkz for your chance to win a $20 Reverse Confetti gift certificate!  I hope you will  join us!  Thanks for stopping by!!


BLOG TEMPLATE BY DESIGNER BLOGS