Thursday, October 29, 2015

Wishing You a Happy Birthday! {Butterfly Reflections Ink}

Hey there!  I am on the Butterfly Reflections Ink blog today with a card using products from Wplus9, Avery Elle, Lawn Fawn and Tim Holtz!  Here's a little peek:


Click here to see the entire card! :)

Wednesday, October 28, 2015

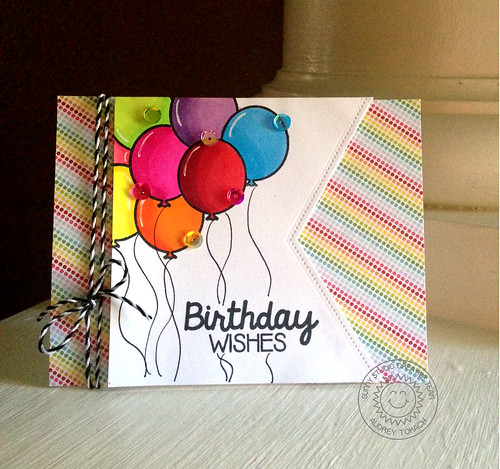
Birthday Smiles {Sunny Studio Stamps}


Hello there!  Today I have  a bright and happy birthday card using the Birthday Smiles stamp set and the  Fishtail Banners dies by Sunny Studio Stamps!  I started off by diecutting a piece of white cardstock with the Fishtail banners dies, and I chose to use the little dotted edge die from the set.  Then, on that same panel, I stamped the open line balloon image, masked it off, and stamped again, repeating this process until I was happy with how my bunch looked.  I colored the balloons with my copic markers and used a white gel pen to add highlights to each balloon, and then I hand drew balloon strings with a black marker, but there is a string image in the stamp set if you prefer.  I stamped the sentiment near the bottom right of the banner.  I cut a white, landscape orientation card base and added some brightly colored patterned paper to coordinate with my balloons, and then popped the panel up on the card base.  I added some twine and tied a bow on the left side of the card base, and added a scattering of fun sequins to finish things off.


Sunny Studio Birthday Wishes

Thanks all for me today!  I hope you enjoyed my bright birthday card!  Thanks for stopping by! :)

Supplies:
Stamps: Sunny Studio Birthday Wishes
Dies: Sunny Studio Fishtail Banners
Paper: PTI white, Avery Elle Everyday collection 6x6
Other: Copic Markers, White Gel Pen, Foam Tape,  Lawn Fawn Black Tie Twine, iridescent sequins from Pretty Pink Posh

Sunday, October 25, 2015

Paper Smooches SPARKS - Our LAST Challenge!

Hello there! Today I am here with a card for the LAST Paper Smooches SPARKS Challenge.  This makes me so sad, but I know that when the  brand new challenge kicks off on November 1st, it's sure to be spectacular!  I am so thankful to have been given the opportunity to be part of the very first SPARKS team in 2011, and part of the final SPARKS team in 2015.  I  have loved every minute!

This week is Designer Drafts week and here is our sketch:


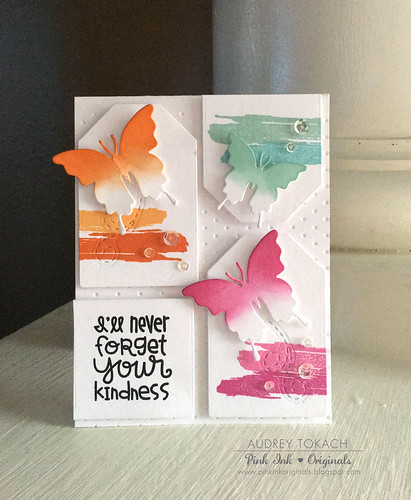
To start my card, I embossed tiny dots on a white card base with an embossing folder.  Then I diecut the largest tag from the Gift Tags dies four times out of white card stock.  I laid out my tags according to the sketch and stamped paint stripes from the Positive Strokes Two stamp set on each tag.  I used the Stitched Flourishes dies to add flight trails to a few tags, and then diecut white butterflies using the Butterfly Duet die set.  I inked the top of each butterfly to coordinate with the paint stripes and popped them up on each tag with foam tape.  I stamped a sentiment from Spreading Sunshine in the bottom left tag, and then popped all of the tags up on the card base with foam tape.  To finish things off, I added a scattering of sequins.


I'll Never Forget Your Kindness

Be sure to visit the SPARKS blog to see get all of the challenge details and see all of the inspiration from the design team.  Then visit the main Paper Smooches blog on November 1st and join in on the brand new challenge!

Thanks so much for stopping by!

Supplies:
Stamps: Paper Smooches Spreading Sunshine, Positive Strokes Two
Dies: Paper Smooches Tags 1, Flourishes, Butterfly Duet
Paper: PTI White
Ink: Memento Tuxedo Black, PTI Aqua Mist, Hawaiian Shores, Hibiscus Burst, Raspberry Fizz, Summer Sunrise, Orange Zest
Other: Sparkling Clear Sequins from Pretty Pink Posh, Foam Tape, embossing folder

Thursday, October 22, 2015

You Warm My Heart for Butterfly Reflections Ink!

Hey there!  Today I am sharing a Lawn Fawn card on the Butterfly Reflections Ink blog!  Here is a little peek:


Click here to see the entire card! :)

Thanks for stopping by!

Wednesday, October 21, 2015

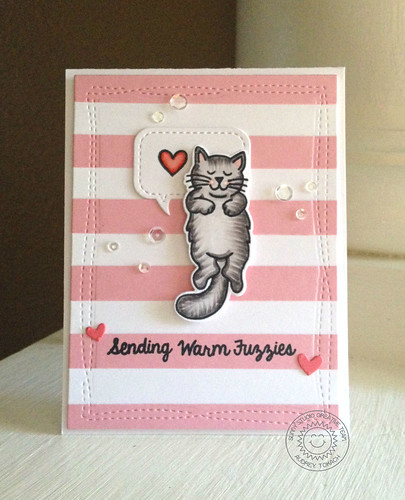
Sending Warm Fizzies {Sunny Studio Stamps}


Hello there!  Today, I'm sending warm fuzzies with the new Furever Friends stamp set by Sunny Studio Stamps!  This set is full of adorable little kitties, and all different positions, and my favorite is the sleeping kitty.  I am a crazy cat lady, with four cats of my own, and 3 of the 4 love sleeping this way!  I started off by creating a striped backgound.  I began with a white panel, and then cut 1/2 inch strips of pink cardstock.  I used the lines on my grid mat to adhere them 1/2 inch apart to create this wide striped pattern.  Then I ran it through my die cut machine to add a stitched border and also really press down the adhesive and make sure the glued pieces stay put.  I colored my cat with copic markers, diecut him with the coordinating Furever Friends dies, and popped him up on a speech bubble "pillow".  His dreams are filled with love!  Then I added a sentiment from the same stamp set.  To finish things off,  I added some clear sequins and a few tiny hearts, and then poppped the panel up on a white card base with foam tape.


Furever Friends

Thanks all for me today!  Thanks for stopping by! :)

Supplies:
Stamps: Sunny Studio Stamps Furever Friends
Dies: Sunny Studio Stamps Furever Friends, Avery Elle Wonky Stitches, SSS Tiny Hearts, Pretty Pink Posh Stitched Speech Bubbles
Paper: PTI White, CSS I'm a Princess  Pink, PTI Berry Sorbet
Ink: Memento Tuxedo Black
Other: Copic Markers, Foam Tape, Pretty Pink Posh Sparking Clear Sequins

Tuesday, October 20, 2015

Let it snow on the Lawnscaping Challenges blog today!

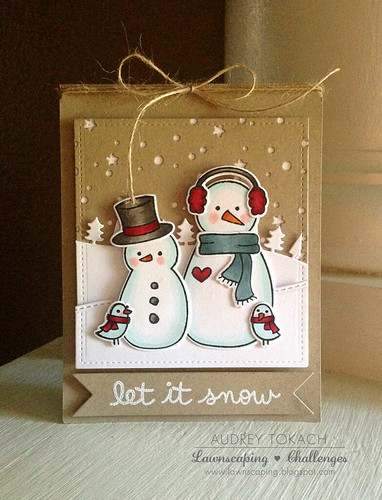
Hi there!  Today I have this rustic winter card to share with you, which is also featured over on the Lawnscaping Challenges Blog!  I love kraft cardstock for winter cards because it really shows off the snow!   I started off using the Small Stitched Rectangles dies and cut the largest rectangle in the set from both kraft and white cardstock.  Then, I used the Snowy Backdrops die to add snow to the kraft rectangle diecut, and backed it with the white rectangle diecut.  The rectangles were a bit longer than I wanted, so I trimmed about an inch off of the bottom, and used the Stitched Hillside Borders die and Forest Border die to create a ground for my little snowman to stand on.  I stamped, colored and diecut the snowmen, their accessories, and the little birds from the Making Frosty Friends stamp set and then popped them up on the hills with some foam tape. I also adhered the panel up on a kraft card base with more foam tape. I stamped a sentiment from the Snowy Backdrops stamp set onto a strip of kraft cardstock using Versamark ink, and then heat embossed it with white embossing powder.  Then I hand cut flag ends on the banner, and popped it up with, you guessed it... foam tape.  I finished the card off with a bow using some jute twine.

Let it Snow

I hope you like it!  Thanks so much for stopping by! :)

Supplies:

All listed and linked above! :)

More Christmas Critters {Mint Owl Studio}

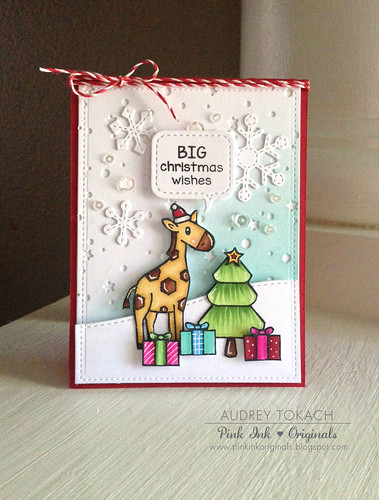
Hi there!  Today I have another card to share with  you using the new Christmas Critters stamp set from Mint Owl Studio!  This card features the cute little giraffe in the stamp set, which I colored with my copic markers.  I created the scene to look like he was towering over the tree in the stamp set, and you can't have a Christmas tree without a bunch of brightly colored presents underneath!  The sentiment is also from the Christmas Critters set!  This is one of three stamp sets currently offered by Mint Owl Studio, and you'll also find a selection of beautiful sequin mixes in the store too!  Check everything out here!

Mint Owl Studio Christmas Critters

Thanks so  much for stopping by! :)
BLOG TEMPLATE BY DESIGNER BLOGS