Sunday, June 28, 2015

Paper Smooches SPARKS Challenge - June Designer Drafts

Hello there!  Happy Sunday!  It's time for another Paper Smooches SPARKS Challenge, and it's Designer Drafts Week!  This week, our challenge is based on this sketch:


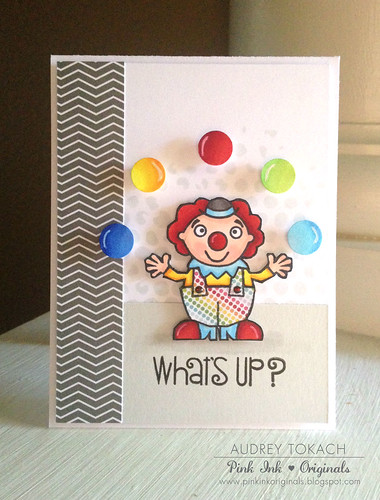
I just got the Enjoy the Show stamp set and I could not resist inking up that adorable clown!  Goodness, he is SO cute, and SO fun to color!!  I started with a piece of white cardstock, and though it is hard to see in the photo, I used light grey ink and the Bubbles stencil by Tim Holtz to add some interest to the background.  Then, I added a piece of light grey cardstock for my clown to stand on, and a strip of fun chevron patterned paper to the left side of the panel.  For the juggling balls, I cut 5 circles using a 1/2" circle punch from white cardstock and then colored them with Copic markers to coordinate with the clown's outfit.  Don't you just love his cute paper pieced polka dot pants?  I added "shine" marks to the juggling balls using a white gel pen and then adhered them with foam squares.  The clown was also popped up with some foam tape before I added a sentiment from the Good Gab stamp set.


What's Up?

Be sure to check out the SPARKS Blog or visit these fabulous ladies for lots more inspiration!!


Audrey Tokach - you are here!!

Thursday, June 25, 2015

Papertrey Ink June Blog Hop!


Hello there!  It's the 25th, and that means it's time for another Papertrey Ink Blog Hop!  I just couldn't resist playing along this month when I saw the gorgeous inspiration photo!  I was completely inspired, and it really encouraged me to step outside my comfort zone.  You all know how much I love my bright colors, but it was fun to tone it down for this challenge.

As soon as I saw the stripes and flowers, I pulled out two of my favorites, Watercolor Wonder and Doodlie Do. Are you surprised? ;)

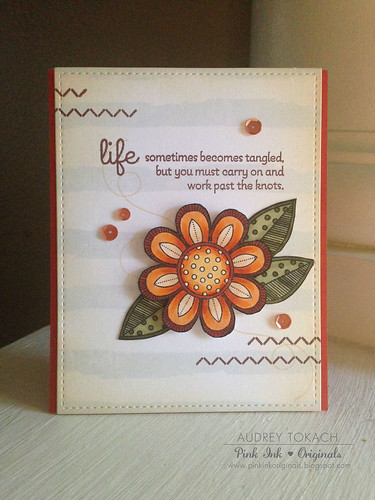
I wanted the flowers to take center stage, and though the stripes are darker in the photo, I wanted them to fade into the background a bit.  I used Soft stone ink for my stripes.  Since I started out with white cardstock, and the picture shows for ivory, I used Antique Linen distress ink and an ink blending tool to soften the bright white.  The flower and leaves were colored with copic markers.  To add a bit of interested behind the flower, I stamped a flight trail from Happy Trails in Fine Linen ink.  I added a sentiment from the Purls of Wisdom stamp set in brown ink, and some stitches using Sew Simple Borders.  I added a scattering of sequins before adhering my panel to a Terracotta Tile card base.

June PTI Blog Hop

That's all for now... thanks for stopping by!

Off to hop!! :)

Supplies:

Stamps: Doodlie Do, Watercolor Wonder, Happy Trails, Purls of Wisdom, Sew Simple Borders
Dies: Lawn Fawn Stitched Rectangle Stackables
Paper: Stampers Select White, Terracotta Tile
Ink: Soft Stone, Fine Linen, Memento Tuxedo Black, Rich Cocoa, Ranger Antique Linen
Other: Copic Markers, Foam Tape, Wink of Stella Clear Glitter Brush Pen, Avery Elle Kraft Mix sequins

Monday, June 22, 2015

Relish the Day {Lawn Fawn}

Hello there!

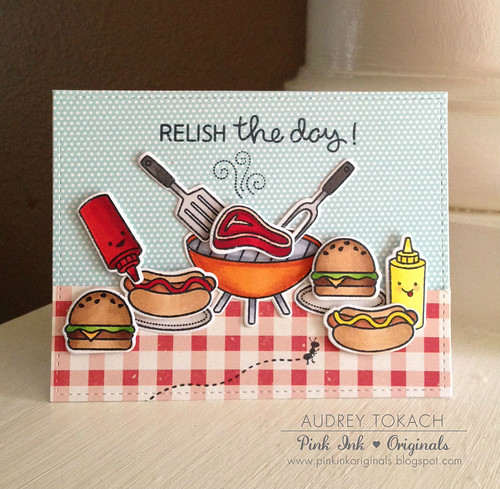
Today I  have a card to share with you that I made for my husband for Father's Day!  I used the new Lawn Fawn Let's BBQ stamp set and coordinating dies.  My husband loves to cook and he uses his grill constantly, so as soon as I saw this stamp set, I knew I needed it.  LOL!

I started out by stamping, coloring and diecutting a bunch of images from the set and just laid them out on my craft mat to create a scene.  Then I diecut some pattern papers from Lawn Fawn and My Minds Eye using the Stitched Rectangles dies.  The tiny ant is from the Happy Summer stamp set.  I adhered some pieces with a glue pen and some with foam tape for some fun dimension.


Relish the Day

That's all for now... thanks for stopping by! :)

Supplies:
Stamps: Lawn Fawn Let's BBQ, Happy Summer
Dies: Lawn Fawn Let's BBQ, Stitched Rectangles
Other: Copic Markers, Memento Tuxedo Black Ink, Foam Tape

Sunday, June 21, 2015

Marker Pop June Guest Designer - Take 2


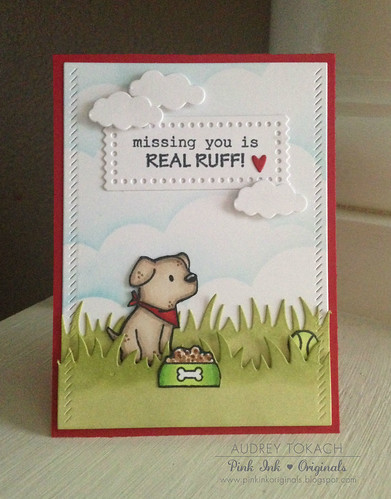
Hey there!  Happy Sunday!  Today I am back with another card that is being shared today on the MarkerPOP blog!  I am so thrilled to be guest designing with them this month.  I've had so much fun!  For my card today, I used the Mama Elephant Playful Pup stamp set and the Sew Fancy Frames to create my little scene.  The little clouds are the Paper Smooches Cute Clouds dies, and the Grassy Border dies are by Lawn Fawn.  I love making cards where I can mix and match my favorite companies!  The great thing is, MarkerPOP carries products from all of these companies, and tons more!!


Missing your is ruff!


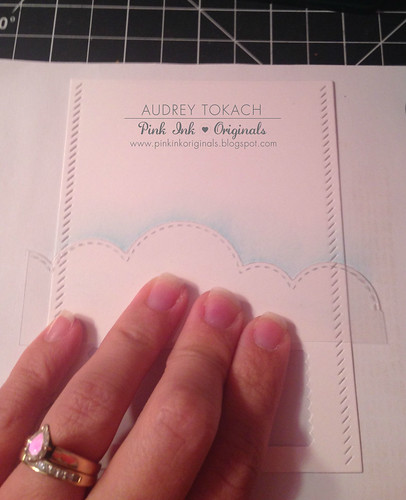
To create the cloud background, I used the Mama Elephant Landscape dies. I used the cloud die from that die set to cut a piece of clear acetate, then I used distress ink and an ink blending tool to sponge ink just along the very edge of the cloud before moving the stencil and repeating.  It is so easy it creates such a fun background! :)


Cloud demo

I want to thank the gang over at MarkerPOP for having me this month!  It's been so much fun! :)  Have a great day!!  Thanks for stopping by!

Supplies:
Stamps: Mama Elephant Playful Pups
Dies: Mama Elephant Sew Fancy Frames, Mama Elephant Landscape Trio, Paper Smooches Cute Clouds, Lawn Fawn Grassy Border
Ink: Memento Tuxedo Black, Ranger Tumbled Glass, Peeled Paint, Shabby Shutters Distress Ink
Other: Copic Markers, Foam Tape

Tuesday, June 16, 2015

Have a Ball! {Lawn Fawn}

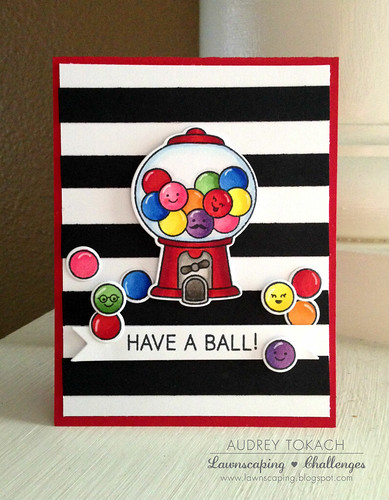
Hey there! Today I am sharing this fun card on the Lawnscaping Challenges blog using the new Sweet Smiles stamp set that is part of the Lawn Fawn Summer release!  I just LOVE this stamp set.  It is so much fun to color, and the selection of little faces in the set make it worth the price alone! I can see myself using them with a lot of my other Lawn Fawn stamp sets.

To start my card, I took a piece of white cardstock, and I added 1/2" stripes of black cardstock along the length of the panel. I used my grid mat to help with placement and spacing.  Then I stamped, colored and diecut the gumball machine and gumballs.  I popped the gumball machine up on foam tape in the center of the panel, and then adhered the loose gumballs randomly, some glued with liquid glue, and some popped up on foam tape.  I stamped a sentiment from the set on a strip of white card stock and then cut banner ends before popping it up with foam tape.  Then I adhered the panel onto a red card base for an extra pop of color.


Have a Ball!

That's all for me today!  I hope you like my card.  If you don't have this stamp set, hurry and go put it in your cart!  You'll love it! ;)

Have a great day!!

Supplies:
Stamps: Lawn Fawn Sweet Smiles
Dies: Lawn Fawn Sweet Smiles
Paper: PTI White, True Black, Pure Poppy
Ink: Memento Tuxedo Black
Other: Copic Markers, White Gel Pen, Foam Tape

Monday, June 15, 2015

Sparkle and Shine Challenge #8

**This is my second post today! If you are looking for my Lawnscaping Challenges post, please scroll down!**

Just a Note

Hello there!  It's time for another Sparkle and Shine Challenge!  This week we are having a sketch challenge based on this sketch:


Our sponsor this week is the super fabulous gang at Winnie and Walter!  You can win a $25 gift card!


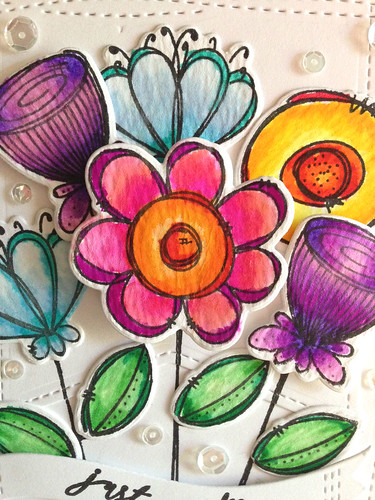
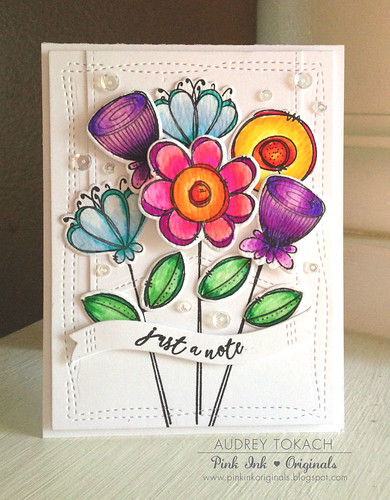
Let  me start by saying that I struggle with sketch challenges.  They really ARE a challenge for me! LOL!  I knew I wanted to play with my new WPlus9 Doodle Buds stamp set.  This stamp set is pretty much perfection in my book.  Perfect for coloring techniques, and a whimsical style which I absolutely adore.  I knew as soon as I saw the peeks of this stamp set that I had to have it, and it does not disappoint!  I started off by stamping a bunch of flowers and leaves on Tim Holtz Distress Watercolor paper using Versafine Black Onyx ink.  Then I colored the images with my Zig Clean Color Real Brush Markers,  After they were dry, I diecut them with the coordinating dies.  For the different layers on my card, I used the larger frame from new Avery Elle Wonky Stitches die set, and the smaller banner from the  Lawn Fawn Stitched Party Banners die set.  I cut off the holes from the banner with my paper trimmer, and then ran the banner diecut back through my Big Shot with with Wonky Stitches frame to give the banner the same stitched edge as the other panel.  I arranged the blooms where I wanted them, and then before gluing them down, I stamped the stems.  The sentiment, from the Doodle Buds stamp set is stamped on a banner die cut from the Avery Elle die set, and then I added some of my favorite Sparkling Clear 4mm and 6mm Sparkling Clear sequins from Pretty Pink Posh to finish things off.

Just a Note

Be sure to stop over at the blog to check out all of the challenge details and get lots more inspiration from the design team! Thanks for stopping by! :)

Supplies:
Stamps: WPlus9 Doodle Buds
Dies: WPlus9 Doodle Buds, Avery Elle Wonky Stitches, Lawn Fawn Stitched Party Banners
Paper: PTI White, Tim Holtz Distress Watercolor Paper
Other: Zig Clean Color Real Brush Pens, Foam Tape, Pretty Pink Posh Sparkling Clear 4mm and 6mm sequins

Lawnscaping Challenge #108 - Stars and Stripes


Hey there!  It's time for another Lawnscaping Challenge!  Challenge #108 is to use Stars and/or stripes on your project!  

Challenge #108 is sponsored by the super awesome Lawn Fawn!


Since I don't send out any July 4th cards, I chose to incorporate stars and stripes in a different way.  
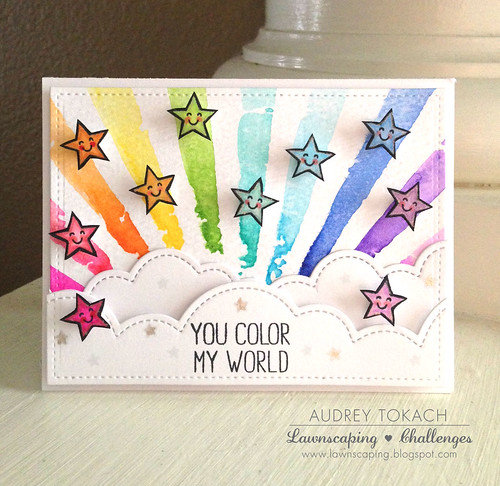
I started off with a piece of Tim Holtz Distress Watercolor paper, and I used the Tim Holtz Rays stencil and my Zig Clean Color Real Brush Markers to create a rainbow.  I simply colored in the bottom of each ray with a different color of marker, and then used a paint brush, damp with water to pull the color upwards to the top of the stencil.  When it was completely dry, I removed the stencil and used the largest die from the Small Stitched Rectangles dies to add a stitched edge to the panel.  I cut the medium and large clouds from the new Puffy Clouds die set from white cardstock.  Then I stamped and colored a bunch of stars from the Critters Ever After stamp set with coordinating Copic Markers and added some Sakura Stardust pen around the edge of each.  I adhered the stars with foam tape. One layer of clouds is adhered right to the panel with tape runner, and the one is the front is popped up with foam tape.  I stamped a sentiment from the Starry Backdrops stamp set before adhering the panel to a white card base with more foam tape.  I felt like I needed to add something to the clouds, so I stamped the tiny stars from the Lucky Stars stamp set in light grey ink and colored some in with the Stardust pen.

You Color My World

Be sure to visit the blog for lots more inspiration from the design team and get all of the challenge details.  I hope you'll join us for a chance to win some Lawn Fawn! :)

Thanks for stopping by!!

Supplies:
Stamps: Lawn Fawn Critters Ever After, Lucky Stars, Starry Backdrops
Dies: Lawn Fawn Puffy Clouds Borders, Small Stitched Rectangles
Ink: Memento Tuxedo Black
Other: Zig Clean Color Real Brush Markers, Copic Markers, Sakura Stardust Pen, Foam Tape

Sunday, June 7, 2015

Marker Pop June Guest Designer!

**This is my second post for today.  If you are looking for my Paper Smooches SPARKS challenge post, please scroll down**


Hello there!  Happy Sunday!  I've got some fun news for you today!  I'm excited to say that I will be guest designing for Marker Pop for the month of June! :) 

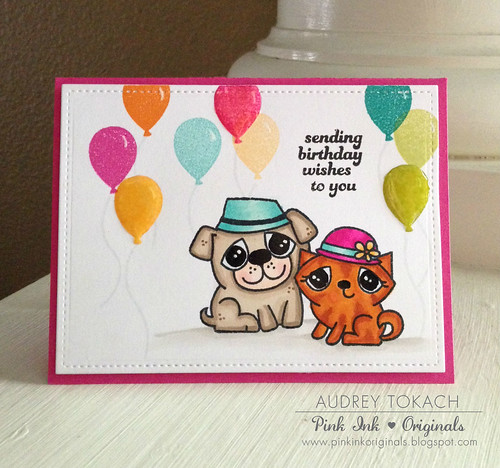
The card that I have to share with you today features an adorable duo from the Paper Smooches We Adore You stamp set.  I just love these two, and I couldn't resist coloring them as soon as they landed in my mailbox.  I stamped and colored the image, then diecut the panel with the largest die from the Lawn Fawn Small Stitched Rectangles Stackables.  I stamped balloons from the Paper Smooches Luminous Spring stamp set in a variety of colors, and added a sentiment from the We Adore You stamp set.

Birthday Wishes

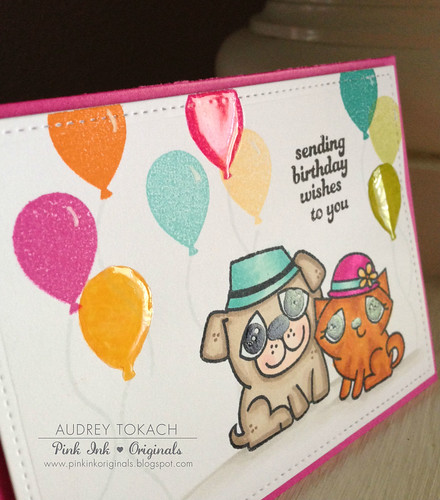
To add a bit of dimension with out a lot of bulk, I added Glossy Accents to a few of the balloons.  I added shine marks on the balloons with a white gel pen, and used a black gel pen to darken the eyes and noses of the critters.

Birthday Wishes

That's all for me today!  Thanks so much for stopping by! :)

Supplies:

All linked above :)

Paper Smooches SPARKS Challenge - Anything Goes!


Hello there!  It's time for another Paper Smooches SPARKS Challenge!  It's week #1 and that means the theme for this challenge is Anything Goes!

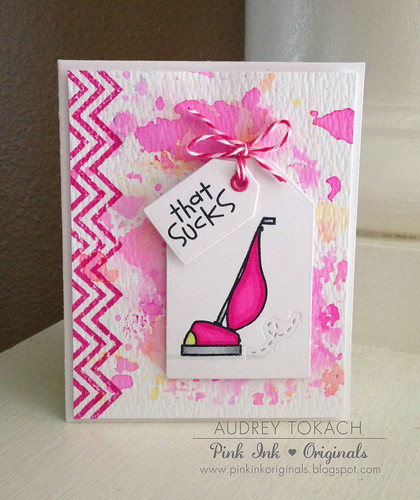
Just before I make my card, I vacuumed the carpet in my craft room.  All the while I was thinking about what I was going to do for my card this week.  It is probably no surprise to you, but I have a pink vacuum...  Yep, a pink Dyson, for Breast Cancer awareness.  As I was thumbing through my stash of Paper Smooches stamps, I came across the Squeaky Clean stamp set, and was inspired to make a card featuring my pink vacuum. :)

I started off with a piece of Tim Holtz Distress watercolor paper.  I scribbled my Zig Clean Color Real Brush Pens on a piece of clear acetate, then sprayed the acetate with a water bottle and pressed the acetate onto the watercolor paper.  I kept picking it up and putting it down in different places to add more color where I wanted it.  When I was happy with how it looked, I inked up the chevron pattern in the Geo-Graphic stamp set with Picked Raspberry Distress ink and stamped it vertically along the left edge of the paper.  For my focal point, I cut the smallest and largest tags from the Gift Tags die set from white cardstock.  I stamped and colored my pink vacuum, added a shadow from the Shadows stamp set, and a fun little movement trail using the Stitched Flourishes dies.  The sentiment was stamped on the smaller of the two tags.  I popped the small tag up with foam tape on top of the larger tag, and added some twine.  Then I popped the large tag up on the watercolor panel with foam tape and added the watercolor panel to a card base with foam tape.

That sucks

Be sure to check in with these fabulous ladies for lots more inspiration!

Audrey Tokach - *you are here*
Savannah O'Gwynn

Hope you'll join us for a chance to win some Paper Smooches!  Thanks for stopping by! :)

Saturday, June 6, 2015

Coffee Lovers Blog Hop - Summer Edition!


Hello there!  Today I am participating in the Summer Coffee Lovers Blog Hop!  I am a coffee lover for sure, and I just love checking out everyone's coffee themed cards!

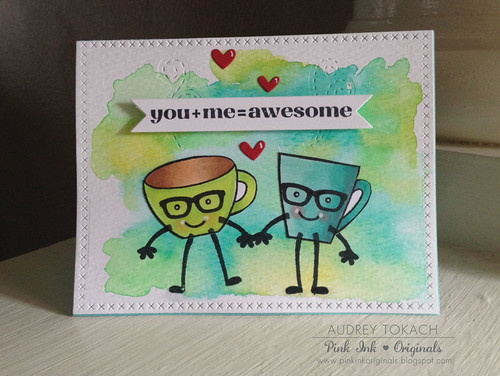
I want to apologize for my photo today... it's been rainy here in Florida, and getting a good picture has proven tough lately!  For my card, I  used one of my favorite Paper Smooches stamp sets, Hot Concoctions!  I added some personality to my coffee mugs using the arms, legs, and faces from the Cute Fruit stamp set.  To add some steam to my coffee, I used the Stitched Flourishes die and the cross stitched frame is from the Mama Elephant Sew Fancy die set.  And I am sure you are shocked to see a watercolored background ;)  I used my $5 pan set of watercolors from Michaels for this card.


Coffee Lovers Summer Hop

I'm going to enter this card in the Pretty Pink Posh Watercolor Blog Hop that's still going on, too! :)


Thanks for stopping by!! :)

Supplies:

All linked above :)

Friday, June 5, 2015

Pretty Pink Posh Watercolor Blog Hop!


Hello there!  Happy Friday!  Today, I am so excited to be participating in a blog hop about one of my favorite things - Watercolor!  Even better is that it is hosted by my favorite sequin supplier, Pretty Pink Posh!

I was super inspired by the beautiful blog hop banner.  I knew I wanted to do a rainbow of watercolor, and I wanted to incorporate the gorgeous new iridescent sequins that Pretty Pink Posh is now offering exclusively in their store!

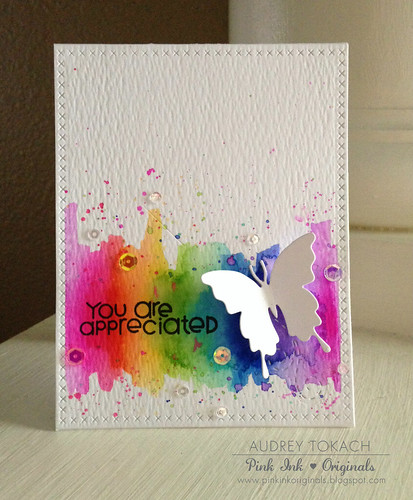
I started off with a piece of Tim Holtz Distress watercolor paper.  I taped to to a clipboard before I started painting.  That does two things... it keeps it fairly flat after the paper dries, and it also gives a nice masked edge.  Then I took my Zig Clean Color Real Brush Markers and scribbled a rainbow of colors overlapping each other across the bottom third of the watercolor paper.  Then I used a paint brush and some water to move the colors around until I was happy with how they looked.  I scribbled the marker on an acrylic block and then picked up the color with a wet brush, tapping the brush to make the tiny paint splatters.  After  the paper dried, I ran it through my diecut machine using the Mama Elephant Sew Fancy cross-stitched frame.  I diecut the largest butterfly from the Paper Smooches Butterfly Duet die set from white cardstock and then used the Paper Smooches Stitched Flourishes dies to add a stitched flight trail under the butterfly.  I stamped a sentiment from the Paper Smooches Word Salad stamp set, and adhered only the body of the butterfly using glossy accents. When the glossy accents was dry, I carefully folded up the wings of the butterfly.  I added 4mm Sparkling Clear sequins, and iridescent sequins in Strawberry Burst, Sunshine Glow, Bermuda Blue and Lavender Moon to finish things off.


PPP Watercolor Hop

I hope you like my card!  I can not wait to hop along and see all of the other amazing watercolor projects!  I have a feeling I will be pinning like a crazy lady! *wink*

Thanks for stopping by! :)

Supplies:

All linked above!!

Monday, June 1, 2015

Sparkle and Shine Challenge #7

**This is my third post for today!  If you are looking for my Papertey Ink Moments Inked post, or my Lawnscaping Challenge post, please scroll down!**


Hello there!  It's the first of the month, and that means that it's time for another Sparkle and Shine Challenge!  Check out this gorgeous inspiration photo!!

This challenge is sponsored by Pretty Pink Posh!


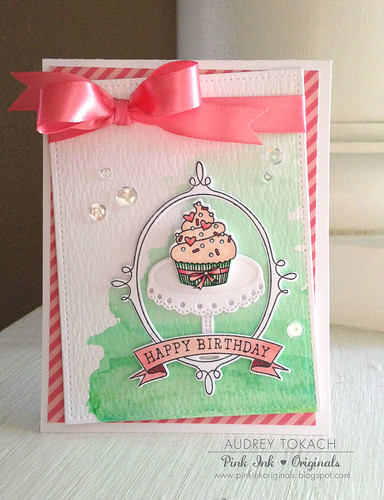
For my card today, I started off with a piece of Tim Holtz Distress watercolor paper.  I used my new Zig Clean Color Real Brush Pens to create a mint ombre along the right side of the paper. Since I only have a set of 12 markers, I mixed green with a smidge of blue to get mint. I just LOVE how easily these markers blend to create new colors.  It's really amazing!  After it was dry, I used my Lawn Fawn Small Stitched Rectangle dies to add a stitched edge to the panel, and then I diecut, stamped and colors images from the Papertrey Ink Bakers Dozen stamp set to create my focal point.  I also cute their adorable Cake Plate dies.  I cut an A2 card base from white cardstock, and then added some Lawn Fawn Let's Polka patterned paper.  I added a satin bow to the watercolor panel before popping it up with some foam tape onto the card base, and then to finish things off, I added a scattering of my favorite Sparkling Clear Pretty Pink Posh sequins! :)


Happy Birthday

That's all for me today!  Be sure to check out the blog for all of the challenge details and for lots more inspiration from the design team.  Thanks so much for stopping by! :)

Supplies:
Stamps: PTI Bakers Dozen
Dies: PTI Bakers Dozen, PTI Cake Plates, Lawn Fawn Stitched Rectangles
Paper: PTI white, Tim Holtz Distress Watercolor Paper, Lawn Fawn Let's Polka 6x6
Other: Zig Clean Color Real Brush Pens, Copic Makers, PTI Berry Sorbet satin ribbon, Pretty Pink Posh 4mm, 6mm and 8mm Sparkling Clear Sequins, Foam Tape

Lawnscaping Challenge #107 - Calling All Critters!

**This is my second post for the day!  If you are looking for my Papertrey Ink Moments Inked post, please scroll down**


It's time for another Lawnscaping Challenge!  This week, it's all about Critters!  Lawn Fawn is known for their critters... grab your favorites and join us for this fun challenge!

Challenge #107 is sponsored by Ellen Hutson!


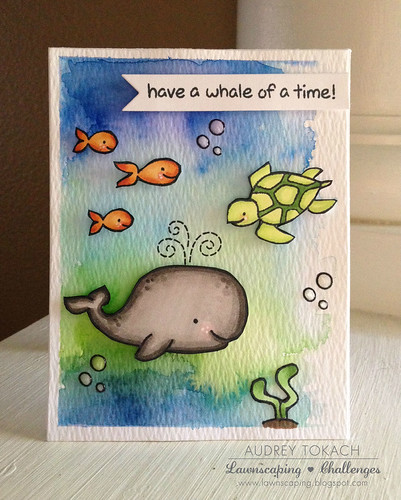
I think I have all of Lawn Fawn's critters stamp sets... it was quite hard choosing one for this challenge!  I settled on one of my very first Lawn Fawn sets, Critters in the Sea.  I started off with a piece of Tim Holtz Distress Watercolor paper.  I scribbled a few thick lines of color using my Zig Clean Color Real Brush pens and then added water with a paint brush to blend them.  While the watercolor was drying, I stamped, colored and fussy cut my critters using copic markers.  I popped everything up using foam tape and added Wink of Stella clear pen and glossy accents to the water bubbles.  I stamped the sentiment on a banner die cut, popped that up on foam tape, and then adhered the entire panel to an A2 card base.


Whale of a time!!

That's all for now... Be sure to stop by the blog for all of the challenge details and for lots more inspiration from the design team!  Hope you'll join us! :)

Supplies:
Stamps: Lawn Fawn Critters in the Sea
Dies: PTI Double Ended Banner
Paper: PTI White, Tim Holtz Distress Watercolor Paper
Other: Zig Clean Color Real Brush Pens, Copic Markers, Wink of Stella Clear brush pen, Glossy Accents, Foam Tape

Moments Inked: Travel Planning and Organization


June 1 _Newsletter_WM

Hello there!  Happy Monday!  Today's it's my turn to share with you how I have been using my Papertrey Ink Moments Inked Planner System!  Today, it's all about travel and trip planning!  Grab a cuppa something, and join me for a walk through my week. :)


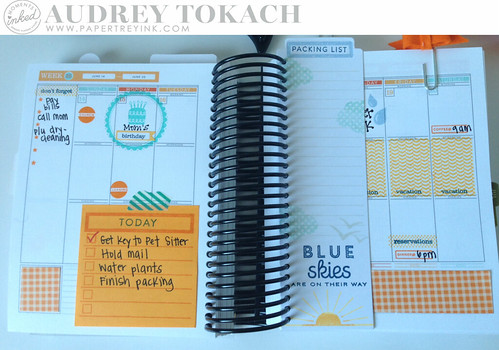
I will start by sharing my full page spread, and then go into more detail about each of the individual elements.  When I decorate my pages, I look to each month's color combination for inspiration.  For the month of June, the color scheme is a beautiful one - Summer Sunrise, Orange Zest and Aqua Mist!  I lay out all of my supplies in those colors - ink, pens, patterned papers, felt, etc.  It is much easier to keep the decorating flow going when it's all at your finger tips,

So here is my full page spread:

PTI Moments Inked Planner

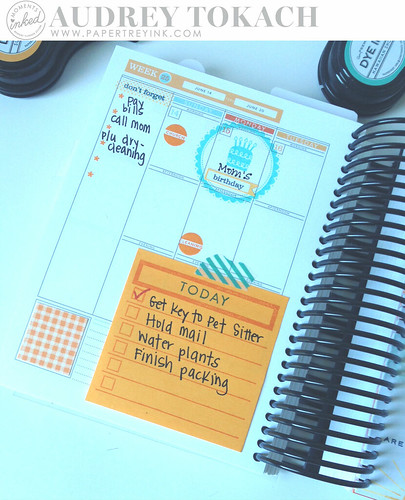
On the left side of my page, I started off by stamping my weekly to-do list on the left side using the tiny star icons from the Moments Inked: Posted stamp set in Summer Sunrise ink.  I highlighted the column with a few images from the Moments Ink: Planner Banners stamp set.  The "chores" that I list here do not have a specific due date, just as long as they get done some time during that week.  I highlighted my Mom's birthday using the Tag It's #1 stamp set and the Moments Inked: Planner Banners stamp set and dies.  Using the Moments Inked: Divided stamp set, I noted church on Sunday, and my cleaning day on Monday.  Near the bottom of my page, I used the Moments Inked: Posted stamp set again to make note of pressing things that will need to occur before travel day. I added some fun patterns to my page using some Orange Zest patterned paper and some fun striped washi.
PTI Moments Inked Planner

On the right side of my page, you will see that it's time to travel and get this vacation started!  I used the little plane image from the Blue Skies stamp set to mark our first day of vacation.  To block off the rest of the week, I used the cute patterned squares from the Background Basics: Diagonals.  I used the Moments Inked: Planner Banners stamp set to note a few other things like a coffee date and dinner reservations.  The little raindrops in the Blue Skies stamp set were perfect to illustrate our day at the waterpark.  Using the Bow Clips die, I make a few coordinating bow clip to mark off this page.
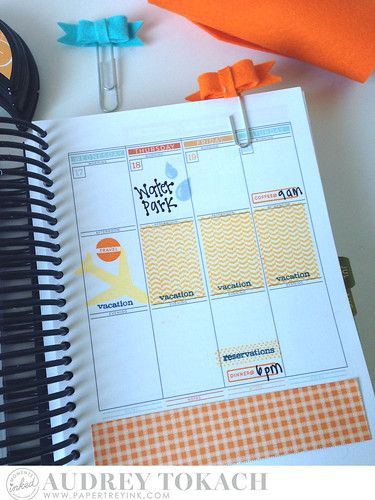
PTI Moments Inked Planner

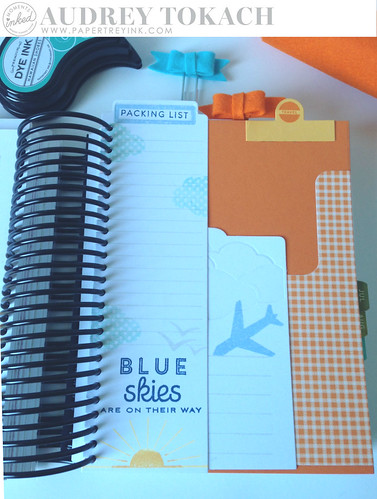
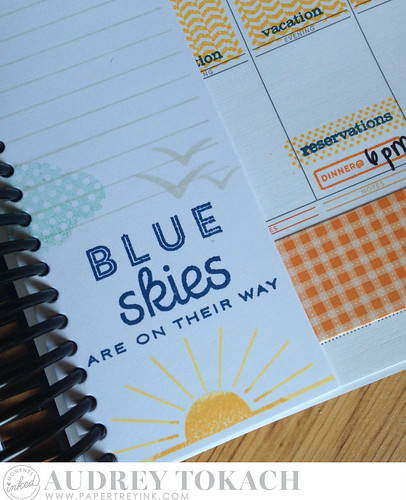
Travel always requires a packing list... and for me, packing and unpacking is such a drag.  But with a cute packing list, it can make the task a tiny bit easier.  I used the Moments Inked: Tabbed List die to cut from white card stock to create my list.  Then, using the Moments Ink: Listed stamp set, I stamped the lines with Soft Stone ink, and added a few cute images from the blue Skies set.
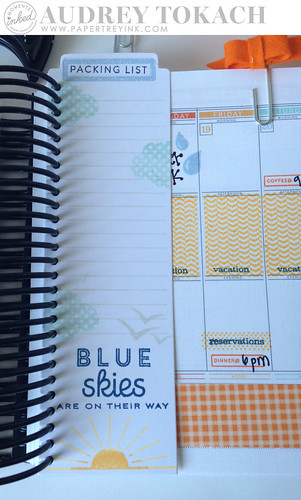
PTI Moments Inked Planner

Then I created a place to make note of travel arrangements. I placed it in the weekly spread, but later, I can move it to the daily pages and use it as a fun keepsake.  I first cut the Blue Skies Coverplate from white cardstock.  Then, using the Moments Inked: Edged die, I added a notebook edge to the side so that I could easily add it to my planner.  I stamped the lines from the Moments Inked: Posted stamp set in Soft Stone ink to coordinate with the packing list, and then stamped the plane image from Blue Skies in Spring Rain Ink.
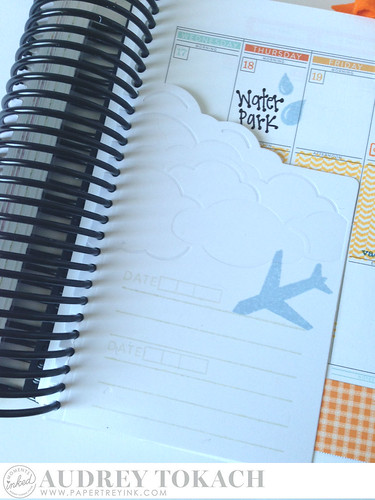
PTI Moments Inked Planner

To put behind that, I created a planner pocket using the Moments Inked: Divided die set and the Moments Inked: Pocket Page die.  The back of the pocket is cut from  Orange Zest card stock and the pocket piece is cut from the same Orange Zest gingham paper that I used to decorate my weekly spread.  To find it easily, I added a tab that I cut from Summer Sunrise card stock using the Moments Ink: Divided stamps and die set.  In this pocket, I can put anything from travel itineraries, receipts, mementos, etc.
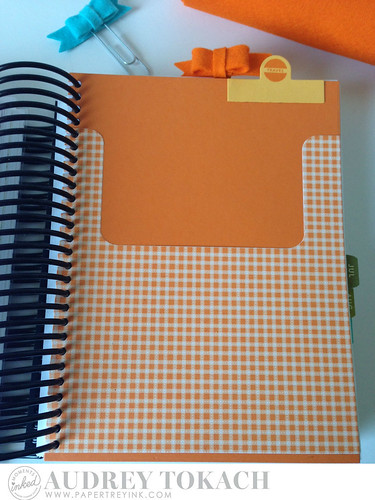

PTI Moments Inked Planner

Here you can see how all of the pieces layer so nicely and everything can be neat and organized (and cute), which will hopefully lead to a less stressful trip!

PTI Moments Inked Planner

I had so much fun putting these pages together and adding these new elements to my planner.  I hope you enjoyed today's post!

We'd love to see how you use your Moments Inked Planner!  Tag us on Instagram with the hashtag #momentsinked so we can see what you've been up to!


Thanks so much for stopping by!  Have a great day!!


BLOG TEMPLATE BY DESIGNER BLOGS