Thursday, January 7, 2016

COOL-est Card Series - Week #1


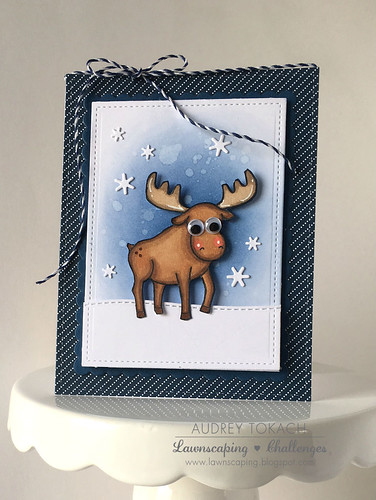
Hello there!  I am so excited, because today, and every Thursday in January, I am teaming up with my friend Jenn Shurkus to bring you the 2016 Coolest Card Series!  Each week, we will be focusing on a particular company and technique, but every card will be winter or snow themed!  Each week, we will be giving away prizes so be sure to play along with us (scroll down for a peek at this week's awesome prize)!  Here is how you can win:

1. Comment on this post
2. Comment on Jenn's post
3. Play along with us and link up using the inlinkz below

That gives you 3 chances to win per week, and we will be giving away one prize per week, so 4 prizes total.  The winners will be posted at 9am, February 4th.  When the winners are announced, you can find them here.

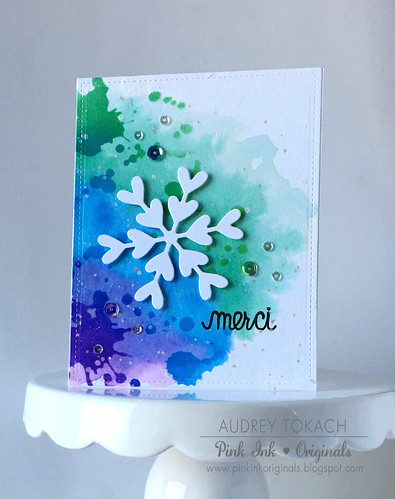
For week one, we will be using Paper Smooches products along with stencils to create our cards.  I started of by watercoloring a piece of Tim Holtz Distress Watercolor cardstock using Cracked Pistachio, Lucky Clover, Salty Ocean and Wilted Violet Distress inks.  When it was dry, I diecut it with a stitched rectangles die, I pulled out my Tim Holtz Splatters stencil to add a few splotches over top of the watercolor using the same colors of distress inks.  Then, using my Kuretake Gansai watercolors, I added some pearl and white paint splatters for more interest.  I diecut the Paper Smooches Lovely Snowflake from white cardstock and popped that up where I wanted it with foam tape, then added a sentiment from the Paper Smooches Good Gab stamp set.  Finally, I added a scattering of sparkling clear and iridescent sequins from Pretty Pink Posh.

COOL-est Card Series 2016

I hope you are feeling inspired!  Be sure to check out what Jenn has to share with you today!  You can see her project by clicking here!  Play along with us for a chance to win!  Share your creations with us on instagram using the hashtag #COOLestcardseries.  We'd love to see how you are inspired by the challenges!

Want a chance to win this week's prize?


Remember, you can win one of three ways!  Leave a comment on this post, leave a comment on Jenn's post, or make a winter or snow themed card using a stencil, and add it to the inlinkz below!


Thanks so much for stopping by! :)

Supplies:
Stamps: Paper Smooches Good Gab
Dies: Paper Smooches Lovely Snowflake
Paper: Tim Holtz Distress Watercolor, PTI White
Ink: Versafine Onyx Black, Disress Inks in Cracked Pistachio, Lucky Clover, Salty Ocean, Wilted Violet
Other: 4mm Sparkling Clear and 6mm Lavender Moon, Peacock Feathers and Peridot Mist sequins from Pretty Pink Posh, Foam Tape, Kuretake Gansai 36 watercolor palette

Wednesday, January 6, 2016

Valentine Collection by Just ME Prints

Hello there!  Today I have a pair of cards to share with you using the new Valentine's Day release from Just ME digital prints on etsy!  My friend Elena is the artist behind these adorable critters, and are part of a collection of digital images that were just released the other day.

First up, this little piggie.  My goodness, he is my favorite.  I LOVE him to pieces.  Seriously, I can't get enough.  Pure cuteness.  And the sentiment?  It doesn't get any better.  I resized the image in a free editing program called Pixlr, and then printed him out and colored him in with copic markers.  I diecut the panel with the Lawn Fawn Small Stitched Rectangles and added a decorative edge with the Lawn Fawn Stitched Scallop dies.  I popped the panel up on a piece of polka dot paper, added it to an aqua card base, and finished things off with some coordinating twine.

You Make My Tail Curl

This long-necked giraffe is so in love that he has his feet on the ground but his head in the clouds.  I resized him to take up most of the card front, and then added some clouds cut from white cardstock and vellum, using the Lawn Fawn Puffy Clouds Borders dies and the WPlus9 Sunshine Layers dies.  I sponged the sky with Faded Jeans Distress Ink, added some tiny heart diecuts, and twine.


It's Been Too Long

If you've never tried digital images, don't be afraid!  They are so versatile!!  Be sure to visit Just ME Prints and check out the new Valentine Collection! 

Thanks for stopping by! :)

Supplies:

Pig Card:
Stamps: Just ME Prints Pig Valentine image
Dies: Lawn Fawn Small Stitched Rectangles, Stitched Scallop Borders, Simon Says Stamp Tiny Hearts
Paper: Lawn Fawn Let's Polka 6x6 paper pad, PTI White, Aqua Mist, Berry Sorbet
Other: Copic Markers, White Gel Pen, Foam Tape, Lawn Fawn Coral Lawn Trimmings

Giraffe Card:
Stamps: Just ME Prints Long Necked Giraffe image
Dies: Lawn Fawn Stitched Rectangles, Puffy Cloud Borders, WPlus9 Sunshine Layers, Simon Says Stamp Tiny Hearts
Other: Copic Markers, White Gel Pen, Foam Tape, Lawn Fawn Sweetheart Lawn Trimmings

Tuesday, January 5, 2016

Countdown to Confetti - Day #1


Hello there!  I am so excited to be joining the amazingly talented Confetti Crew and Reverse Confetti for their new release this month!  All of the new products that I am using will be available for purchase in the Reverse Confetti store on January 8th, just a few short days away!

For my project today, I pulled out an old Reverse Confetti favorite and paired it some of goodies that will be available in the January release.  I started off by watercoloring a piece of Tim Holtz Distress Watercolor paper with Picked Raspberry and Worn Lipstick distress inks.  While I was waiting for it to dry, I stamped and colored the adorable puppies from the Puppy Love stamp set, and then used the coordinating Puppy Love Confetti Cuts to cut them out.  Then I diecut a few of the new Lovey Words from dark pink cardstock to create my sentiment along with the help of the new Lovey Words Coordinates stamp set.  I love being able to mix and match the stamp and die combination to create a ton of different sentiments!  I diecut the new Double Heart Garland from white and dark pink cardstock, and strung it across my watercolor panel where I wanted it, and then adhered it with a glue pen.  The Lovey Words diecuts didn't stand out enough for my liking, so I outlined each word with a white gel pen to  highlight them better.  I popped the little dogs up on the card front using foam tape, and then popped the entire panel up on a white card base using more foam tape.


I Love You Forever

Here is my card a little closer, so you can see all of the fun texture from the watercolor paper, and that white gel pen.  I just love how it adds so much life to the images and word diecuts!


I Love You Forever

That's all for me today, but I will be back with more Reverse Confetti inspiration soon! 

Be sure to hop along and visit the rest of the Confetti Crew to see more of the new products! 

Thanks so much for stopping by! :)


Monday, January 4, 2016

Lawnscaping Challenge #121 - Winter Wonderland

Hi there!  It's time for our first Lawnscaping Challenge of the new year!  This challenge is Winter Wonderland themed!


We are sponsored by our friends at Ellen Hutson!


For my project today, I pulled out my Critters in the Arctic stamp set.  I just love the moose in the stamp set, and I love him even more with googly eyes!  I started off my diecutting a piece of white cardstock with the Small Stitched Rectangles Stackables die set.  Then I used Faded Jeans distress ink and an ink blending tool to add color to the center of the panel.  I added a few water droplets to give the panel some more interest.  I diecut a snowy hill for my friend to stand on using the Stitched Hillside borders dies, and popped that up on the panel with foam tape.  Then I stamped, colored and fussy cut the moose, adding some white gel pen accents, and his googly eyes before popping him up with foam tape.  Then I added a scattering of tiny snowflakes using the Mini Snowflakes dies.  I mounted the panel on a Scalloped Rectangles Stackables cut from navy cardstock.  Then I diecut some patterened paper from the Pint Sized Patterns: Beachside 6x6 paper pad using the Large Stitched Rectangles Stackables and added that to a white card base.  I popped the panel up with foam tape, and added a bow with some Blue Jay Lawn Trimmings.


Winter Moose

That's all for me today!  Be sure to check out the blog for all of the challenge details and to see lots more winter wonderland inspiration from the design team!

Thanks for stopping by!

Supplies:
Stamps: Critters in the Arctic
Dies: Small and Large Stitched Rectangles Stackables, Scalloped Rectangles Stackables, Stitched Hillside borders, Mini Snowflakes
Paper: Lawn Fawn Beachside Prints 6x6 pad, PTI White, Enchanted Evening
Ink: Memento Tuxedo Black, Faded Jeans Distress
Other: Copic Markers, White Gel Pen, Foam Tape, Blue Jay Lawn Trimmings

Sunday, January 3, 2016

I'm a 'Fetti Friend for January!


Hello there!  I have some fun news to share with you!  I am so excited that I am joining the Confetti Crew at Reverse Confetti for the month of January!  


The new release will be available in the Reverse Confetti store on January 8th, but the fun starts on the Reverse Confetti blog on January 5th with lots of inspiration from the design team (and ME!)  You are in for a TREAT!  So many adorable products are coming your way this month!!


Be sure to check back here on Tuesday to get a glimpse of the January Reverse Confetti release! :)

Have a great day!


Friday, January 1, 2016

Sparkle and Shine Challenge #21

Hi there!  Can you believe that we are starting our first Sparkle and Shine Challenge of the new year already!  Today starts a new challenge with this inspiration photo:
 
 
We have a new sponsor for 2016, Create a Smile Stamps!


I think the color combination used in the inspiration photo lends itself very well to a magical glittery scene!  One thing I love to do is mix and match stamp sets, sometimes using sets from different companies, together.  The Avery Elle Pixie Dust stamp set and the Star Scribbles by Papertrey Ink are a match made in heaven!  To start my card, I added Tumbled Glass, Shaded Lilac and Dusty Concord Distress Ink in a circular shape to the center of a piece of watercolor paper.  Then I added a a few flicks of water to get the looks I was after and diecut the panel with the Avery Elle Wonky Stitches dies.  I took the large circle scribble from the Star Scribbles stamp set and stamped in the center of the panel using a light grey ink, and filled in the stars with a Sakura Stardust pen for some added sparkle.  Then I stamped, colored and fussy cut one of the adorable fairies from the Pixie dust stamp set and popped her up in the center of the circle with foam tape.  I stamped a sentiment, also from the Pixie Dust stamp set, next to her and added a few silver sequins to finish the scene.


Pixie Hugs and Kisses

Be sure to stop by the blog to get all of the challenge and to see lots more inspiration from the design team!  I hope you will join us!!

Thanks for stopping by! :)

Supplies:
Stamps: Avery Elle Pixie Dust, Papertrey Ink Star Scribbles
Dies: Avery Elle Wonky Stitches
Paper: PTI White, Tim Holtz Distress Watercolor Paper
Ink: Memento Tuxedo Black, Versafine Black Onyx, Mama Elephant Moonlight, Ranger Distress in Tumbled Glass, Shaded Lilac, Dusty Concord
Other: Copic Markers, White Gel Pen, Sakura Stardust Pen, Silver sequins, foam tape

Hogs and Kisses for Butterfly Reflections Ink!


Hello there!  

Today, I am over on the Butterfly Reflections Ink blog with hogs and kisses for you!

Here is a little peek:


Click here to see the entire card!

Thanks for stopping by!! :)
BLOG TEMPLATE BY DESIGNER BLOGS