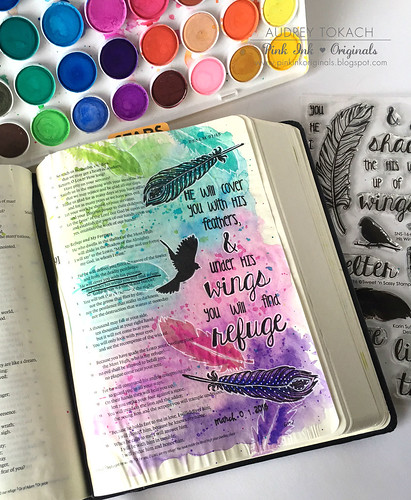
Today I have a bible page to share with you using the Creative Worship: His Wings stamp set from Sweet n Sassy Stamps! I chose to journal Psalm 91:4. The His Wings stamp set has all of the words in that Psalm for you to include the entire verse on your page. I started off my lining up my word stamps as I wanted them on my page, and then picked up each line, one by one on my acrylic block, and stamping the verse a line at a time. I was sure to use waterproof ink because I planned to watercolor over top of them and I didn't want the ink to bleed. If you don't have waterproof ink, you could always watercolor first, and then stamp after it's dried. After I watercolored, I stamped the feather images included in the stamp set randomly around the page. I use ink colors slightly darker than the watercolor beneath them. Then, I stamped the more detailed outline feathers and the bird in flight in black ink. Everything was looking a little flat for me, so I added some accents with a white gel pen. I added polkadots to the feathers, and outlined the colored feathers and the bigger words in the verse in white gel pen. Suddenly, everything started popping off of the page! It's amazing how one little addition can change the look of the entire page!
That's it for me today! Thanks so much for stopping by! :)
Supplies:
Stamps: Sweet n Sassy Creative Worship: His Wings
Ink: Versafine Onyx Black, Lawn Fawn Celery, Fresh Lavender, PTI Hawaiian Shores, Hibiscus Burst
Other: ZIG Clean Color Real Brush Markers, Artist Loft Watercolors, White gel pen, Heidi Swapp date stamp
Supplies:
Stamps: Sweet n Sassy Creative Worship: His Wings
Ink: Versafine Onyx Black, Lawn Fawn Celery, Fresh Lavender, PTI Hawaiian Shores, Hibiscus Burst
Other: ZIG Clean Color Real Brush Markers, Artist Loft Watercolors, White gel pen, Heidi Swapp date stamp


WOW Audrey, this is simply amazing and definitely the best piece of Bible journaling art I have seen.
ReplyDeleteI love how the white gel pen makes the words and images pop off the page!
ReplyDeleteWhich white gel pen did you use and I'm also curious about how you did the watercolor background. I'm new to water colors and am having trouble finding tutorials on how to create backgrounds like this. Thanks!