Wednesday, October 26, 2016

Reverse Confetti October SFYTT


Hello there!  Today, I have a card to share with you for the Reverse Confetti October SFYTT Challenge!  Here is the sketch:


And here is my card...

I started off my card with a Stone card base.  Then I diecut the second largest Lacy Scallop Frame from the Fright Night patterned paper pad.  I adhered that to the card base with a glue pen, then added a strip of gold cardstock across the bottom third of the scallop layer. On top of that, I diecut a Circle Garland from white cardstock.  Then, using the Butterfly Dreams stamp set, I stamped a butterfly in Stone ink and diecut it with the coordinating Butterfly Dream Confetti Cuts.  I also cut a second butterfly from patterned paper.  I popped the stamped butterfly up on to the polka dot butterfly using foam tape, and bent them slightly in the center make the wings appear to stand up more.  To finish things off, I added a scattering of sequins.


October SFYTT

Here is a closeup of the butterfly:

October SFYTT


There is still time for you to play along with the SFYTT challenge this month!  You could win a gift certificate to Reverse Confetti!  I hope you'll join us!!

Thanks so much for stopping by! :)


Thursday, October 20, 2016

Reverse Confetti Happy Fallidays - Christmas


Hello there!  Today, the Reverse Confetti gang is continuing our Happy Fallidays celebration!  Today, it's all about Christmas!

I created a gift card holder tag using the appropriately named Gift Card Holder Tag Confetti Cuts.  I created a double tag that opens to reveal a gift card.  To do this, I started off by diecutting the Gift Card Holder Tag from a piece of the Very Merry patterned paper pad, and I cut a second tag from white cardstock to cut and use for the snowy ground.  I stamped, colored, and diecut images from the Jolly Holiday stamp set, and popped those up on the polka dot tag.  I added a score line near the top of the tag to make it fold open easily.

Gift Card Holder

To create the inner tag that holds the gift card, I diecut another piece of Very Merry patterned paper, and another tag from Brick cardstock. I used the die from the Gift Card Holder Tag that cuts the slit for the giftcard, and added a polka dot banner to coordinate with the outside tag.  I glued the red patterned tag to the Brick cardstock tag to make it a bit more sturdy.  I was careful only to glue it on three sides, leaving the area near the gift card slot free of adhesive.  For my sentiment, I stamped an image from the Naughty or Nice stamp set on a piece of white cardstock, then used the Edge Essentials dies to add a wavy border cut from Aqua cardstock to either side of the sentiment before gluing it to the red patterned tag.
Gift Card Holder

I love how easily the gift card slides in and out of the inner tag!  To finish things off, I put one tag on top of the other, and threaded both with twine, and then tied it, along with some red tulle, to a white gift bag filled with fun tissue paper.

Gift Card Holder


That's all for me today,  but be sure to visit the Reverse Confetti blog to see a full list of designers who have projects to share with you today!

Thanks so much for stopping by!! :)


Wednesday, October 19, 2016

Lawn Fawn Inspiration Week - Home for the Holidays


Hello there!  Welcome to the final day of Lawn Fawn Inspiration Week for the month of October!  Today, I have a card to share with you using the Home For the Holidays stamp set! 

To create my card, I started off by diecutting a piece of Perfectly Plaid Winter paper using the largest die from the Small Dotted Rectangles Stackables die set.  Then I diecut a mountain from Narwhal cardstock using the Stitched Mountain Border die set, and a snowy hillside using the Simple Stitched Hillside Borders.  I stamped, colored the diecut the car, and presents from Home for the Holidays, and stamped the trees, also from the same set, in Freshly Cut Grass ink.  I added a scattering of Mini Snowflakes to the background, added some stickles to the mountain snowcaps, and some white gel pen accents to the car and presents.  I stamped a sentiment from Home for the Holidays on a white hand cut banner, and popped that up above the mountains, then mounted the panel on a Chili Pepper card base.


Home For the Holidays

Be sure to visit the Lawn Fawn blog for lots more inspiration from the design team!

Thanks so much for stopping by! :)

Supplies:
All listed and linked above :)

Tuesday, October 18, 2016

Reverse Confetti Happy Fall-idays : Halloween

**This is my second post today.  If you are looking for my Lawn Fawn inspiration week post, please scroll down**


Hello there!  Today the Reverse Confetti gang is kicking off a fun three day series of holiday inspiration, called "Happy Fall-idays".  Today, we are focusing on Halloween projects!

For my project, I chose to create a treat box using the Clear Totes and the In the Bag die set.  I diecut a backer and bottom for the tote from Fright Night patterned paper.  I glued those pieces together, and then added a few strings of stars using the Star Garland die cut from Tangerine cardstock.  I stamped the witch, cauldron and mummy from the Best Witches stamp set, as well as two of the cute bats, and then diecut them with the coordinating Best Witches Confetti Cuts.  I glued everything in place with a glue pen, and then carefully slid the insert into the clear tote.  I added  handful of candies, which are a bit hard to see in the photos.  You could certainly add more, but I didn't want to cover up my scene.  To finish things off, I added a bow with lime green tulle, and a bow tied with Charcoal twine.

Halloween Treat Box

Here is a closeup of the inside of my treat tote:

Halloween Treat Box

Be sure to visit the Reverse Confetti blog for a list of other designers participating today!

Thanks so much for stopping by! :)


Lawn Fawn Inspiration Week - Merry Messages


Hello there!  Welcome back to day 4 of Lawn Fawn inspiration week!  Today, I  have a card featuring the new Merry Messages stamp set!

To create my card, I started off by watercoloring wide stripes on a piece of watercolor paper with a 1/2" flat brush and distress inks.  When it was dry, I diecut it with the largest die from the Large Dotted Rectangles Stackables.  I stamped a sentiment from Merry Messages on a diecut Dotted Square in black ink.  Then I created 3D light strings using the String of Lights die set.  I cut the bulbs from white cardstock and colored them with Copic markers to add a bit of extra dimension.  I popped them up overlapping the sentiment panel, and then added some stickles for extra sparkle.

Merry Messages

Be sure to visit the Lawn Fawn blog for lots more inspiration from the design team, and stop back by tomorrow for another project using the winter release! :)

Supplies:
All listed and linked above :)

Monday, October 17, 2016

Lawn Fawn Inspiration Week - Perfectly Plaid Winter

Hi there!  We are in the middle of Lawn Fawn Inspiration Week, and today, we are showcasing the beautiful Perfectly Plaid Winter paper collection!

For my card today, I started off by ink blending some Tumbled Glass, and Broken China distress ink on a piece of watercolor paper.  Then I splattered some Broken China ink over top, and bleached out some spots by adding clean, clear water, and soaking it up with a paper towel.  I diecut the panel with the largest die from the Small Dotted Rectangles die set, and added a strip of Perfectly Plaid Winter paper to the bottom.  I stamped, colored and fussy cut the ice patch from Critters in the Arctic, and glued it down with a glue pen.  Then, using the Narwhal and Friends die set, I created a little seal to sit on top of the ice.  His hat is cut from more Perfectly Plaid Winter paper. I popped him up with foam tape, and added a scattering of Mini Snowflakes and sequins behind him, then stamped a sentiment from the Snow Cool stamp set.

Perfectly Plaid Winter

Be sure to visit the Lawn Fawn blog to see lots more inspiration from the design team, and stop back by tomorrow  because I have another project to share with you!

Have a great Monday!!

Supplies:
All listed and link above :)

Sunday, October 16, 2016

Lawn Fawn Inspiration Week - New Scripty Words and Fa La La La Border

Hello there!  It's day 3 of Lawn Fawn inspiration week, and today I am sharing a card using the new Scripty Sweet and Scripty Wishes dies!

I started off by watercoloring a piece of watercolor paper with my $5 Artist Loft watercolors from Michaels.  When it was dry, I diecut it with the largest die from the Large Dotted Rectangles die set.  I added a strip of patterned paper from the Let's Polka in the Dark paper pad.  I stamped and diecut images from Baked with Love and Year Three, then adhered some pieces flat, and others popped up with foam tape.  I diecut Scripty Sweet and Scripty Wishes in bright pink cardstock and black cardstock and glued them together, with the bright pink piece peeking out a bit to look like a shadow.  I glued my piece to a black card base, and tied a bow with Black Tie Lawn Trimmings.

Scripty Sweet Wishes

Be sure to visit the Lawn Fawn blog for lots more inspiration from the design team, and stop back by tomorrow for another fun project!

Thanks so much for stopping by! :)

Supplies:

All listed and linked above

Saturday, October 15, 2016

Lawn Fawn Inspiration Week - Tiny Tags and Tiny Tags Sayings

Hello there and welcome to day 2 of Lawn Fawn Inspiration Week!  Today, we are showcasing Tiny Tags and Tiny Tags Sayings!

For my project, I created a tiny treat bag using the Goodie Bag die. cut from some Perfectly Plaid Christmas patterned paper.  I assembled the bag, and then diecut a snowy hill using the Simple Stitched Hillside Borders.  I stamped and colored the adorable penguins from Toboggan Together.  I adhered the stack of presents from the same set in the center of the hill, then popped the penguins up on either side.  I added some Mini Snowflakes to the sky, and then diecut the square Tiny Tag from white cardstock, stamped a sentiment from Tiny Tags Sayings, in black ink with a heart in Plastic Flamingo ink.  Finally, I tied it to the bag with some Peppermint Lawn Trimmings.

Tiny Tags

Be sure to visit the Lawn Fawn blog for lots more inspiration from the design team!

Stop back by tomorrow!!  I have another project to share with you! :)

Supplies:

Listed and linked above :)

Friday, October 14, 2016

Lawn Fawn Inspiration Week - Winter Unicorn


Yay! It's Lawn Fawn inspiration week!  I am so excited to share my creations with you this week!  Today, I am showcasing the adorable Winter Unicorn!  

For my card today, I started off by watercoloring a piece of watercolor paper with my Artist Loft Watercolor palette from Michaels.  When it was dry, I diecut it with the largest die from the Small Dotted Rectangles Stackables.  I stamped and colored the unicorn with Copic Markers, then diecut her with the coordinating Winter Unicorn die.  I used the Simple Puffy Clouds to diecut some clouds, and popped those up with foam tape.  Then I popped the unicorn up with foam tape too. I stamped a sentiment from Flirty Frames, then I added some accents with a white gel pen, and a scattering of sequins and iridescent star confetti to finish off my card.

I love that this set can be used for so much more than the holidays!


Winter Unicorn

Be sure to check out the Lawn Fawn blog to see lots more inspiration from the design team, and stop back by for another fun project!

Thanks so much for stopping by! :)

Supplies:
Stamps: Winter Unicorn, Flirty Frames
Dies: Winter Unicorn, Simple Puffy Clouds, Small Dotted Rectangles
Other: Copic Markers, white gel pen, foam tape, sequins, star confetti


Monday, October 10, 2016

Papertrey Ink Moments Inked - Planner Pages with Pizzaz!


Hi there!  I have a fun post for you today featuring the Papertrey Ink Moments Inked Planner!  

I really love pulling out my card making supplies to dress up the pages of my planner!  We use our planners, in our every day lives, and some weeks you just need a little extra happy to get through life!  I love opening the pages of my planner to find bright colors, and fun images.  It makes daily, sometimes boring tasks, a little more fun!  Dress up your pages for the upcoming holidays, or pull out your favorite stamp sets and dies, and use them to bring life to the pages of your planner!

PTI Moments Inked Planner

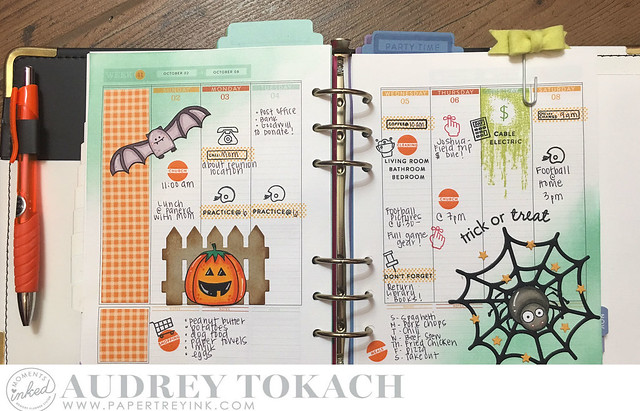
For this weekly spread, I wanted to decorate my pages for halloween using one of my favorite PTI stamp sets, Tremendous Treats Halloween, along with a few other favorites!  I wanted to keep the color scheme something that would coordinate with the October color scheme, and I am quite happy with how things turned out!  Here is the full weekly spread.  As you can see, I used a variety of products - stamps, dies, ink, copic markers, cardstock, patterned paper, felt...  I just pulled out my card making supplies and created on planner pages rather than a card base!  So fun!

PTI Moments Inked Planner

I added the biggest elements first, and let my weekly events be written in around them.  One of the biggest elements is the Picket Fence die, cut from kraft cardstock, inked with brown ink, and just in front of it sits the cute little jack-o-lantern from the Tremendous Treats Halloween stamp set, colored in copics, with white gel pen accents.  I glued everything down with a glue pen so that when my planner is closed, it stays flat and there is no bulk.  I used the Moments Inked: Everyday Symbols, Moments Inked: Active Symbols, Moments Inked: Divided, and the Moments Inked: Planner Banners stamp set to stamp other elements on this page, as well as the adjacent page.


PTI Moments Inked Planner

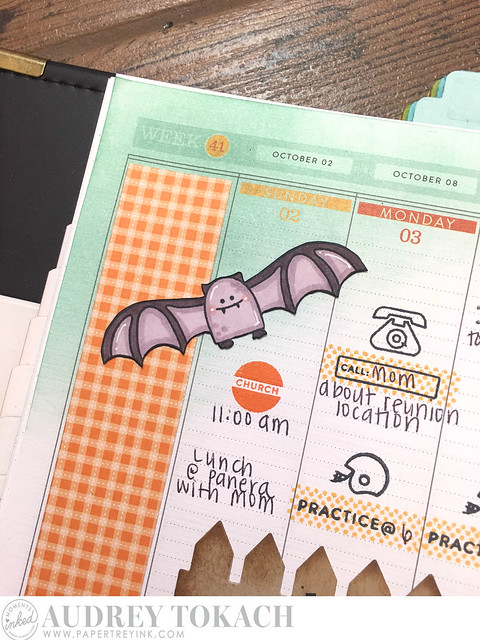
Here is the entire left hand side of the spread, up close.  I love the fun that patterned paper, cut using the Moments Inked: Boxed die, adds to the page.  I don't normally use that area in my planner but adding a pop of color and a cute pattern helps it from looking like something is missing from the page.


PTI Moments Inked Planner

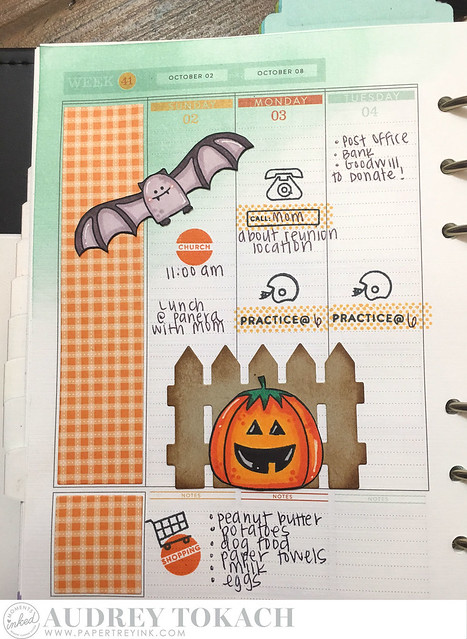
I used Aqua Mist ink and a sponge blending tool to incorporate another favorite card making technique into my planner pages.  This paper takes the ink beautifully and though it is hard to see in the photos, it really highlights the amazing linen texture in the paper.


PTI Moments Inked Planner

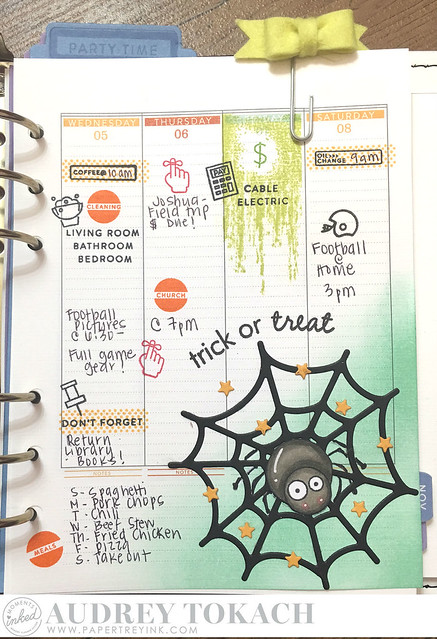
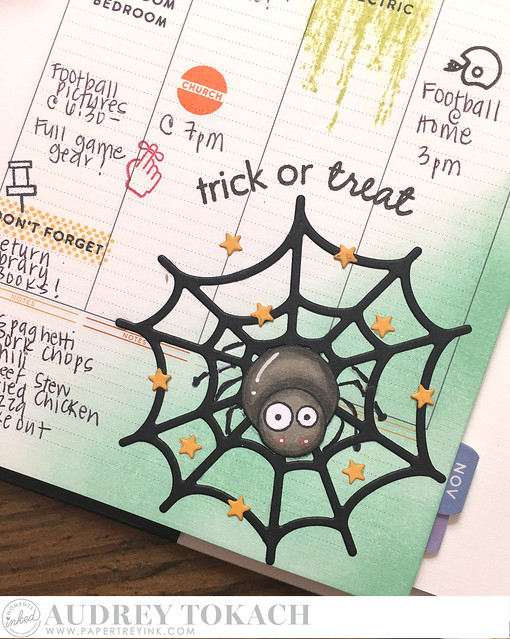
Here is the right side of the spread close up.  On these pages, I used the same stamp sets mentioned above, along with another favorite, Brushed Off.  I love how it looks like Limeade Ice colored slime on this halloween themed spread. 

I couldn't have a halloween themed project without pulling out my Spiderweb Trio dies!  I wait all year to use them!  And the spider from Tremendous Treats is perfect on the middle sized web.  How cute is he!?  I diecut tiny stars using the Star Gazer die collection and some Summer Sunrise cardstock.

PTI Moments Inked Planner

I hope you were inspired to go add some pizzaz to your planner pages!  Be sure to share your planners with us on Instagram using the hashtag #momentsinked .  We'd love to see how you are using your Moments Inked Planner! :)


That's all for me today!  Thanks so much for stopping by!! :)


BLOG TEMPLATE BY DESIGNER BLOGS