Saturday, March 26, 2016

Reverse Confetti March SFYTT


Hello there!  Today I have a card to share with you using the Reverse Confetti March SFYTT!  You can find all of the current challenge details here!

Here is our March sketch:


And here is my card!  I used a bunch of celebration themed patterned papers from my stash and paired them with the adorable monkey from the Monkey Business stamp set.  I stamped him and his balloons and party hat, colored them, and then diecut them with the coordinating Monkey Business Confetti Cuts.  I adhered my patterned papers to an aqua card base according to the sketch, and then used the  Pretty Panels Happy die to ground my little monkey.  I added a piece of red cardstock behind the HAPPY panel to make the diecut letters pop and then stamped the word "birthday" from the Whole Lotta Happy stamp set to complete the sentiment.  I popped the monkey up with foam tape and added a few red buttons to the bottom right side of the card to finish out the sketch.


Reverse Confetti March SFYTT

Be sure to click on the link above to add your creation to the inlinkz for your chance to win a $20 Reverse Confetti gift certificate!  I hope you will  join us!  Thanks for stopping by!!


Monday, March 21, 2016

Lawnscaping Challenge #126 - Sweets

Hello there!  It's time for another Lawnscaping Challenge, and this one is pretty SWEET!


We are sponsored by the super fabulous Lawn Fawn!


For my card, I pulled out one of my favorites Sweet Smiles.  I just love coloring that gumball machine!  My background was inspired by something I saw in a magazine... sort of a sponged ombre of sorts.  I am not sure how well it worked it, but I  think it's kind of cool.  I used Blueprint Sketch distress ink at the bottom, and then pounced the ink blending tool up to the top of the panel adding less ink and I went up.  I stamped, colored and diecut the gumball machine and a few gumballs with the coordinating Sweet Smiles dies, then stamped a sentiment from the same stamp set.  Finally I added some accents with a white gel pen, and tied a twine bow with Blue Jay Lawn Trimmings.


You're So Sweet

Be sure to visit the blog for all of the challenge details and lots more inspiration from the design team!

Thanks so much for stopping by!

Supplies:
Stamps: Sweet Smiles
Dies: Sweet Smiles, Small Stitched Rectangles Stackables
Ink: Memento Tuxedo Black, Blueprint Sketch Distress Ink
Other: Copic Markers, white gel pen, foam tape, Bluejay Lawn Trimmings

Friday, March 18, 2016

Reverse Confetti Spring Fling Blog Hop!


Hello there!  Today you are in for a treat!  The Reverse Confetti Crew is hosting a spring flip blog hop, and one lucky commenter will win a $15 Reverse Confetti gift certificate!  You can get all of the details on how you can win, plus start the hop from the beginning on the Reverse Confetti Blog.  You should have arrived here from Amy Tsuruta's blog!!

For my card today, I used the beautiful new Rose Garden Stamp set!  I started off by stamping and Copic coloring the large outline rose and leaves from the stamp set.  Then I diecut them with the coordinating Rose Garden Confetti Cuts.  I arranged the flowers how I wanted them, and before adhering them, I added some black watercolor splatters to one of the new So Very Spring Quick Card Panels.  I stamped a sentiment from the Whole Lotta Happy stamp set, and then popped my flowers up with foam tape.  I mounted that panel on a piece of black cardstock, and added some more splatters to a white card base, before popping the panel up with foam tape.  Finally, I added a scattering of sequins.

Happy Mothers Day

I really love how the black splatters add to the panel.  It adds an artsy feel to a pretty simple design.

Happy Mothers Day

Thank you so much for stopping by today!  Be sure to visit the Reverse Confetti Blog for more details on how you could win a Reverse Confetti gift certificate!

Next stop on the hop is Amy Sheffer!  In case you got lost or want to start at the beginning, here is the full hop order:

Audrey Tokach - **You are here**

Thursday, March 17, 2016

Have an Unbelievable Birthday! {Lawn Fawn}

Hello there!  Today I am sharing this unbelievable birthday card for you using the new Lovable Legends stamp set and coordinating dies on the Lawnscaping Blog!

I just LOVE this little Big Foot, and couldn't wait to ink him up!  I started off by diecutting a piece of white card stock using the largest die in the Small Stitched Rectangles Stackables die set.  Then I used Tumbled Glass and Vintage Photo distress inks to sponge a  background.  I also splattered some Vintage Photo along the bottom dirt line, and added some clean clear water droplets to give more dimension.  I stamped, colored and diecut the big foot, trees, party hat, and a few sets of foot prints from the Lovable Legends stamp set.  I added some white gel pen accents, and accents with copic markers to the solid stamped images.  Then I diecut some clouds using the Puffy Clouds border dies.  They are cut from white cardstock and again from vellum.  I stamped a sentiment from the stamp set on the white cloud, and popped that up on the panel with foam tape.  Then I adhered all of the other pieces to my scene with either foam tape or a glue pen.  The little big foot looked empty handed, so I stamped the balloon from the Year Four stamp set, and fussy cut it out to pop up.  Finally, I matted the panel on brown cardstock, and popped the matted panel up on a kraft card base using foam tape.

Have an unbelievable birthday

That's all for me today!  Thanks for stopping by! :)

Supplies:
Stamps: Lawn Fawn Loveable Legends, Year Four
Dies: Lawn Fawn Lovable Legends, Puffy Cloud Borders, Small Stitched Rectangles Stackables
Ink: Lawn Fawn Freshly  Cut Grass, Memento Tuxedo Black, Rich Cocoa, Distress ink in Tumbled Glass and Vintage Photo
Other: Foam Tape, Copic Markers, White Gel Pen

Wednesday, March 16, 2016

Creative Worship: Psalm 91:4 {Sweet n Sassy Stamps}

 Today I have a bible page to share with you using the Creative Worship: His Wings stamp set from Sweet n Sassy Stamps!  I chose to journal Psalm 91:4.  The His Wings stamp set has all of the words in that Psalm for you to include the entire verse on your page.  I started off my lining up my word stamps as I wanted them on my page, and then picked up each line, one by one on my acrylic block, and stamping the verse a line at a time.  I was sure to use waterproof ink because I planned to watercolor over top of them and I didn't want the ink to bleed.  If you don't have waterproof ink, you could always watercolor first, and then stamp after it's dried.  After I watercolored, I stamped the feather images included in the stamp set randomly around the page.  I use ink colors slightly darker than the watercolor beneath them.  Then, I stamped the more detailed outline feathers and the bird in flight in black ink.  Everything was looking a little flat for me, so I added some accents with a white gel pen.  I added polkadots to the feathers, and outlined the colored feathers and the bigger words in the verse in white gel pen.  Suddenly, everything started popping off of the page!  It's amazing how one little addition can change the look of the entire page!

Sweet n Sassy - Creative Worship

That's it for me today!  Thanks so  much for stopping by! :)

Supplies:
Stamps: Sweet n Sassy Creative Worship: His Wings
Ink: Versafine Onyx Black, Lawn Fawn Celery, Fresh Lavender, PTI Hawaiian Shores, Hibiscus Burst
Other: ZIG Clean Color Real Brush Markers, Artist Loft Watercolors, White gel pen, Heidi Swapp date stamp

Tuesday, March 15, 2016

Sparkle and Shine Challenge #26


Hello there!  It's time for another Sparkle and Shine Challenge!  This challenge is Easter themed!


We are sponsored this week by Right at Home Shop!


For my card, I used the super adorable Hippity Hoppity stamp set by Reverse Confetti!  I started off by watercolor a piece of watercolor paper with my Artist's Loft watercolors. Then I stamped and colored the little boy and girl bunnies from the Hippity Hoppity stamp set, and diecut them with the coordinating Hippity Hoppity Confetti Cuts.  I stamped a scattering of easter eggs, also included in the stamp set, masking off a few to stamp the eggs one behind the other.  I added a strip of patterned paper across the top of my watercolor panel, and then diecut the Double Heart Garland in but hot pink and white card stock to string across the patterned paper.  Then I stamped two sentiments from the stamp set on to a banner diecut from the Tag Me die set, and popped it up with foam tape just below the heart garland.


Happy Easter

It is it a bit hard to tell in the photo above, but I added some sparkle to the Easter eggs with a Sakura Stardust Pen.  It is so pretty in real life and adds such a fun touch!


Happy Easter

That's all for me for now, but be sure to check the Sparkle and Shine blog for lots more inspiration from the design team and to get all of the challenge details.  Hope you will play along with us!

Thanks so much for stopping by! :)


Saturday, March 12, 2016

You Are My Sunshine {Sunny Studio Stamps}


Hello there!   I am excited to be back for a guest posting for Sunny Studio Stamps using the Rain or Shine and Sunny Sentiments stamp sets!  I love that these stamp sets work so well on their own, but can also be used together for even more options!  Adorable images, great sentiments, and super cute fonts... doesn't get better than that! :)

For my card today, I started off my using Salty Ocean Distress Ink to ink blend a blue ombre background.  I concentrated the ink to be darker and the top and fade lighter towards the bottom of the panel.  I used a water bottle to spritz water on the panel and soaked it up after about 30 seconds. I just love the effect that it creates.  I added a stitched edge to the panel, and then stamped, colored and fussy cut the rainbow and clouds from the Rain or Shine stamp set, and the sun from the Sunny Sentiments stamp set.  I adhered the rainbow with a glue pen, and popped the sun and clouds up using foam tape.  I added some white gel pen accents to the sun, and some Diamond Stickles around the edge of each cloud for some added sparkle.  Then I stamped a sentiment from the Sunny Sentiments set under the rainbow, and popped the entire panel up on a white card base.


You are My Sunshine

I hope you like it!  That's all for me today!  Thanks for stopping by! :)

Supplies:
Stamps: Sunny Studio Stamps Rain or Shine and Sunny Sentiments
Dies: Avery Elle Wonky Stitches
Ink: Memento Tuxedo Black, Versafine Black Onyx, Salty Ocean Distress
Paper: PTI White
Other: Copic Markers, White Gel Pen, Diamond Stickles, Foam Tape

Tuesday, March 8, 2016

Reverse Confetti March Blog Hop!


Hey there!  It's blog hop day at Reverse Confetti!  That means that all of the awesome goodies we have been showcasing over the last few days are now available for purchase!  You can find them in the Reverse Confetti Store!


For my card today, I am showcasing the gorgeous new Rose Garden stamp set!  This set is full of rose images and leaves, some solid and some outline.  Since I love to color, I couldn't wait to play with the outline images especially.  I started of my stamping my center rose, then masked it off, and stamped the leaves.  While I had it masked, I stamped the other two roses, then masked those off and stamped their leaves.  I knew I wanted to use strips of the new So Very Spring Quick Card Panels on either side of my colored panel, so I made sure to color one of the roses yellow to coordinate.  To give some extra depth, I outlined the trio of roses with a few shades of aqua copics.   After everything was colored, I stamped a sentiment from the same stamp set.  I just love the font!

Rose Garden

Since it is impossible for me to make a flat card, I stamped another rose, colored it, fussy cut it out there are coordinating Rose Garden Confetti Cuts available), and popped it up with foam tape.  I felt much better about things after that. LOL!  Then adhered a few strips of patterned paper from one of the So Very Spring Quick Card Panels to a white card base, and popped the panel up with foam tape.

Rose Garden

Here you can see the gradient of color outlining the roses.  And of course, I had to add sequins, because everything is more fun with sequins!

Rose Garden

That's all for me today, but the whole Confetti Crew has a bunch of eye candy to share with you!  Be sure to hop along and check it all out!  Thanks for stopping by! :)


Fetti Friend--Nina-Marie Trapani 
Audrey Tokach - **you are here**


Monday, March 7, 2016

Lawnscaping Challenge #125 - Color Splash

Hello there!!  It's time for another Lawnscaping Challenge!  This challenge is a fun one!  Create a black and white project with just a splash of color!


This challenge is sponsored by Ellen Hutson!


I couldn't wait to ink up some of the goodies I got from the newest Lawn Fawn release!  Loads of Fun is my most favorite (though I will probably say that every time I ink up a new stamp set!).  I stamped and colored the washing machine, laundry basket, undies, and laundry soap, and then diecut them with the coordinating Loads of Fun dies.  I diecut a piece of black and white patterned paper from the Let's Polka in the Dark 6x6 paper pad using the largest die in the Small Stitched Rectangles Stackables die set, and cut it again from black cardstock to use as the floor in my little scene.  I adhered everything to the patterned paper, some pieces with glue pen, and others with foam tape.  Then I added a few accents with a white gel pen.  I stamped a sentiment from the same set using versamark ink and heat embossed it with white embossing powder.  Finally, I adhered the panel to a red card base and added a bow with some red and white Lawn Fawn Twine.

I'm Missing You

Be sure to visit the Lawnscaping Blog for lots more inspiration from the design team, and to get all of the challenge details.  I hope you will join us for a chance to win an awesome prize! :)

Thanks for stopping by!

Supplies:
Stamps: Lawn Fawn Loads of Fun
Dies: Lawn Fawn Loads of Fun, Small Stitched Rectangles Stackables, SSS Tiny Hearts
Paper: PTI White, Pure Poppy, True Black, Lawn Fawn Let's Polka in the Dark 6x6 paper pad
Other: Lawn Fawn Peppermint Lawn Trimmings, Copic Markers, White Gel Pen, Foam Tape

Sunday, March 6, 2016

Countdown to Confetti - Day 2

Hey there!  I'm back for day 2 of Countdown to Confetti!


The March release from Reverse Confetti will be available on March 8th!  You will find them in the store, HERE.

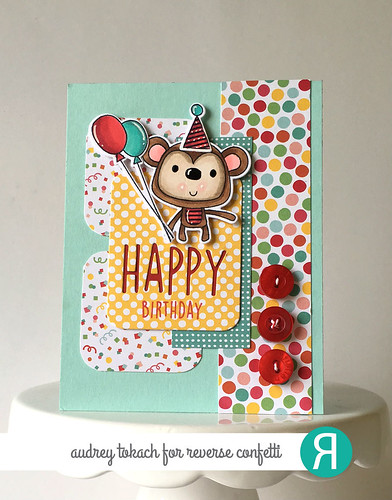
Today's introductions include Butterfly Dreams and the coordinating Butterfly Dreams Confetti Cuts!  This stamp set is unique in that in nearly every stamp, you get an image and sentiment all in one!

I started off my card by watercoloring a teal ombre pattern on a piece of watercolor paper.  When it was dry, I used a stencil and dark teal ink to add a tone on tone pattern over top of the watercolor.  I added some gold and white pearl watercolor spatter for even more dimension.


Let Your Dreams Take Flight

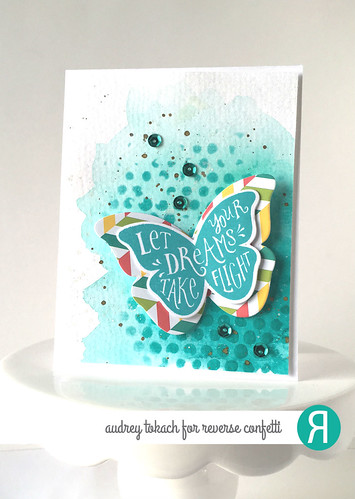
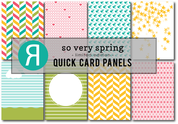
I used the largest butterfly in the Butterfly Dreams Confetti Cuts set to cut a butterfly from one of the new So Very Spring Quick Card Panels.  Then I stamped and diecut one of the sentiment butterflies to adhere on top of it.  I used foam tape to put one on top of the other, and gently folded the butterfly in the center to help it pop off of the panel a little bit more.

Let Your Dreams Take Flight

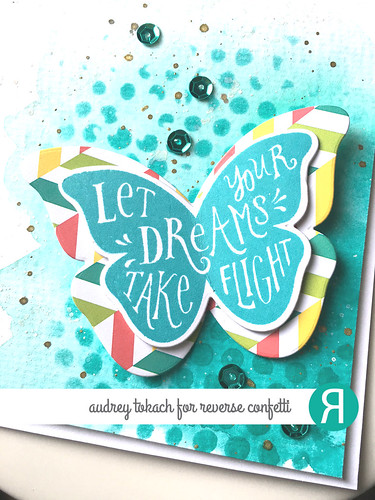
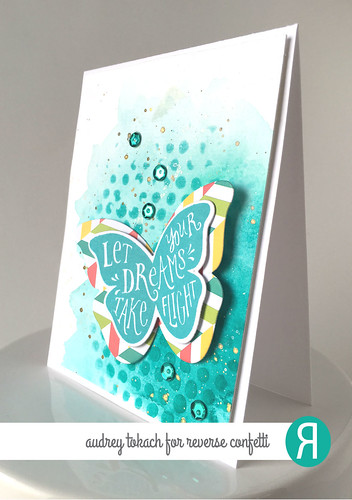
I added a scattering of teal metallic sequins to finish things off before popping the panel up on a white card base using foam tape.

Here you can see how much fun that gold metallic watercolor is!  I just can't get enough of it!  I want to paint everything with gold watercolor!! :)

Let Your Dreams Take Flight

I have a second card to share with you today using the new 
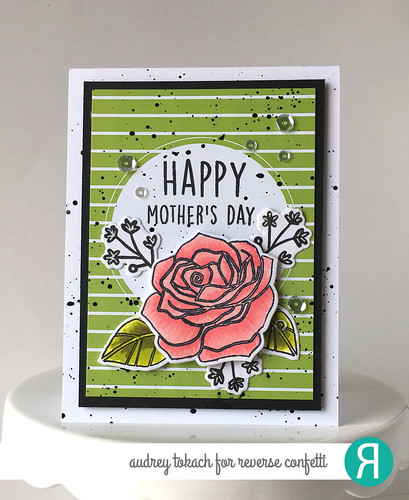
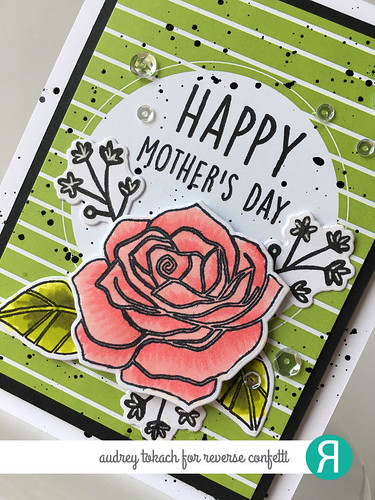
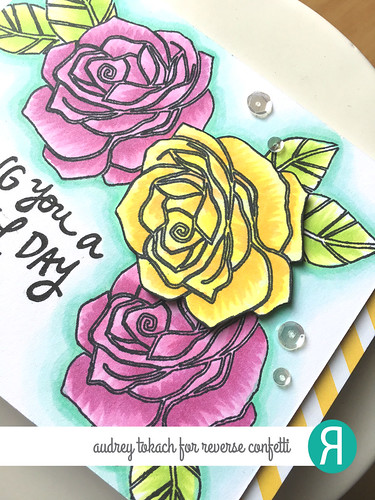
Flowers for Mom, the new Double Panel Hearts dies, and a super awesome new sentiment stamp set called Whole Lotta Happy!  The stamp set is done in an adorable whimsical font, and includes sentiments for a whole lotta holidays! *wink*

As soon as I saw the 
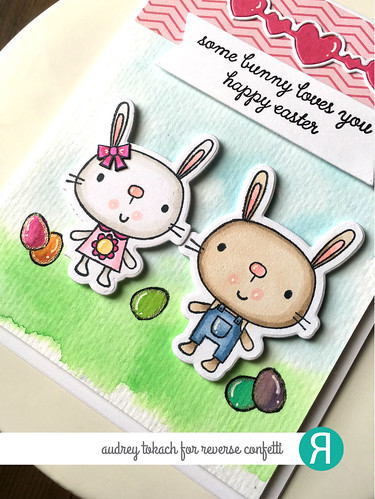
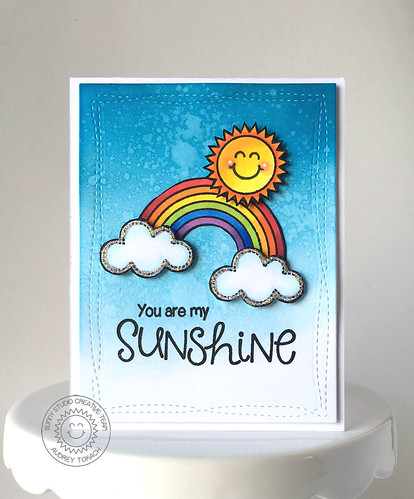
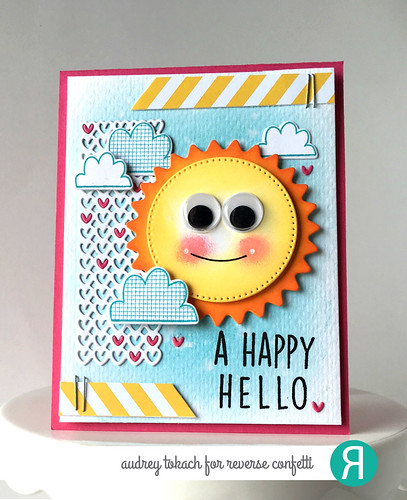
Flowers for Mom dies, I knew I wanted to create a sun with the pinked edge circle and pierced circle dies!  To start off my card, I used an ink blending tool and Tumbled Glass Distress ink to add a subtle blue color to most of a 4 x 5.25" panel of watercolor paper. I concentrated the color in the center and blended out to white around the edges.  I splattered some clean, clear water on it and blotted it up a few seconds later to add more texture to the panel.  Then I diecut the pinked edge circle and pierced circle from white cardstock and colored them with shades of yellow and orange distress inks.  I added some googly eyes and a blushing smile for some additional cuteness, and popped the yellow circle up on the orange rays with foam tape.  I also diecut the open heart die from the Double Panel Hearts dies out of white cardstock, and again from bright pink cardstock.  I then stamped and diecut the small and large clouds from the Weather it Together stamp set.  I arranged everything like I wanted it on my watercolor panel, and adhered some pieces flat with a glue pen, and others popped up with foam tape.  I collected some of the teeny hearts that are cut with the Double Panel Hearts die, and glued them into the white diecut, randomly with a glue pen.  I stamped the "A Happy Hello" sentiment from the Whole Lotta Happy stamp set in the bottom right corner.  I felt like it needed something else, so I cut some stripes of the yellow chevron pattern in the new So Very Spring Quick Card Panels, and stapled them to the top right and bottom left edges of the panel before popping the panel up on a bight pink card base using foam tape.

A Happy Hello

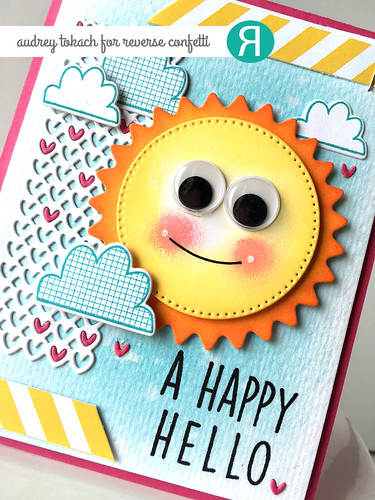
I just love how you can piece the tiny hearts into the bigger panel with the Double Panel Hearts dies!  It really gives endless possibilities!  Can you just picture rows of rainbow hearts?  A fun pattern?  A black panel with tiny red hearts?  See... endless possibilities!  And those tiny hearts make the most perfect bitty heart confetti!  LOVE!

A Happy Hello

That's all for me today!  Be sure to check out the Reverse Confetti blog to see lots more inspiration from the design team!  There are prizes to be won, too! Be sure to leave a comment here and the rest of the Design Team blogs for more chances to win!  Thanks for stopping by!


Let Your Dreams Take Flight:


A Happy Hello:


BLOG TEMPLATE BY DESIGNER BLOGS