Thursday, October 29, 2015

Wishing You a Happy Birthday! {Butterfly Reflections Ink}

Hey there!  I am on the Butterfly Reflections Ink blog today with a card using products from Wplus9, Avery Elle, Lawn Fawn and Tim Holtz!  Here's a little peek:


Click here to see the entire card! :)

Wednesday, October 28, 2015

Birthday Smiles {Sunny Studio Stamps}


Hello there!  Today I have  a bright and happy birthday card using the Birthday Smiles stamp set and the  Fishtail Banners dies by Sunny Studio Stamps!  I started off by diecutting a piece of white cardstock with the Fishtail banners dies, and I chose to use the little dotted edge die from the set.  Then, on that same panel, I stamped the open line balloon image, masked it off, and stamped again, repeating this process until I was happy with how my bunch looked.  I colored the balloons with my copic markers and used a white gel pen to add highlights to each balloon, and then I hand drew balloon strings with a black marker, but there is a string image in the stamp set if you prefer.  I stamped the sentiment near the bottom right of the banner.  I cut a white, landscape orientation card base and added some brightly colored patterned paper to coordinate with my balloons, and then popped the panel up on the card base.  I added some twine and tied a bow on the left side of the card base, and added a scattering of fun sequins to finish things off.


Sunny Studio Birthday Wishes

Thanks all for me today!  I hope you enjoyed my bright birthday card!  Thanks for stopping by! :)

Supplies:
Stamps: Sunny Studio Birthday Wishes
Dies: Sunny Studio Fishtail Banners
Paper: PTI white, Avery Elle Everyday collection 6x6
Other: Copic Markers, White Gel Pen, Foam Tape,  Lawn Fawn Black Tie Twine, iridescent sequins from Pretty Pink Posh

Sunday, October 25, 2015

Paper Smooches SPARKS - Our LAST Challenge!

Hello there! Today I am here with a card for the LAST Paper Smooches SPARKS Challenge.  This makes me so sad, but I know that when the  brand new challenge kicks off on November 1st, it's sure to be spectacular!  I am so thankful to have been given the opportunity to be part of the very first SPARKS team in 2011, and part of the final SPARKS team in 2015.  I  have loved every minute!

This week is Designer Drafts week and here is our sketch:


To start my card, I embossed tiny dots on a white card base with an embossing folder.  Then I diecut the largest tag from the Gift Tags dies four times out of white card stock.  I laid out my tags according to the sketch and stamped paint stripes from the Positive Strokes Two stamp set on each tag.  I used the Stitched Flourishes dies to add flight trails to a few tags, and then diecut white butterflies using the Butterfly Duet die set.  I inked the top of each butterfly to coordinate with the paint stripes and popped them up on each tag with foam tape.  I stamped a sentiment from Spreading Sunshine in the bottom left tag, and then popped all of the tags up on the card base with foam tape.  To finish things off, I added a scattering of sequins.


I'll Never Forget Your Kindness

Be sure to visit the SPARKS blog to see get all of the challenge details and see all of the inspiration from the design team.  Then visit the main Paper Smooches blog on November 1st and join in on the brand new challenge!

Thanks so much for stopping by!

Supplies:
Stamps: Paper Smooches Spreading Sunshine, Positive Strokes Two
Dies: Paper Smooches Tags 1, Flourishes, Butterfly Duet
Paper: PTI White
Ink: Memento Tuxedo Black, PTI Aqua Mist, Hawaiian Shores, Hibiscus Burst, Raspberry Fizz, Summer Sunrise, Orange Zest
Other: Sparkling Clear Sequins from Pretty Pink Posh, Foam Tape, embossing folder

Thursday, October 22, 2015

You Warm My Heart for Butterfly Reflections Ink!

Hey there!  Today I am sharing a Lawn Fawn card on the Butterfly Reflections Ink blog!  Here is a little peek:


Click here to see the entire card! :)

Thanks for stopping by!

Wednesday, October 21, 2015

Sending Warm Fizzies {Sunny Studio Stamps}


Hello there!  Today, I'm sending warm fuzzies with the new Furever Friends stamp set by Sunny Studio Stamps!  This set is full of adorable little kitties, and all different positions, and my favorite is the sleeping kitty.  I am a crazy cat lady, with four cats of my own, and 3 of the 4 love sleeping this way!  I started off by creating a striped backgound.  I began with a white panel, and then cut 1/2 inch strips of pink cardstock.  I used the lines on my grid mat to adhere them 1/2 inch apart to create this wide striped pattern.  Then I ran it through my die cut machine to add a stitched border and also really press down the adhesive and make sure the glued pieces stay put.  I colored my cat with copic markers, diecut him with the coordinating Furever Friends dies, and popped him up on a speech bubble "pillow".  His dreams are filled with love!  Then I added a sentiment from the same stamp set.  To finish things off,  I added some clear sequins and a few tiny hearts, and then poppped the panel up on a white card base with foam tape.


Furever Friends

Thanks all for me today!  Thanks for stopping by! :)

Supplies:
Stamps: Sunny Studio Stamps Furever Friends
Dies: Sunny Studio Stamps Furever Friends, Avery Elle Wonky Stitches, SSS Tiny Hearts, Pretty Pink Posh Stitched Speech Bubbles
Paper: PTI White, CSS I'm a Princess  Pink, PTI Berry Sorbet
Ink: Memento Tuxedo Black
Other: Copic Markers, Foam Tape, Pretty Pink Posh Sparking Clear Sequins

Tuesday, October 20, 2015

Let it snow on the Lawnscaping Challenges blog today!

Hi there!  Today I have this rustic winter card to share with you, which is also featured over on the Lawnscaping Challenges Blog!  I love kraft cardstock for winter cards because it really shows off the snow!   I started off using the Small Stitched Rectangles dies and cut the largest rectangle in the set from both kraft and white cardstock.  Then, I used the Snowy Backdrops die to add snow to the kraft rectangle diecut, and backed it with the white rectangle diecut.  The rectangles were a bit longer than I wanted, so I trimmed about an inch off of the bottom, and used the Stitched Hillside Borders die and Forest Border die to create a ground for my little snowman to stand on.  I stamped, colored and diecut the snowmen, their accessories, and the little birds from the Making Frosty Friends stamp set and then popped them up on the hills with some foam tape. I also adhered the panel up on a kraft card base with more foam tape. I stamped a sentiment from the Snowy Backdrops stamp set onto a strip of kraft cardstock using Versamark ink, and then heat embossed it with white embossing powder.  Then I hand cut flag ends on the banner, and popped it up with, you guessed it... foam tape.  I finished the card off with a bow using some jute twine.

Let it Snow

I hope you like it!  Thanks so much for stopping by! :)

Supplies:

All listed and linked above! :)

More Christmas Critters {Mint Owl Studio}

Hi there!  Today I have another card to share with  you using the new Christmas Critters stamp set from Mint Owl Studio!  This card features the cute little giraffe in the stamp set, which I colored with my copic markers.  I created the scene to look like he was towering over the tree in the stamp set, and you can't have a Christmas tree without a bunch of brightly colored presents underneath!  The sentiment is also from the Christmas Critters set!  This is one of three stamp sets currently offered by Mint Owl Studio, and you'll also find a selection of beautiful sequin mixes in the store too!  Check everything out here!

Mint Owl Studio Christmas Critters

Thanks so  much for stopping by! :)

Monday, October 19, 2015

Lawnscaping Challenge #116 - Too Cute To Spook!

**This is my second post today!  If you are looking for my Papertrey Ink Moments Ink Planner post, please scroll down**

It's time for another Lawnscaping Challenge!  This week, the challenge is to create a cute, non-spooky halloween project!


We are sponsored this week by the super fabulous gang at Lawn Fawn!


For my project, I created this halloween tag.  I started by cutting two tags out of white cardstock using the largest tag from the Stitched Circle Tags die set.  Then, I diecut one of those tags with the Snowy Backdrops die, and inked it with Chipped Sapphire distress ink.  I adhered it to the other tag diecut to let the white show through to create a starry sky.  I cut the same tag again out of dark blue card stock, and then used the Stitched Hillside borders to create a ground for my scene.  I stamped, colored and diecut the bunnies from the Snow Day stamp set, the pumpkin from the Happy Harvest stamp set, and the little witch hats from the Holiday Party Animal stamp set.  I popped them all up on the tag using foam tape, and then I stamped the "boo" speech bubble from the Booyah stamp set and fussy cut that out.  I adhered that with a glue pen, and stamped the tiny spider from the same stamp set.  To finish things off, I added some bright orange ribbon, and tied a bow with Blue Jay Lawn Trimmings.


Bunny Boo!

Be sure to check out the blog for all of the challenge details and lots more inspiration from the design team!

Thanks for stopping by! :)

Supplies:
Stamps: Lawn Fawn Snow Day, Happy Harvest, Holiday Party Animal, Booyah
Dies: Stitched Tags, Snowy Backdrops, Stitched Hillside, Snow Day, Happy Harvest
Paper: PTI White, Enchanted Evening
Ink: Memento Tuxedo Black, Ranger Chipped Sapphire Distress
Other: Copic Markers, White Gel Pen, Foam Tape, Lawn Fawn Blue Jay Lawn Trimmings, PTI Orange Zest satin ribbon

Moments Inked: Adding Watercolor to your Planner

Hello there!!  I am so excited about today's post!  Watercolor is a huge trend right now, and one that happens to be one of my favorites.  I was so curious to see how the beautiful linen pages of the PTI Moments Inked Memory Planner would hold up to watercoloring, and I am very pleased with the results!  Keep reading to see for yourself! :)


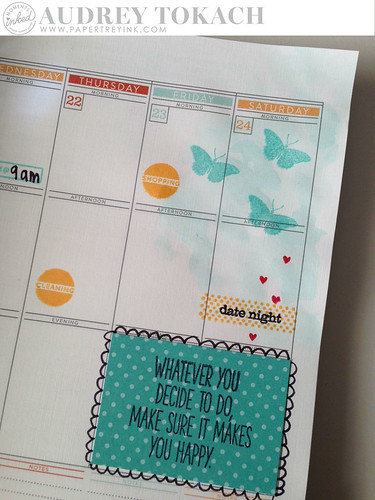
For this example, I tapped my Hawaiian Shores ink pad on an acrylic block, and used a damp paint brush (a lot of water is not necessary to move the color around) to pick up the ink and dab it on the corner of one of my planner pages.  I did not feel like the color was evident enough for me, so I let the first layer of ink dry, and then went in again using the same method to deepen up the color.  I have found that air drying is best when watercoloring on this linen paper.  As with any most papers, when you add water, you will get some warping to the paper,  but it is very minimal compared to others I have tried.  I found that the paper really warped though, when I used my heat tool to dry the watercolor.  To keep warping to a minimum, air dry. :)

After my watercolor was dry, I used the 
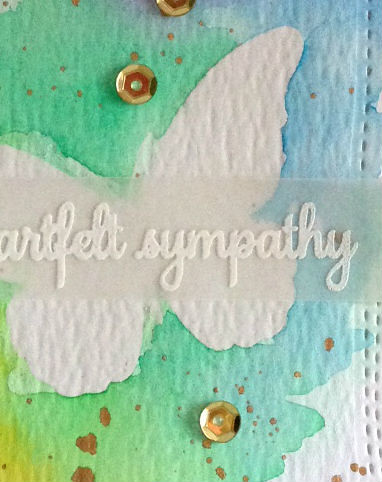
Beautiful Butterflies stamp set to add a trio of tiny butterflies to the page corner.  I used the Moments Inked: Divided to add some errands to my week.  I added a few additional details using the Moments Inked: Planner Banners stamp set.  I then cut a piece of Hawaiian Shores bitty dot paper to add some interest to a few of the planner blocks and stamped an inspirational sentiment from the A Little Inspiration stamp set.  I added a fun doodle frame too.


Moments Inked

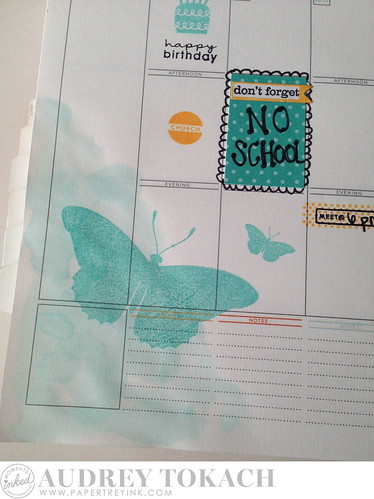
On the opposite page, I did the same technique  on the bottom corner.

Moments Inked

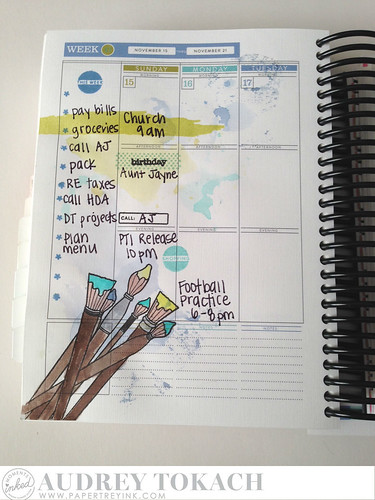
On another page in my planner, I went for a more artsy feel and did a little "ink smooshing" a la Betsy Veldman!  I added Blueberry Sky, Limeade Ice and Hawaiian Shores ink to a piece of acetate and added a very small amount of water.  I pressed the acetate onto the planner pages, smooshing and moving the  colors around until I was happy with how it looked, and then I left it to air dry.  In the bottom corner, I stamped the paint brushes from the Friendship Jar Fillers stamp set, and I watercolored those with Hawaiian Shores, Limeade Ice, Dark Chocolate inks.  I also used the Watercolor Wonder stamp set to add some watercolor-esque stripes in Limeade Ice ink.


Moments Inked


Here you can see the opposite page:

Moments Inked

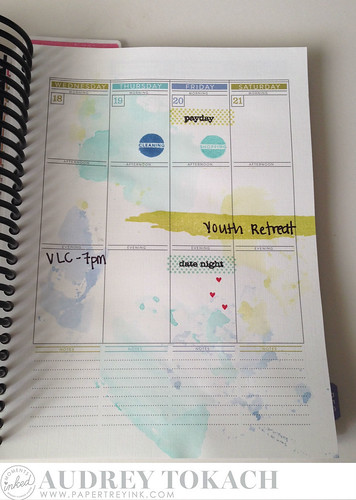
Since I was having so much fun, I moved onto a page in December, so that I could try other ink colors.  I think it's fun to have these pages ready and waiting so I can fill them in when I'm ready.  For this set of pages, I used Aqua Mist and Winter Wisteria ink (which looks a bit like spilled grape juice on the pages - LOL!), and added some snowflakes and the cute little guy from the Winter Penguin stamp set.

Moments Inked

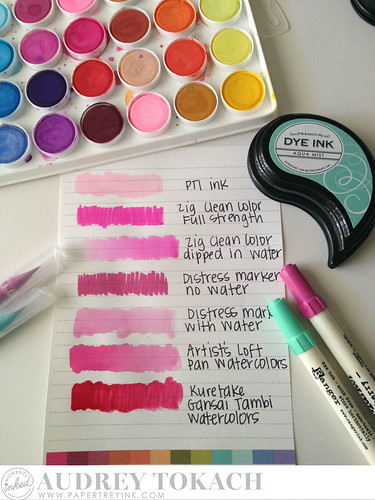
In all of the watercoloring I have done in my planner so far, I have used the Papertrey Ink dye inks, which give a beautiful subtle wash.  I prefer a pastel wash as to not interfere with my writing in my planner, so PTI inks are my preferred medium in my planner.  It adds a bit of fun without being too busy.  I thought it might be helpful to share a few other mediums with you so that you can also see how they look on the linen paper. 


Moments Inked

Here is the same page, from the back.  As you can see, there is no bleed through and very minimal wrinkling of the paper.  The pen I used to write is more obvious than the watercoloring.

Moments Inked

I hope this post inspired you to add some more color on the pages of your Moments Inked Memory Planner!  If you do, please share pcitures and tag them with #momentsinked so we can see what you've been up to!


Thanks so much for stopping by!! :)


All supplies have been listed and linked above!! :)


Thursday, October 15, 2015

Sparkle and Shine Challenge #16

**This is my second post today!  Please scroll down to see the sneak peek of a project that I am sharing on the Butterfly Reflections Ink blog today**

Hi there!  It's time for another Sparkle and Shine Challenge!  We have a super fun inspiration photo today!  I love the pink pumpkins, and the mix of glittery and matte finishes!  Can't wait to see how other people are inspired by it!


This challenge is sponsored by our friends at Winnie and Walter!


I am still working on my halloween tags for this year... I can't believe that halloween is only about two weeks away!  Where is time going!?  For my tag, I used a super cute set by Reverse Confetti called Too Cute to Spook!  I started off using the Tag Me die and cut it from some hot pink cardstock.  Then I stamped, colored and diecut my images.  I added some patterned paper to the bottom of the tag to give the cute little cat something to stand on.  Then I used the smallest web from the Papertrey Ink Spider Web trio die set to cut a place for the spider to sit.  I popped the images up with foam tape, added a scattering of Strawberry Burst and Sparkling Clear sequins by Pretty Pink Posh, and some Lawn Fawn Black Tie twine to finish things off.

Too Cute To Spook

That's it for me today!  Be sure to check out the blog for all of the challenge details and lots more inspiration from the design team.  Thanks for stopping by! :)

Supplies:
Stamps: Reverse Confetti Too Cute to Spook
Dies: Reverse Confetti Took Cute to Spook, Reverse Confetti Tag Me, PTI Spiderweb Trio
Paper: PTI White, Raspberry Fizz, Smokey Shadow Pattern Pack
Other: Pretty Pink Posh Strawberry Burst sequins, 4mm Sparkling Clear Sequins, copic markers, foam tape, Lawn Fawn Black Tie Lawn Trimmings

Heartfelt Sympathy {Butterfly Reflections Ink}

Hello there!  Today, I am on the Butterfly Reflections Ink blog sharing a watercolored sympathy card using products from Paper Smooches, Avery Elle and more.  Here is a little peek:

October 15_peek


Click here to see the entire card!  Thanks for stopping by! :)

Wednesday, October 14, 2015

Harvest Happiness {Sunny Studio Stamps}

**This is my second post today.  Scroll down to see my Lawn Fawn post**

Hi there!  Today I have a  Thanksgiving card to share using the new Harvest Happiness stamp set and coordinating dies from Sunny Studio Stamps!  I just love these adorable fall images!  This is is perfect for scene building too, which I one of my favorite things to do when making a card!  I used a mix of patterned papers as a backdrop for my images, which I colored with copic markers.  

Sunny Studio

By adding distress ink to the oval that grounds my focal point, it dulled down the bright white of the paper, and allowed my brightly colored images to really pop!  And while some of my images are adhered with a glue pen, others are popped up with foam tape adding lots of fun dimension.  Accents with a white gel pen help to make images have more life, too!

Sunny Studio

That's all for me today!  I hope you enjoyed my card!  Thanks for stopping by! :)  

Supplies:
Stamps: Sunny Studio Harvest Happiness
Dies: Sunny Studio Harvest Happiness, Lawn Fawn Stitched Rectangles, Simon Says Stamp Stitched Ovals
Paper: PTI White, Lawn Fawn Sweater Weather and Into the Woods 6x6 paper pads
Ink: Memento Tuxedo Black, Versafine Black Onyx, Tea Dye Distress Ink
Other: Copic Markers, White Gel Pen, Foam Tape, Lawn Fawn Hot Cocoa Lawn Trimmings

Monster Birthday Ensemble on the Lawn Fawn blog today!

Hello there!!  Today, I am so excited to be sharing another project on the Lawn Fawn blog!  I made this little birthday ensemble for my husband's birthday earlier this week.  I think the Monster Mash monsters are some of my most favorite Lawn Fawn images!  They are so fun to color, and just absolutely adorable!

 Monster Birthday Ensemble

To create my card, I started off by watercoloring a piece of Tim Holtz Distress watercolor paper with my Artist's Loft watercolor pans from Michaels.  When it was dry, I diecut the panel with the Small Stitched Rectangles Stackables dies.  I added a strip of Let's Polka in the Dark 6x6 patterned paper to the bottom to ground the monsters, then I stamped colored and diecut images from the Monster Mash and Party Animal stamp sets.  I curved a sentiment from Party Animal on my block and stamped it at the top of the panel, and then adhered my monsters and balloons with foam tape,  Everything else was adhered using a glue pen.  I stamped some birthday confetti from the Party Animal stamp set using Lobster and Fish Tank inks, and added a few iridescent sequins from Pretty Pink Posh, and then adhered the panel to a red card base.

Monster Birthday Card

For the matching tag, I used images from the same two stamp sets.  I diecut more of the paper that I watercolored using the Tag You're It die, after I stamped the coordinating frame from Winter Gifts.  I finished it off with some Peppermint Lawn Trimmings.

Monster Birthday Tag

I hope you like!  Thanks for stopping by! :)

Supplies:
Stamps: Lawn Fawn Monster Mash, Party Animal, Winter Gifts
Dies: Lawn Fawn Monster Mash, Party Animal, Tag You're It, Small Stitched Rectangles Stackables
Ink: Lawn Fawn Lobster, Fishtank, Memento Tuxedo Black
Paper: Lawn Fawn Let's Polka in the Dark 6x6 paper pad, Tim Holtz Distress Watercolor Paper, PTI White, Pure Poppy
Other: Lawn Fawn Peppermint Lawn Trimmings, Copic Markers, Foam Tape, White Gel Pen, Watercolors, Pretty Pink Posh sequins

Tuesday, October 13, 2015

Christmas Critters {Mint Owl Studio}

Hello there!  Today I have a project to share with you featuring a stamp set from a brand new company, Mint Owl Studio!  They just had a new release which included 2 stamp sets and a beautiful sequin mix.  I used the new Christmas Critters for my tag today!  This set is full of animals all decked out in holiday attire.  This little cow cracks me up.  The little presents and sentiment are also included in the stamp set.

Mint Owl Studio Christmas Critters

Be sure to check out the blog for lots more examples using the new stamp sets!!

That's all for me today!!  Thanks for stopping by!

Supplies:
Stamps: Mint Owl Studio Christmas Critters
Dies: SSS Stitched Ovals, Pretty Pink Posh Speech Bubbles, Lawn Fawn Mini Snowflakes, Stitched Hillside borders
Ink: Memento Tuxedo Black
Paper: PTI White, Pure Poppy
Other: Pretty Pink Sparkling Clear Sequins, Copic Markers, White gel pen, Lawn Fawn twine

Thursday, October 8, 2015

Sending Colorful Greetings with Butterfly Reflections Ink!


Hey there!  I am on the Butterfly Reflections Ink blog today with a card using some new goodies from My Favorite Things stamps!  Here is a little peek... click here to see the entire card! :)

Thanks for stopping by!!

Wednesday, October 7, 2015

Thank You Teacher {Sunny Studio Stamps}


Hi there!  Today I have a card to share using the new School Time stamp set from Sunny Studio Stamps!  I'm sure it comes as no surprise that I started off my card by creating a watercolor background using several colors of distress inks.  I wanted to create a backdrop for my focal point, and I kept the size of the notebook paper image in mind when painting, so that color was just peeking out from behind the image.  I stamped the notebook page, crayons, apple and ruler, all from the School Time stamp set, and colored them with copic markers.  To add some interest, I adhered the ruler at an angle near the bottom third of the card front, and added a strip of bright patterned paper below the ruler.  I popped the crayons and apple up on foam tape for some added dimension, and then popped the entire watercolored panel up on a white card base using foam tape.

School Time

That's all for me today!  Thanks so much for stopping by! :)

Supplies:
Stamps: Sunny Studio School Time
Dies: Lawn Fawn Small Stitched Rectangles
Paper: PTI White, Tim Holtz Distress Watercolor paper, Avery Elle Everyday Collection 6x6 pad
Ink: Memento Tuxedo Black, Versafine Onyx Black, Ranger Distress inks in Picked Raspberry, Spiced Marmalade, Squeezed Lemonade, Twisted Citron, Peacock Feathers, Wilted Violet
Other: Copic Markers, white gel pen, foam tape, Studio Calico wood stars

Monday, October 5, 2015

Lawnscaping Challenge #115 - Sentiments

Hi there!  It's time for another Lawnscaping Challenge!  This week, we are all about sentiments!  Make the sentiment the focal point on your card!


We are sponsored this week by Ellen Hutson!


For my card, I pulled out my Love You a Latte stamp set and coordinating dies!  I started off by watercoloring a piece of watercolor paper with distress inks.  When it was dry, I used a die from the Small Stitched Rectangles die set to add a stitched edge.  I stamped, colored and diecut the coffee mug, saucer and spoon from the Love You a Latte stamp set.  Before I adhered it with foam tape, I stamped the tiny coffee bean using first and second generation stamping with brown ink.  I stamped a sentiment from Latte Love in black ink above the coffee mug and added some tiny hearts from the set using Lobster ink.  I matted the panel on kraft card stock and then popped it up onto a Mermaid Notecard using foam tape.


Love You a Latte

That's all for now!  Be sure to stop by the blog to see lots more inspiration from the design team and get all of the challenge details.  I hope you'll join us! :)

Supplies:
Stamps: Lawn Fawn Latte Love
Dies: Lawn Fawn Love You a Latte, Small Stitched Rectangles
Paper: Lawn Fawn Mermaid Notecard, PTI Classic Kraft, Masters Touch Watercolor Paper (Hobby Lobby)
Ink: Memento Tuxedo Black, Memento Rich Cocoa, Lawn Fawn Lobster, Distress Inks ink Tumbled Glass and Shabby Shutters
Other: Copic Markers, Foam Tape

Sunday, October 4, 2015

Paper Smooches SPARKS Challenge - Anything Goes!


Hi there!  It's time for another Paper Smooches SPARKS Challenge! This week, anything goes!!  I started off my card by stamping the large "thanks" sentiment from Chit Chat near the bottom right of a white card panel.  Then, using the Calico stamp set, I stamped the flowers and leaves in several colors of ink until I got an arrangement that I was happy with.  I colored in the "thanks" with a black copic marker, and added a scattering of sequins before adhering the panel to a white card base using foam tape.


Thanks

Be sure to check out what the other design team members have to share with you today!

Audrey Tokach - you are here!

Stop by the blog to check out all of the challenge details.  I hope you'll join us for a chance to win some Paper Smooches stamps! :)

Thanks for stopping by!

Supplies:
Stamps: Paper Smooches Calico, Chit Chat
Paper: PTI White
Ink: Various from PTI, WPlus9 and Lawn Fawn
Other: 4mm, 6mm, and 8mm Sparkling Clear sequins by Pretty Pink Posh, Foam Tape, Copic Markers

Thursday, October 1, 2015

Sparkle and Shine Challenge #15

Hello there!  It's time for another Sparkle and Shine Challenge!  This inspiration for this challenge is a fun one that could take you in many directions... watercolor, rainbow, circles, etc!


We are sponsored this week by Pretty Pink Posh!


I am participating in the Online Card Classes Watercolor for Card Makers: Exploring Mediums class, and one of the lessons is on watercoloring shapes.  I got quite excited, because I knew this challenge was coming, so I kept that in mind when I did my class homework for the day.  I started off by stamping circles from the Papertrey Ink Polka Dot Basics stamp set in Fine Linen distress ink.  Then I used my Zig Clean Color Real Brush Markers to watercolor in the circles, careful to keep one side of the circle darker to make them look more rounded.  Then I stamped a sentiment from the Paper Smooches Spreading Sunshine stamp set in the bottom right corner.  I used the Easel die, also from Paper Smooches, to create a frame for my sentiment.  The paint brush is from the Paper Smooches I Heart Art stamp set, and though it's a bit hard to see in the photo, I added a stamped shadow under the easel with the Paper Smooches Shadows stamp set.  I mounted it on a black card base, and then added a scattering of Pretty Pink Posh iridescent sequins in several colors.


Paint it.

Be sure to stop by the blog to get all of the challenge details and see all of the inspiration from the design team!!  Thanks for stopping by! :)

Supplies:
Stamps: Paper Smooches Spreading Sunshine, I Heart Art, Shadows, PTI Polka Dot Basics
Dies: Paper Smooches Easel
Paper: Tim Holtz Distress Watercolor Paper, PTI True Black
Ink: Versafine Black Onyx, Memento Tuxedo Black, Ranger Antique Linen Distress
Other: Copic Markers, Zig Clean Color Real Brush Markers, Pretty Pink Posh sequins in Ballerina Pink, Strawberry Burst, Fairytale Fuchsia, Peacock Feathers, Ocean Spray, Lavender Moon, Sunshine Glow, Foam Tape
BLOG TEMPLATE BY DESIGNER BLOGS